1. General Workflow
MorphoBank provides a set of tools that can be employed in many combinations to solve a wide variety of research problems. With this flexibility comes complexity, which can make it daunting to get a project started and populated with data. This section outlines a typical workflow that has proven to be efficient and effective for most projects.
All project-specific tools are in the My Projects section.
1.1. Creating a New Project
All data in MorphoBank must belong to a project workspace, so the first step is always to create a new project.
Figure 1.1. Creating a new project
To create a new project workspace click on the "Create new project" button at the top of the "My Projects" page. This will display a new Project
Information form, which includes fields for project title, abstract, exemplar media, and citation information (fields for article and journal information.) You can also choose to allow reviewer login from this page, and set the reviewer login password (you can choose to do this at any time). The Project Administrator can edit the Project Information form at any time by clicking "Edit Project Info" from the left side of the Project Overview page. We encourage users to work within MorphoBank while they are doing their research, thus, a user may not have all this information at the time of project creation. It does not need to be added until the project is about to be released for publication on MorphoBank.
Figure 1.2. Portion of Project Information form
The creator of a project is by default its Project
Administrator (PA). The PA has a few abilities beyond that of other project members:
Only the PA can invite new members to join a project.
Only the PA can change project information such as title and citation information.
Only the PA can publish a project.
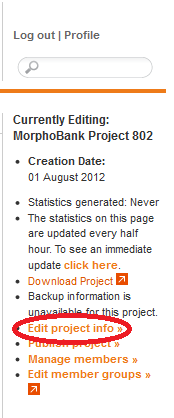
The Project Administrator can edit the Project Information form at any time by clicking "Edit Project Info" from the right side of the Project Overview page.
Figure 1.3. Right hand menu options for Project edits.
1.2. Setting Project Options
When you publish your project on MorphoBank, information from the Project Information form, including your abstract and citation information, will be used to describe it (see examples on the Browse Projects page). Prior to publication this information remains accessible only to you and your collaborators. Although you may begin your project with only a title, you must complete the other required fields before publishing it. Don't worry if you do not have all of the information at the start of your project; you may update it at any time prior to publication.
1.2.1. Naming your project
When starting your project, give it as descriptive a title as possible. Prior to publication you will need to revise your title to reflect the published title of your findings. If starting from a published paper, you may begin by entering the DOI into the DOI field on this page, and clicking <Retrieve>. Bibliographic information except for the abstract will be automatically pulled in.
1.2.2. The project accession code
Each project is issued a unique MorphoBank project ID. These IDs are always the letter P followed by a number (Project 4063 is represented ast P4063). The project ID for your project is displayed in many locations throughout the site. For example, it appears next to your project title in the list of your projects in the My Projects section of the site and in the title bar of your browser window when you are editing or viewing a project. The project ID should be included in any e-mails to MorphoBank technical support. It is also used to construct PermaLinks to your project once it is published. Learn more about PermaLinks.
1.2.3. Setting citation information
As your project proceeds toward publication you should fill in the other fields in the Project Information form. As mentioned, the project information form is available to the Project Administrator by following the "Edit Project Info" link on the right side of the Project Overview page. This information will be used to construct a citation and to present your project publicly on MorphoBank. Learn more about Project Information Fields.
1.3. Setting Up Context for Your Project
After creating your project and filling out the project title and abstract, the next step is to enter context. "Context" in MorphoBank takes the form of media views, taxonomy and specimen information, all of which provide a framework for your analysis. You can add additional taxa, specimens and views at any time.
Tip
1.3.1. Media views
"Views" describe the anatomical view displayed by images (and other media) in your project. Some example views are "wing, lateral," "leaf venation," or "antenna". A view is not the medium used to generate the image, a view is not "CT scan" or "light microscopy." Views are the means of telling someone looking at the image what they are looking at. Views provide a straightforward means to categorize project media (2D and 3D images) according to anatomical feature.
Tip
Views for Media link in the project sub-navigation on the left-hand side of your window. You should establish the list of views used in your project early on, and definitely prior to uploading media.Figure 1.4. Setting Up Media Views
1.3.2. Taxonomy
The next foundational step in setting up your project is assembling your taxonomy. In MorphoBank you can use taxa of any rank that suits your project (e.g., species, genera, families, or even rankless taxa). As you enter taxa in your project workspace using the Taxa link in the project menu, MorphoBank builds a central taxonomic directory exclusive to your project. You may enter taxa in several ways:
one at a time using the taxon editor form.
in bulk using the
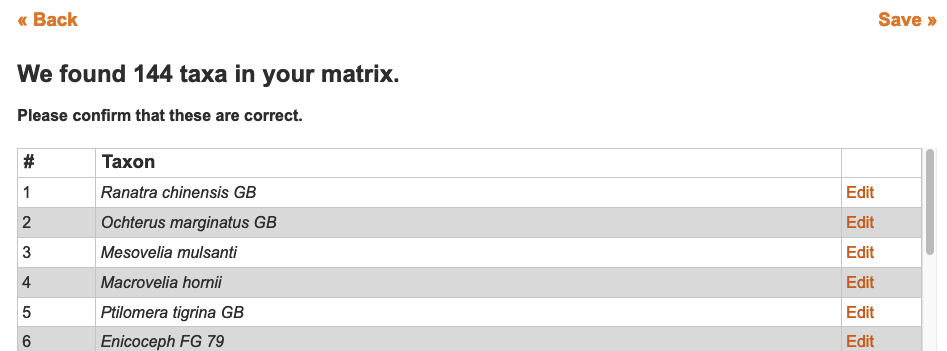
Upload Taxa Batchfeature.in bulk by uploading a NEXUS or TNT-format matrix. All taxa contained in such a file will be automatically loaded into your project if they do not exist already in your project. Note that NEXUS and TNT formats treat taxonomic identifiers as simple text. It is a best practice to spell out the taxonomic name fully so that it is clearly identifiable by future workers looking at your data, i.e., instead of 'human' or 'H. sapiens,' enter 'Homo sapiens' in the respective fields of the Taxon editor form.
Note
Because entry of specimen and matrix data rely upon taxonomy being established, it is generally best to establish taxonomy early on in the project. You will not be able to create matrices unless taxa are defined. Likewise, creating a specimen record requires that it be a specimen of some particular taxon.
All taxonomic editing features are located in My Projects >
Taxa. More details found below in the Managing Taxonomy section.
1.3.3. Specimens
As with taxonomy, MorphoBank provides a master directory of specimens used in your project. Because uploaded media need to be tagged with the specimen they depict, it is usually best to define specimens early on, but after taxonomy is established.
Note
All specimen editing features are located in the Specimens section when editing a project. More details found below in the Specimens section.
1.3.4. Bibliography
You can attach bibliographic citations to taxa, characters, media, specimens, matrices and scores in matrices. In order to create a citation in a matrix, your bibliographic references must already exist in the database, so it is generally best to enter these as early in your project as possible. Once established, any subsequent changes made to the reference are automatically propagated to all citations that use it.
All bibliographic editing features are located in the Bibliography section when editing a project. More details found below in the Project Bibliographies section.
1.4. Adding Data
Once project options and context are established, you can start adding 2D and 3D media, characters, and matrices to your project.
Learn more about Using Media.
Learn more about Managing Characters.
Learn More about Using Matrices.
1.5. Inviting Collaborators
The Project Administrator - the creator of the project - may invite anyone with a valid e-mail address and web access to join their project. If the invitee is already a registered member of MorphoBank they will receive an e-mail notification and the project will appear in their My
Projects list the next time they login. If the invitee is not a registered member of MorphoBank, they will receive an e-mail notification with login instructions and a pre-issued password.
In a typical workflow, the Project Administrator will create the project, setup the context and preload a basic set of data, and then invite collaborators to start editing the dataset.
When inviting collaborators, the Project Administrator can grant full membership, character annotator, bibliography maintainer or observer status. Full members may edit any item in the project, subject to item-level access restrictions. Observers may not modify anything in the project, no matter the access restrictions on items. Character annotators are prevented from editing characters and character states. Bibliography maintainers are limited to editing bibliographic data only.
The controls to invite collaborators are located in the Members form accessed by the Project Administrator from the link in the right bar of the Project Overview page.
Note that an additional type of access - anonymous and read-only - is possible using the reviewer login settings on the Project
Information form accessed by the Project Administrator from the link in the right bar of the Project Overview page. As the name suggests this type of access is designed to accommodate anonymous publication reviewers.
1.6. Editing Project Data
Once you've established your data set and granted project members access, collaborative editing can begin. All full-access members can add data (e.g., taxa, characters, matrices, media, etc.) to the project as needed. Access control for individual elements in MorphoBank is simple: the creator of a data element "owns" it and can either elect to allow anyone in the project to modify it, or reserve that right for themselves. This form of control is subject to a user's overall access level. An observer cannot edit elements, no matter the items's access setting, even if the observer had created the element at a time when they had full access.
All changes to data elements are logged by MorphoBank. A change history for any object can be viewed by selecting the Change
History tab or side bar element in the element editor. The change history log will include the date and time of each change, who made it, and the nature of the change - enough information to undo the change if necessary.
Every project includes a Project Overview page that summarizes the state of the project, the number of changes that have been made in the past day, weeks and month, and the relative contributions of each member of the project.
1.7. Publishing Your Data
Typically, MorphoBank is used to document research that supports a paper published in a peer-reviewed scientific journal. When the time comes to make your data public, the Project Administrator should complete the Project
Information form with final citation information (including an abstract, exemplar media, article information, and journal information). They can then use the Publish Project link (located on the right side of the Project Overview page) to publish their project.
Figure 1.5. Publish project link in right hand menu
Once the Publish Project form has been completed, the project will be publicly accessible on MorphoBank via the site search, the Browse Projects list and by "PermaLink." PermaLinks are stable web addresses (URLs) that can be used to cite MorphoBank-hosted data in papers and in online postings. Learn more about Citing Your MorphoBank-Hosted Data.
Warning
Once you change the project status to "published" you cannot change it back, nor will you be able to further edit your data. Be sure your project is complete before publishing it! If you accidentally publish your project and need it unpublished, contact technical support via the online form available from the Ask Us link in the main navigation.
2. Establishing Context for your Project
"Context" in MorphoBank refers to the views, taxonomy and specimen data that provide a framework for your analysis. The MorphoBank tools for managing the data are explained in the following sections.
2.1. Media Views
Views are simple descriptors used to indicate the anatomical view displayed by images (and other media) in your project. A View should indicate both the orientation and element in your 2D or 3D image, for example, 'dorsal skull' or 'cross-section of leaf' or 'CT scan of insect body'. A View should never be simply a description of the tool used, i.e., 'light microscopy" - it should always tell the reader what this is a picture of. MorphoBank anticipates that you will use the same Views over and over and, to save you time, creates a drop-down list of views specific to your project in the Views for Media section.
To see a list of existing media views, add a new view or edit or remove an existing one, click on the Views for Media link in the sub-navigation on the left side of your window when editing a project. "Edit" and "delete" buttons next to each view allow you to manage existing views. To create a new view click on the "Add new media view" link on the top of the page.
2.2. Character and Taxon Partitions
Partitions are one of the most useful tools for matrix data exploration. If your project consists of a single large matrix or supermatrix, you can then create any number of Partitions, which are your chosen subsets of characters and taxa from that matrix. You can download partitions and use them for analyses. Using partitions is a much less error-prone work flow than having many separate, free-standing matrices. Partitions simply grab, in real time, from your single, overarching supermatrix, taxon and character subsets as separate, smaller matrices. You can create as many partitions as needed, and a taxon or character may belong to as many partitions as exist.
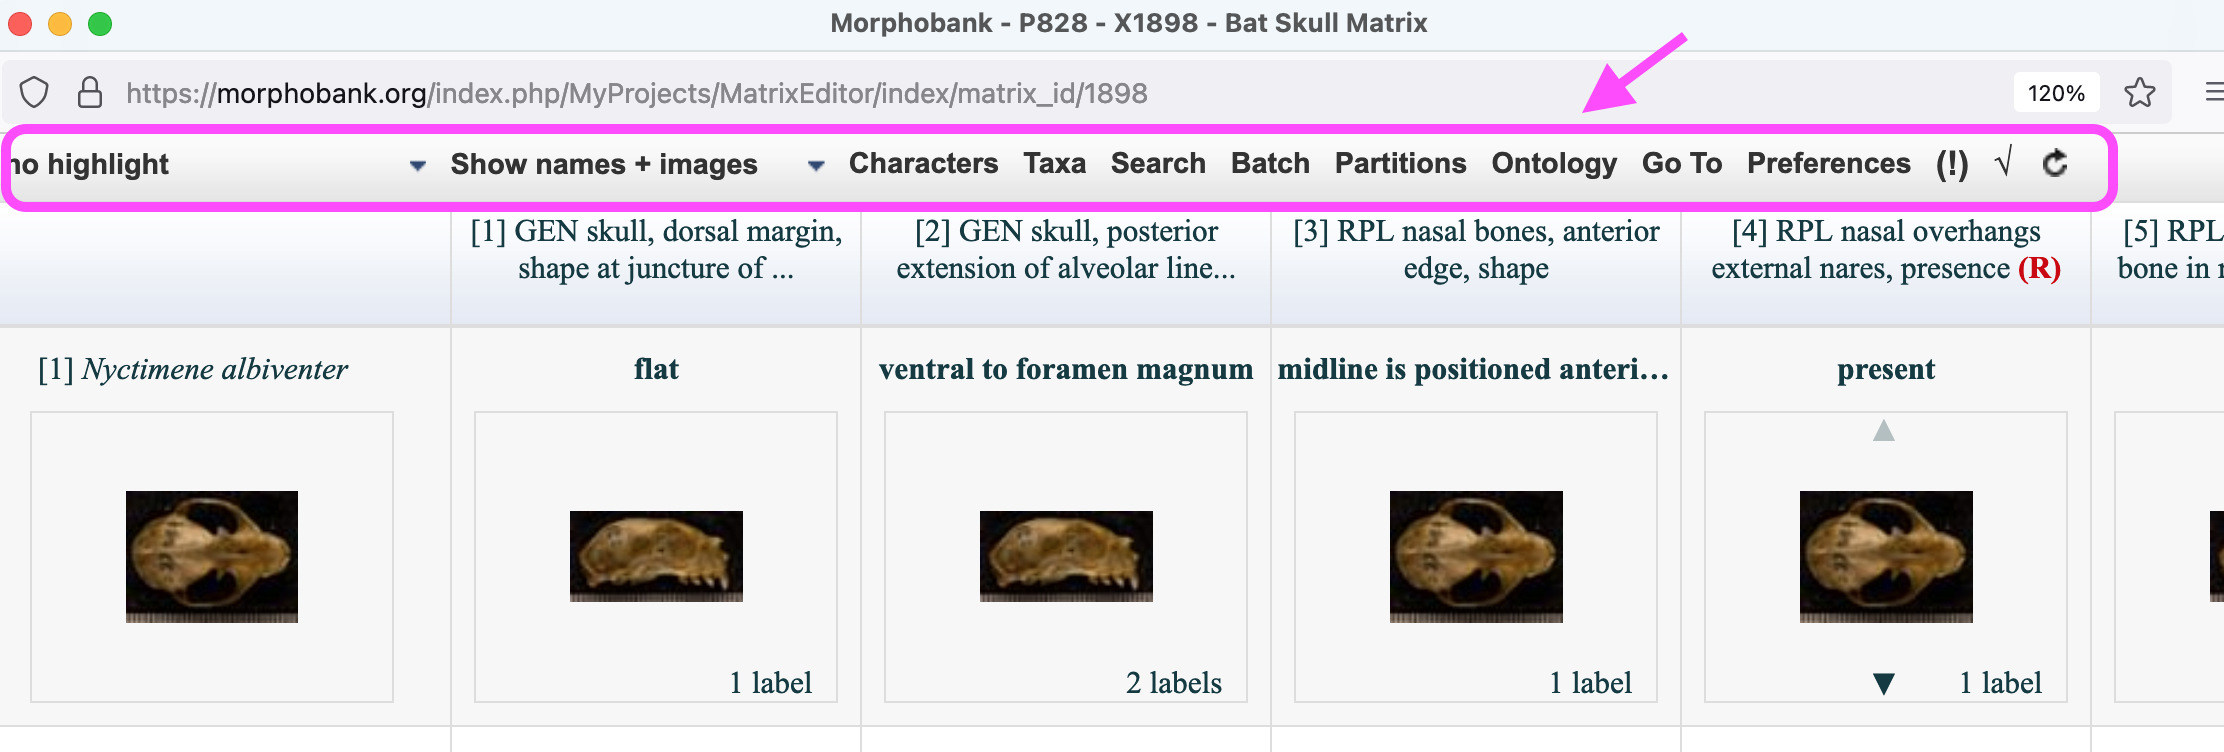
Character and taxon partitions are managed through the MorphoBank matrix editor. To create new partitions open a matrix in the matrix editor and click on the Partitions button on the button bar at the top of the editor.
Figure 2.1. The partitions option in the matrix editor button bar
Figure 2.2. The partition editor
To create a new partition click on the "Add new" button.
To remove an existing partition hover over the name, then click on the "x" button. Note that deleting a partition is permanent and cannot be undone. However, only the partition itself is deleted. The characters or taxa that were part of the partition are not removed from the database.
To rename an existing partition double-click on it. An editing window, in which you can alter the partition name and/or description, will appear.
To add characters or taxa to a partition click on the partition once to highlight it, then drag characters or taxa from the "not in partition" list to the "in partition" list. To remove characters (or taxa) reverse this operation by dragging from the "in partition" list to the "not in partition" list.
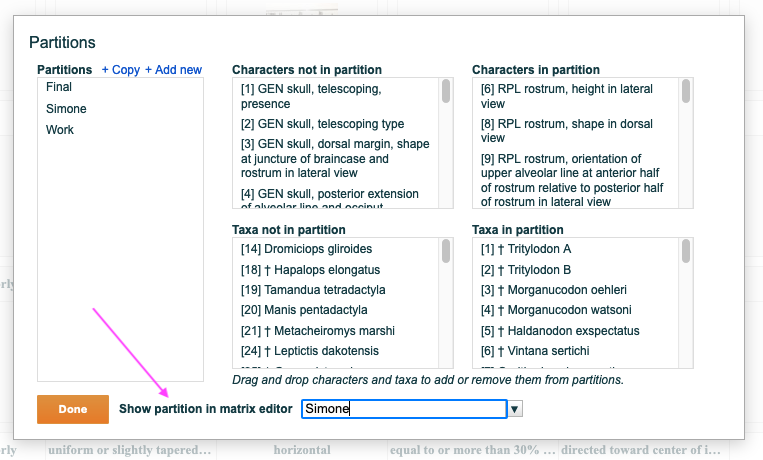
The "Show partition in matrix editor" drop-down lets you refine the matrix editor so that it displays only one partition at a time. When selected only the characters or taxa in the partition are visible and editable, thus enabling a more streamlined editing experience. All changes to the matrix editor display are applied when the "done" button is clicked.
Figure 2.3. The partition editor showing the tool to select and display a partition
2.2.1. Publishing Partitions
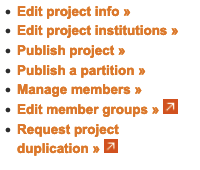
Because a partition represents a discrete portion of your project, you may choose to copy (or "publish") a partition while keeping the rest of your project private. To do this, select the Publish a Partition link from the right-hand side of the Project Overview page (you must be Project Administrator to do this). This link will take you to a screen entitled "Partition Publishing" with a drop-down list that displays all of the partitions in your project. Select the partition you wish you isolate, and all of the taxa and characters in your partition along with any associated matrix data, media, specimens, views, labels, character notes and cell notes will be copied. All bibliographic references and documents from the project, regardless of partition, will be copied as well, as will any media related to project bibliographic references. The result will be a new project separate and independent from the initial project containing only the partition-defined subset. Subsequent changes made in either this project or the published partition will not be reflected in the other. This tool is useful if you wish to focus on refining a specific portion of your data, or if you wish to make one portion of a large project publish while keeping the rest private. Note that when you use this tool – the daughter partition does not go live immediately. It is entered into your queue of unpublished projects. This way you can set the partition to be anonymously reviewed if you wish, and can enter the new project number into your publications.
Figure 2.4. Publishing a partition can be achieved by selecting the fourth choice shown above
2.3. Managing Taxonomy
Taxonomy is a critical part of any MorphoBank project - it is the basis for your context and analysis. You cannot create specimen records or matrices from scratch without loading taxonomic names. The sections below describe MorphoBank's tools for taxon loading and management.
MorphoBank maintains a central directory of the taxonomic names you enter for each unpublished project. This directory is specific to your project and not shared across the project workspaces of other scientists. The directory lists each taxon once - no duplicates are allowed. Matrices and specimens using the same taxon are actually referring to a single entry in the taxonomic directory. This means that if you modify a taxon, the change will be reflected everywhere it is used in your project.
2.3.1. Finding taxa
To view the taxonomic directory click on the Taxa link in the project sub-navigation bar.
Figure 2.5. A portion of the taxonomic directory showing unranked taxa, which are listed first.
Taxa are browsable in a variety of ways. You can use the search function to find a specific taxon, you can browse alphabetically, and you can limit the displayed taxa to a specific partition or matrix. Taxa may also be edited or deleted using the respective buttons. When you click "edit" you will see the same form you would use to enter a taxon in the first place, which will be described in further detail in section 9.3.2 Note that if you delete a taxon, it will be removed from all matrices and specimen records that refer to it.
Warning
You can search taxa by entering any part of the taxon name into the search box and clicking on the "search" button. Partial matches can be made by using the asterisk ("*") wildcard character. For example, to find all taxa starting with the letters 'aeto' search on 'aeto*'
2.3.2. Adding new taxa
In this section, we will discuss the steps you must take to add a new taxon or taxa to your project as you build your taxonomic directory.
2.3.2.1. Minimum data requirements
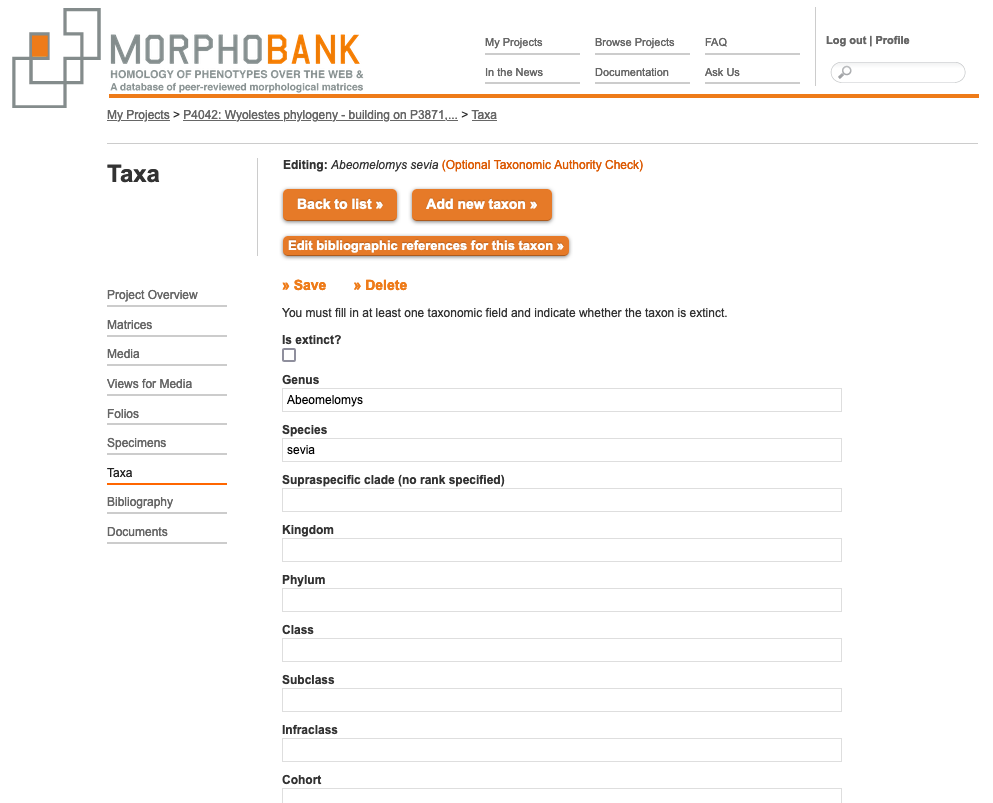
At least one element of the taxonomic name must be specified. While some users may prefer to express complete names, from kingdom to subspecies, this is not required. All fields are optional.
2.3.2.2. Adding a single taxon
To add taxa one at a time, click on the "Add new taxon" button on the top-left of the Taxa page, then fill in all applicable fields in the new taxon form and click on the "save" button. In addition to defining the fields in this taxon, you can also use this page to define who can edit the taxon, and how the taxon author's name should appear in citations. In addition, if the taxon is extinct check the "is extinct" checkbox.
2.3.2.3. The Taxonomic Authority Checkers
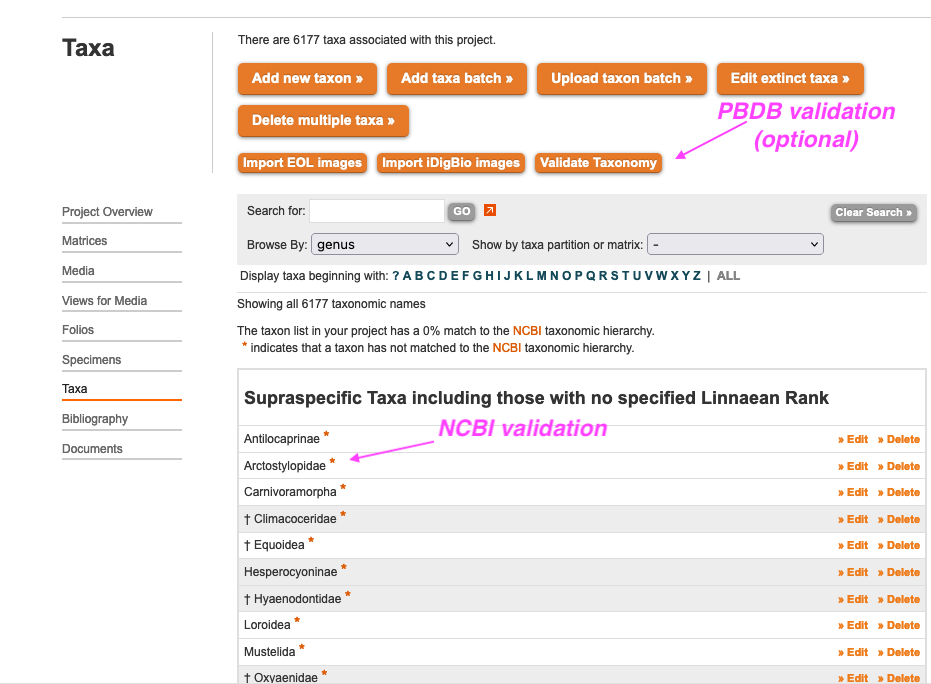
MorphoBank links to two online taxonomic authorities: NCBI Taxonomy and the Paleobiology Database. Validation of your taxa against NCBI Taxonomy occurs automatically in the background and does not change your data in any way. If the taxon you entered has no match to the NCBI Taxonomy hierarchy, an orange asterisk will appear next to it. The purpose of this validation is to improve navigation of MorphoBank's publish projects. Additionally, when adding taxa by hand (or reviewing taxa after a batch import) you can employ the "Validate Taxonomy" tool to look for additional higher taxonomy matches for a given taxon at the Paleobiology Database. This tool will introduce new higher taxonomy terms into your project if you choose to use it. The Validate Taxonomy tool searches the Paleobiology Database and allows you to pick and choose among the hits to affiliate your taxa with higher taxonomy.
Figure 2.6. The taxonomic directory showing the Validate Taxonomy tool and the orange asterisk indicating that a taxon is not listed in NCBI Taxonomy
2.3.2.4. Batch adding taxa using a tab-delimited file
You can add a set of taxonomic names to your project in one go by clicking on the "Upload taxon batch" link and using the displayed form to upload a properly formatted taxon file.
Figure 2.7. The Taxa tab showing all ways to edit taxa.
A taxon file is simply a specially formatted tab-delimited text file. Each line of a taxon file represents a single taxon and is split into several columns, one for each component of the taxon, separated by TAB characters. The first line of the file is reserved for column labels. You must label your columns using the following labels: Kingdom, Phylum Class, Subclass, Order, Suborder, Superfamily, Family, Subfamily, Genus, Species, Subspecies, Author, Year and Notes.
The labels must be entered exactly as displayed above or your file will be rejected. You may omit any column not used by your data - all columns are optional. However, at least one of the name columns must be defined. The "notes" column is intended for taxon-specific notes you wish to associate with the new taxon. You may enter the author with year separated by comma (e.g., "Schwartz, 1879"), or you may place the year in the separate "year" column. Surround the author's name with parentheses if you wish it to display that way.
Although any text editor may be used to create taxon files, it is usually more convenient to employ spreadsheet software such as Google Sheets or Microsoft Excel and a sample file to get you started.
Note
2.3.2.5. Batch adding taxa using a TNT or NEXUS file
When uploading a TNT or NEXUS matrix file to create a matrix, all taxa present in the file are automatically added to the taxonomic directory. This is a collateral effect of importing a matrix but can be used to batch add taxonomy and is especially convenient if your data is already in NEXUS format.
The NEXUS and TNT formats treat taxonomic names as simple strings of text. There is no formal delineation of the hierarchical elements present in a taxon. Because hierarchy information is not present in such files MorphoBank assumes that the first word in each taxa is the operational taxonomic unit, and that each subsequent word is one level below in the hierarchy. For example, if the OTU is set to genus, then all names will be interpreted as genus/species/subspecies. Although this is an admittedly imperfect system, it performs acceptably for many data sets. Unless your taxonomy is uniform you may need to do some clean up after importing a NEXUS file into MorphoBank.
You should always spot check your taxa after upload but clicking on some of them to see that the taxonomy has been appropriately assigned to rank.
2.3.3. Editing taxa
To edit a taxon, find it using any of the provided tools - search, browse by first letter of name or list by matrix or partition - and click on the taxon's "edit" button. You can then change any of the values of the taxon using the provided form. Note that changes made to a taxon will affect all matrices and specimens that refer to it. If your taxon is extinct it is important to indicate that.
2.3.4. Editing extinct status of taxa
To batch update the extinct status of taxa in your project, click on the Taxa tab and then on the "Edit extinct taxa" button (Fig. 2.5). You can drag and drop taxa from one list to the other and move taxa in batches from one side to the other.
Figure 2.8. Editing taxon extinct status in batch
2.3.5. The Operational Taxonomic Unit (OTU)
In MorphoBank, the OTU function allows you to set a rank for the taxa in your matrix. Each matrix in your project has a default OTU that applies to all taxa without an otherwise specified OTU. If you want to ensure that a taxon always has a specific OTU you must set it in the taxon form when adding or editing. If you have OTUs of different ranks and are starting a project by uploading a matrix, select the rank most commonly found and then make adjustments by hand for taxa that do not fit that rank.
Figure 2.9. The taxon editing page showing the form fields for ranks. Here only the genus and species are completed.
2.4. Specimens
As with taxonomy, MorphoBank provides a central directory for specimens used in your project. Each specimen record contains catalogue information, a reference to a taxon in the project taxonomy directory and, optionally, notes.
2.4.1. Finding specimens
To view the specimen directory click on the Specimens tab in the project tool tab bar.
Figure 2.10. Portion of the specimen directory. Note examples of unvouchered (top arrow) and vouchered (bottom arrow) specimens, the latter have a collection and catalog number.
You can view lists of all the specimens for a given taxon by first letter of their taxonomic name using the "Show specimens whose [x] begins with..." bar as shown in the above figure. Specimens may be edited or deleted using the respective buttons. Note that if you delete a specimen, it will be removed from all media records that refer to it.
You can search project specimens by entering any part of the taxon name, catalogue number or notes into the search box and clicking on the "search" button. Partial matches can be made by using the asterisk ("*") wildcard character.
The "show unidentified specimens" button in the upper-right hand corner of the specimen list will restrict the list to show only those specimens without an associated taxon.
2.4.2. Adding and editing specimens one at a time
To add a specimen, click on the "Add new specimen" link in the upper-right hand corner of the tab, then fill in all applicable fields in the new specimen form and click on the "save" button.
To edit a specimen, find it using any of the provided tools - search or browse by first letter of name - and click on the specimen's "edit" button. You can then change any of the values of the specimen using the provided form. Note that changes made to a specimen will affect all media that refer to it.
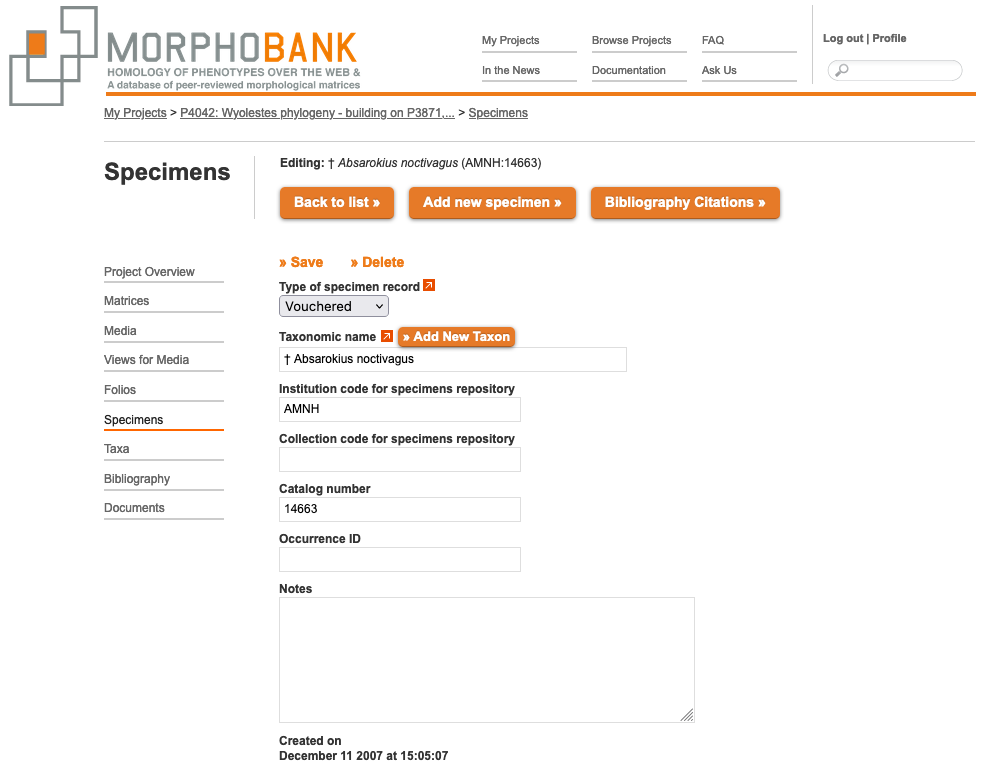
Figure 2.11. Specimen entry form for vouchered specimens
2.4.3. Vouchered vs. Unvouchered specimens
In the above figure the button "Type of Specimen Record" lets you distinguish to the database whether you are entering data from a vouchered and unvouchered specimen record.
Vouchered specimens - are specimens in collections with formal numbering and (ideally) accessioning system.
Unvouchered specimens - specimens for which there is no actual vouchered specimen in a collection, examples include: images in the literature such as in anatomical atlases, images captured in the wild, or specimens documented on the Internet at a specific URL for which no specimen was accessioned, among others.
The form shown above is for vouchered specimens.
For vouchered specimens, at an absolute minimum you must provide the institution code and catalog number for the specimen. Both of these values should conform to the standards of the institution from which the specimen originates. If you are not sure of the formats for these values, contact the institution's collections manager. Typically, the institution code will be a 2-4 letter abbreviation of the institutional name (e.g., AMNH = American Museum of Natural History, YPM = Yale Peabody Museum). Whenever possible a collection code should be provided (note, this is important because many institutions may use a specimen more than once for specimens in different collections). As with the institutional code and catalog number, collection code should conform to institutional standards. Many, but not all, institutions use collection codes. As you type codes into the institution and organization fields, MorphoBank will suggest possible values based upon previous user input. If possible you should use a suggested value.
For specimens cited from a manuscript, either provide as much of the citation information as possible or link to a reference in your project bibliography.
For internet references, at an absolute minimum provide the URL (ideally a persistent URL).
A taxonomic identification of the specimen should be provided for all specimens and is used by the matrix editor to retrieve relevant media, and by the media search/filtering system.
2.4.4. Adding a batch of specimens
Click on the 'Add specimen batch' button in Fig. 2.10. You will be taken to a page where you can upload a tab- or comma-separated file with your specimen information from your computer. Instructions on the fields and their contents are on this page as well.
Figure 2.12. Batch upload page for specimens
2.5. Project Bibliographies
MorphoBank provides a facility for managing bibliographic references for your project, including, most importantly, the paper to which your project primarily refers. You can import a bibliography from the popular EndNote citation management software or any other software that can export in EndNote XML format. Once references are in your bibliography may be attached (with specific page numbers and comments) to taxa, characters, specimens, media, matrices and matrix cells in your project.
Unlike most other MorphoBank data, project bibliographies can be shared across multiple projects. Thus you can establish a single bibliography and cite it across all of your MorphoBank-hosted workspaces. The process of linking projects together so they can share a bibliography is described below.
Figure 2.13. Project bibliography list
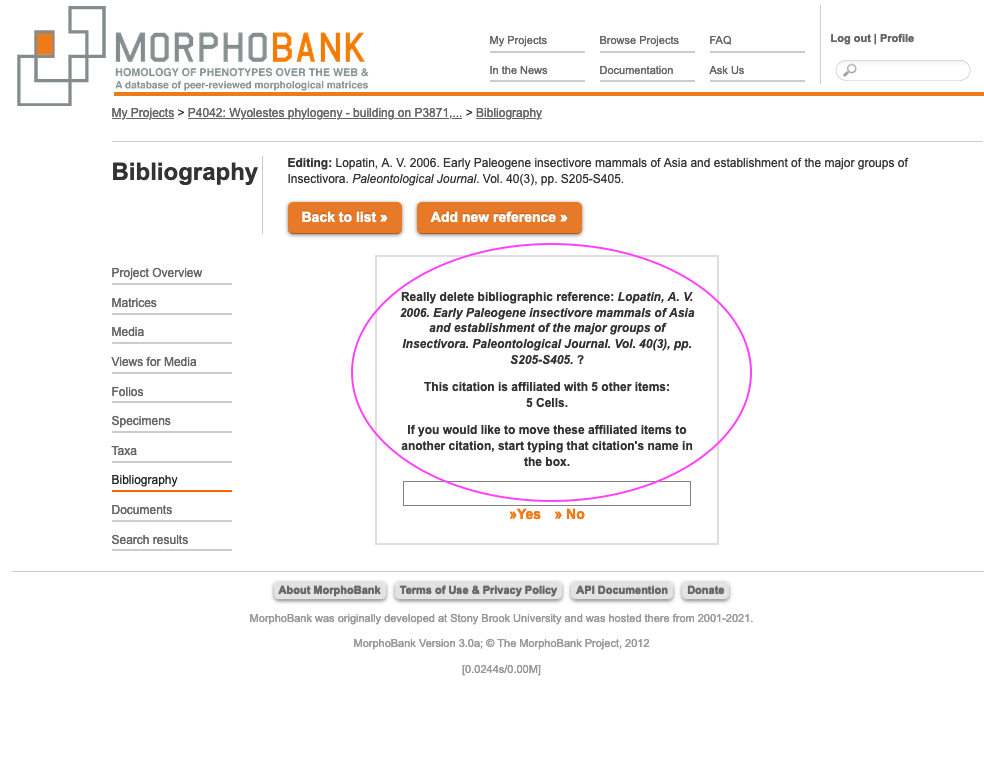
The bibliography can be navigated alphabetically by author's name or searched. If you edit an existing reference that is already used in citations for your project data, then any changes made will automatically propagate to the citations. As shown below, if you try to delete a reference that is used by existing citations you will be shown the list of items (taxa, characters, media, etc.) that cite the reference and given the option to shift the citations to another reference.
Figure 2.14. Warning when attempting to delete a bibliographic reference that is in use to document for matrix cells or media.
To shift citations from a to-be-deleted reference simply type the first few letters of the title or author name for the reference to which you wish to switch. A list of possible matches will appear. Pick the relevant reference and click on the "delete" button.
2.5.1. Adding bibliographic references by hand
You can add a reference to your bibliography by clicking on the "Add new bibliographic reference" button in the upper-right-hand corner of the bibliography display. You will see a form like the one below. Follow the data-entry guidelines shown on the form and in the tips visible when mousing over the "(help)" buttons above each form field, filling in as much information as you can. Then click the "save" button.
Figure 2.15. Editing a single bibliographic reference
2.5.2. Importing bibliographic references from external reference management programs
Tip
After you have exported your file in EndNote XML format from your reference manager, open your MorphoBank bibliography, click on the "Import Endnote XML file" button in the upper-right-hand corner of the bibliography display, then choose the XML file on your computer using the file-browse button.
Figure 2.16. Importing references in batch
You will be presented with the results of the import when it is complete. When uploading a new Endnote XML file to an existing project bibliography, the new file will generally append itself to the list of references. However, if one uploads an EndNote XML file which contains citations that are already present, the related citations are updated. For example, if one adds another EndNote file that has 3 new citations and 2 citations, which were previously added, the import will add the 3 new citations to the database and update the 2 citations to reflect the new information.
2.5.3. Searching
The bibliography is fully searchable. Simply type in a word or words and click on "search." The search covers all fields in the bibliography.
2.5.4. Exporting bibliographic data
You can export your project bibliography as a tab-delimited file suitable for import into Microsoft Excel, EndNote and other similar programs. Simply click on the "Export as Endnote TAB-delimited file" in the upper-right-hand corner of the bibliographic display. A file containing all of your project's references will download to your computer's desktop.
3. Using Media (Images, Video)
3.1. Supported media formats
You can upload any number of media documenting specimens to MorphoBank. Most uploaded media are 2D or 3D images, although video formats are also supported. (Thus our use of the more neutral "media" terminology).
You will typically upload an image and tag it with a specimen identification, any pertinent copyright information and a view description (e.g., "skull, dorsal", "leaf, external", "cell wall").
Image Files: MorphoBank accepts a variety of image formats including JPEG, GIF, PNG, PLY, STL, ZIP, TIFF, DCM, and Photoshop. Note that Photoshop files that use layer effects may not render properly on MorphoBank. For consistent results we recommend converting these files to TIFF format before uploading. All image files should be in RGB mode. Files in CMYK mode and color manipulations may not render properly.
You should upload image files at the highest resolution that makes sense for your project. MorphoBank will automatically create sized versions for use on the site as well as a full-resolution version optimized for online viewing. The original uploaded file will be retained and can be made available for download.
Videos: MorphoBank also accepts the following video file formats: MPEG-4, QuickTime and WindowsMedia. The preferred video file format for upload to MorphoBank is MPEG-4. Files in QuickTime and WindowsMedia format will usually work so long as the compression method used is supported by MorphoBank's video processor. In general, videos compressed with WindowsMedia will work, as will most QuickTime compression methods (some very old and rarely used methods like GIF compression are the notable exceptions). AVI files usually will not work and should be converted to MPEG-4 prior to upload. In general if your uploaded file is being rejected by MorphoBank it is recommended that you try re-encoding the file in MPEG-4 format using one of the many video conversion tools available for Mac OS X, Windows and Linux.
3.2. Uploading Media
Media (2D and 3D images, video, or sound) should be a key component of any MorphoBank project. All MorphoBank projects include at least one media item, and many contain hundreds or thousands of media items. MorphoBank allows you to upload as many media as needed for your scientific research, to use these media to document scorings in your matrices and to assemble these media into annotated groupings (see Folios) for online publication.
Important
File uploads are limited to 2GB per file/compressed file. Please break down groups of files into chunks <= 2 GB. Files larger than 50 MB will take a very long time to upload. Files larger than 2GB will cause an error message will display.
Figure 3.1. Adding Media - All Options
Regions of uploaded images may be labeled using tools integrated into MorphoBank's high-resolution pan-and-zoom image viewer. If the labels are added to an image in a matrix cell the labels will be associated specifically with that cell and automatically include the taxon and character names.
Uploaded media should be tagged with the specimens they depict as well as a view descriptor (see Media views), and relevant citations from your project bibliography. A media browser allows project members to conveniently browse and filter large quantities of multimedia data.
Original uploaded media files are always retained by MorphoBank and may be downloaded at any time. Thus, you should always upload your media at a resolution and quality suitable for research work, even if that file is too large for convenient use on the web.
MorphoBank will automatically convert and resize uploaded media to web-viewable formats at appropriate resolutions and quality for web use. This feature largely frees you and your collaborators from tedious media conversion tasks. If your files are in any of a number of mainstream formats no pre-processing on your part should be necessary.
MorphoBank includes a built-in image viewer that, in addition to providing labeling tools, allows users to pan-and-zoom over a full-resolution version of your images. Because it sends only the portion of the image that is actually visible, even very high-resolution imagery is usable on a normal internet connection in MorphoBank. The image viewer also supports image labeling functions.
General workflow for any media upload
Please contact us if you run into any problems.
- Make sure the taxon for the image exists in your Taxa list.
- Select the image from your desktop to load
- Choose the side represented, if applicable
- Assign the specimen represented
- add a new specimen, if needed (function is embedded)
- Assign a view
- add a new view, if needed (function is embedded)
- Assign the appropriate copyright
- (if image comes from the internet and is not in the public domain) Record copyright, copyright holder, and URL of the source
3.2.1. Uploading 2D Media
To add a media file to your project, click on Media in the left-side sub-navigation. If it is a single 2D Media, make that selection.
Figure 3.2. Adding and editing a single media item
Figure 3.3. Portion of upload form to add new media
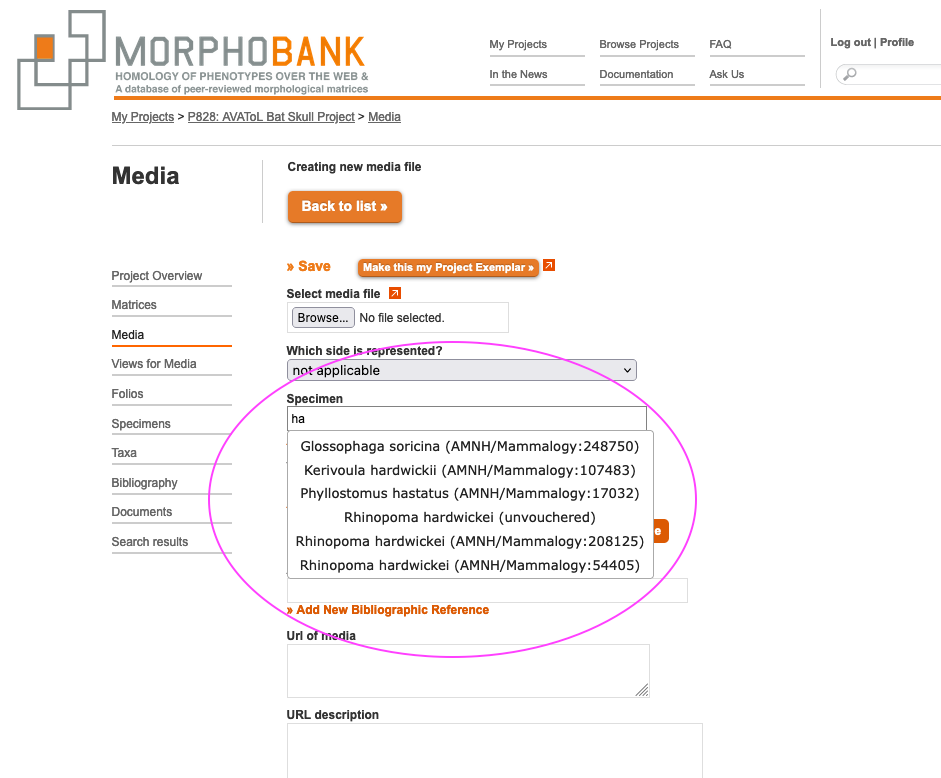
Several fields need to be completed when loading media so that future users of your data understand what this is image is of. A media item may show left or right and the side can be indicated. To pick the specimen from the project specimen directory that this media item represents, type the first few letters of the taxonomic name catalogue number or institution code into the "Specimen" text entry box. A menu will appear with all possible matches, as shown below. The more you type the more specific the list of possible matches will become. If you have not defined any media, use the Add New Specimen link (Fig. 3.3 in orange) to create a new one without having to exit the add media screen.
Figure 3.4. Media editing form with specimen match menu visible
You can tag your image with one of the views as configured in the Media Views tab by choosing it from the "View" drop-down menu. Remember a View should tell the user what this image is a picture of (e.g., leaf, skull, cell wall, etc...)
3.2.2. Adding a Batch of 2D Media Batch
You can upload batches of 2D media directly into your project using the Add Batch of 2D Media upload tool, which will add any number of media directly to your project in a single step, provided all the media items have been compressed into a single archive file (e.g., a Zip file).
To upload a batch of media first compress those media on your desktop as a ZIP, TAR, TAR+gzip, or TAR+bzip archive. Then click 'Add Batch of 2D Media".
You will then see a screen like the one shown below.
Figure 3.5. Portion of form to add a batch of 2D media at one time.
Under the header "Choose a ZIP, TAR, TAR+gzip, TAR+bzip archive or individual file" click on the Browse button and select a batch of media that you have already compressed. Fill in any of the other fields for which you have data or preferences, including specimen, Url of media, access settings, media notes, and publishing status. To select a specimen type the first few letters of the specimen's name into the text entry to display a list of possible matches.
Important
Similarly, if you wish to link a bibliographic citation to the uploaded media, type the first few letters of the reference's title or author and then pick the relevant reference from the resulting list of possible matches. You can also choose views for the media, if appropriate.
When you are done click on the "upload media batch " text. When the upload and processing is complete you will be presented with a summary of results from batch processing.
3.2.3. Uploading and Viewing CT Scans and 3D Media
3.2.3.1. Uploading CT Scan Files
MorphoBank can accept CT scans and derived 3D surfaces for inclusion in your project. A CT scan is a series (“stack”) of images created along a single axis. You may upload a CT stack, comprised of hundreds or thousands of individual images, to MorphoBank as a single ZIP-format archive. Your ZIP file should include only images with no extraneous files or sub-directories. All images in the stack should be TIFF or DICOM format and must be numbered sequentially. Any file with a missing number will be skipped during upload, resulting in an error or inaccurate 3D image. The TIFF format is recommended for images in stacks intended for reuse by other researchers.
IMPORTANT
You may also upload media derived from CT data to MorphoBank, including 3D surfaces in PLY and STL format and pre-rendered 3D animations in QuickTime, MPEG-4 and WindowsMedia formats.
To upload a CT scan or derived media, go to the Media tab of your project. Click on the button titled “Add 3D media.” You can upload and label your CT stack, 3D surface or animation with specimen information, views, and copyright restrictions just as you would with other media upload formats.
When a PLY or STL 3D surface is uploaded, this icon will be shown in place of a thumbnail wherever the file appears in your project.
Figure 3.6. MorphoBank's symbol for a 3D image, e.g., PLY or STL file.
3.2.3.2. Viewing CT Scans and 3D Image Files
You can view a sample frame of an image stack from within MorphoBank prior to download. Click on the image thumbnail, as you would with any other image in Morphobank.
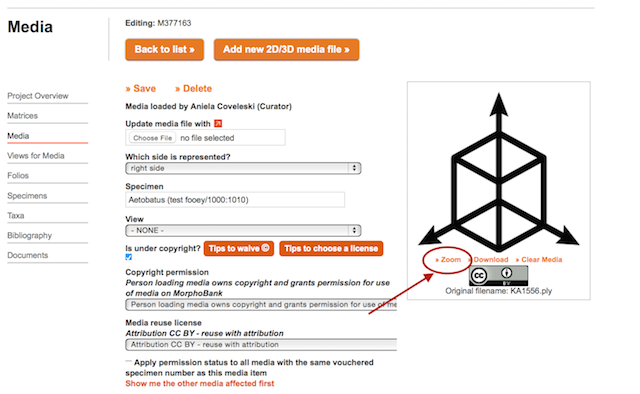
You can view uploaded 3D surfaces interactively within MorphoBank using the 3D viewer. To access the viewer, click on “Zoom” underneath the icon on the uploaded media page.
Figure 3.7. A 3D image with its associated data on specimen, view and copyright
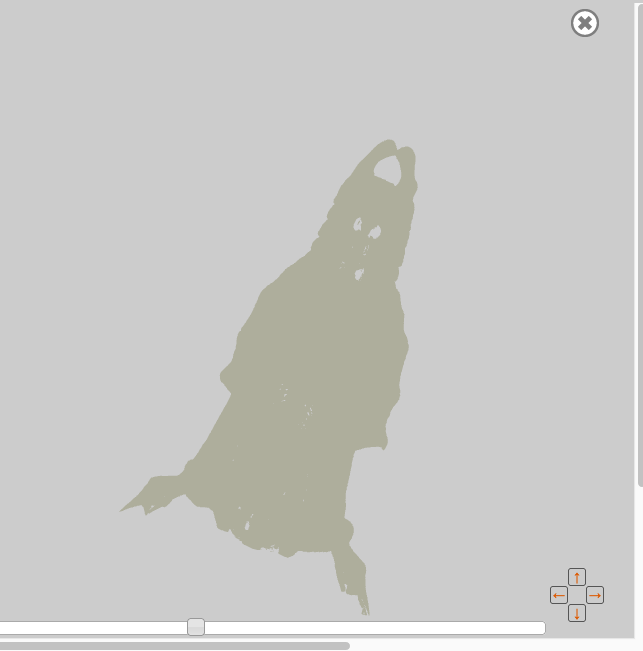
Once you click on “Zoom”, you will see the 3D rendering of the surface data displayed in a pop-up viewer. Large surfaces may take a while to load.
Figure 3.8. A 3D image surface rendered on MorphoBank.
Tip
Use the horizontal slider to zoom in and out of the image. Preset trackpad or mouse actions or gestures for zooming in/out will also work.
You can use your mouse to click and drag to rotate the object in 3 dimensions. Alternative you may use the on-screen zoom slider and directional buttons to control the view.
The up/down arrows may be used to spin the image vertically, and the left/right arrows may be used to spin the object horizontally.
3.2.4. Copyright Tools for Any Uploaded Image
If an image is under copyright, be sure to check the "Is under copyright?" box, When this is checked, new fields appear that allow you to specify copyright information. These include drop-downs describing the status of the permission and the Creative Commons reuse license, and space to enter the copyright holder’s name and the relevant bibliographic reference.
Important
Figure 3.9. Media editing form with copyright tools
If at all possible, use images to which you own the rights and set the Media reuse license of your choosing. The licensing options are as follows:
CC0 - Relinquish copyright. This option will place your media in the public domain. This license enables scientists, educators, artists and other creators and owners of copyright-or-database-protected content to waive those interests in their works and thereby place them as completely as possible in the public domain, so that others may freely build upon, enhance and reuse the works for any purposes without restriction under copyright or database law. You will waive all copyrights and related or neighboring rights that you have over your work, such as your moral rights (to the extent waivable), your publicity or privacy rights, rights you have protecting against unfair competition, and database rights and rights protecting the extraction, dissemination and reuse of data.
The purpose of storing data on MorphoBank is to make those data available to the scientific community and the public so that data may be reused in the service of research and education. Standards of good scholarship dictate that when reusing prior work the authors of that prior work should be cited. To emphasize freedom for others to reuse by formally relinquishing all copyright claim to deposited published work, select a CC0 license.
CC BY - This license lets others distribute, remix, tweak, and build upon your work, even commercially, as long as they credit you for the original creation. This is the most accommodating of licenses offered. Recommended for maximum dissemination and use of licensed materials.
CC BY-SA - Sharealike. This license lets others remix, tweak, and build upon your work even for commercial purposes, as long as they credit you and license their new creations under the identical terms. This license is often compared to “copyleft” free and open source software licenses. All new works based on yours will carry the same license, so any derivatives will also allow commercial use. This is the license used by Wikipedia, and is recommended for materials that would benefit from incorporating content from Wikipedia and similarly licensed projects.
CC BY-ND - Attribution-NoDerivs. This license allows for redistribution, commercial and non-commercial, as long as it is passed along unchanged and in whole, with credit to you.
CC BY-NC - Attribution-NonCommercial. This license lets others remix, tweak, and build upon your work non-commercially, and although their new works must also acknowledge you and be non-commercial, they don’t have to license their derivative works on the same terms.
CC BY-NC-SA - Attribution-NonCommerical-ShareAlike. This license lets others remix, tweak, and build upon your work non-commercially, as long as they credit you and license their new creations under the identical terms.
CC BY-NC-ND - Attribution-NonCommerical-NoDerivs. This license is very restrictive, only allowing others to download your works and share them with others as long as they credit you, but they can’t change them in any way or use them commercially.
Media Released for One-Time Use, No Re-Use Without Permission. The copyright holder has released the media for use in one MorphoBank project only. To honor the copyright holder's wishes MorphoBank only allows such Media to exist in one project. If you have a question about this please send a message to using the Ask Us link on the MorphoBank home page.
CC0 or CC-BY licenses allow maximum flexibility and data sharing online because they (and only they) are Open Data licenses. Please be aware that choosing an NC (non-commercial usage only) license may prevent your Media from being used on Open-content only websites such as Wikipedia. We do not recommend choosing this license. When you have obtained permission (unless you, the person uploading the material, have granted it yourself) you will need to upload a signed document proving this. MorphoBank automatically prompts this when you select "Permission to use media on MorphoBank granted by copyright holder" from the Copyright Permission drop-down list shown above. When you choose this option, the following form pops up:
Figure 3.10. Copyright Permission Upload Form
You can simply attach the relevant document using the "Choose File" button and it will automatically be saved to the Documents section of your Project Workspace. If you have already uploaded a Copyright Permission document, you can simply select it from a list of all available documents within your project. You can then exit the form uploader and return to the Media Editing page to save your work. Please be sure to clearly state the copyright holder on the Media Editing form by typing the name into the text box labeled "Copyright Holder."
If your media item is associated with a publication, as an additional layer of documentation, you may wish to attach a bibliographic reference to the Media by typing in the first few characters of the reference title or author name(s) into the "Add bibliographic reference" box. You will be presented with a list of possible matches from your project bibliography from which you can choose the appropriate reference. Remember that you must first create the reference in the project bibliography before you can attach it here.
The only data absolutely required is the media file itself. You are strongly encouraged to attribute a specimen from the specimen directory to each media item. The matrix editor uses the specimen taxonomy to suggest relevant media for placement in cells. Thus media without specimen data will not be usable in matrices.
You must also specify copyright information for your media, if applicable. The earlier this is done the fewer copyright clearance problems you will encounter later as you move towards publication.
3.2.5. Copyright Settings for Project Data: Matrices and Documents
Matrices and Documents on MorphoBank can be marked with a CC0 license, distinct from Media copyright settings.
“Non-media data copyright preferences” or “Matrix copyright preferences” can be accessed from a few locations in your Project workspace, and allow you as a Project Administrator to place a CC0 tag on data, thereby releasing it to the public domain.
For unpublished projects, you can select copyright preferences from within the Matrix tab or from within the Documents tab. If you access the copyright preference button from either area, the CC0 license will be applied to all non-Media data (Project Matrices, Documents, Characters and Ontologies). You need only select the setting once.
Figure 3.11. Click the "copyright preferences" button
Figure 3.12. Check box and click "save"
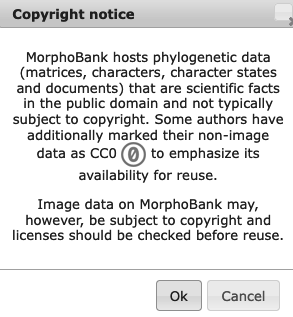
When a Project is later published, there are several possible actions by visitors browsing MorphoBank that will trigger a reminder about copyright and a possible CC0 license.
Notices appear in the following instances:
- When downloading media items:
Figure 3.13. Notification prior to download of Media
When downloading a Matrix, Character List, or Ontology:
Figure 3.14. Notification prior to download of Matrices, Character lists and Ontologies
3.2.6. Delete Multiple Media Feature
Occasionally a user will upload a large number of images only to discover that, for one reason or another, they simply aren’t right for the current project. As a corollary to the Ass Batch of 2D or 3D Media Upload feature, MorphoBank has a Delete multiple media feature to allow efficient deletion of multiple media. To use the Delete multiple media tool, navigate to the “Media” tab, and then select the orange button “Delete multiple media” from the top of the screen. You will then see a new button, just above the image thumbnails themselves, that reads “Trash Media.” Any project member can then begin the batch deletion process by clicking on each unwanted image. A small check mark will appear in the upper-left-hand corner of each selected thumbnail. When you’ve made your selections, click “Trash Media.” You can click through multiple pages of media making your selections or you can add continuously to your media recycling bin. The small recycling bin to the right of the “Trash Media” button will change shape to indicate that it contains the discarded images. This feature ensures that you have the opportunity to re-think your deletions before it is too late.
Figure 3.15. Batch Deletion function
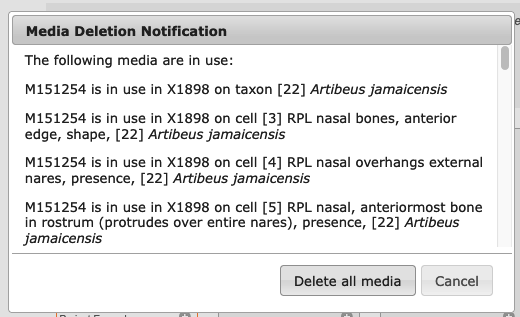
You can choose to select all and delete or you can click on individual media to delete them. When using the second option a check mark will appear in the upper left of media selected for deletion. To complete the process, click the Delete button. If the media item(s) are in use you will receive a warning to make sure you have considered the consequences of deleting media, i.e., that they will disappear from every part of your project.
Figure 3.16. Media deletion notification warning the user if media about to be deleted are in use in other parts of her project.
If your media are not in use in your project, they will simply be deleted once you select delete.
Warning
3.3. Using the Media Browser
The media browser, accessible by clicking on Media in the left-hand navigation, lets project members conveniently view, sort and filter through previously uploaded project media. Unless filtering is enabled, the browser shows all media in the project as thumbnails.
Figure 3.17. Media can be viewed on the browse page at two sizes. The default is the smaller size.
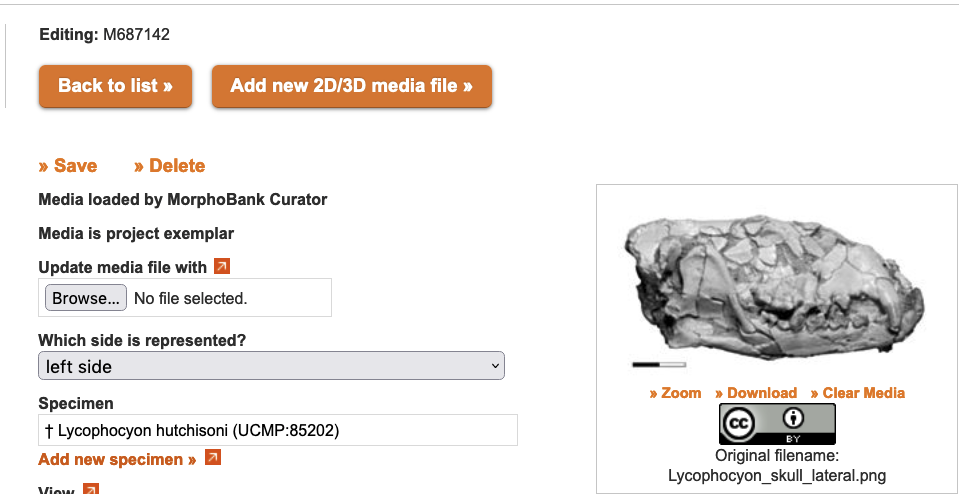
Clicking on an media thumbnail opens up the basic media editing form, which includes copyright information, and a larger version of the media. Clicking on the larger version will open the largest web-viewable version of the media (for images, a pan-and-zoom version of the image, for video or audio, a playable version). The original media file can be downloaded by clicking on the "download" button on the basic editing form.
Figure 3.18. Media editing form. Note the Download link directly under the media item.
3.3.1. View modes
The media browser supports two different ways of viewing sets of media:
Thumbnail mode displays twenty-five items per page at lower high-resolution with only MorphoBank number and taxonomic name.
Mosaic mode displays one-hundred items per page at low high-resolution without any additional information. Images in mosaic mode are cropped to be square, so portions of rectangular images may be missing in this view.
A set of view mode buttons is present in the upper-right hand corner of the media browser. Clicking on a button changes the view mode.
Figure 3.19. Media browser view modes
3.3.2. Sorting
The browser under the Media tab, accessible for unpublished projects when logged in, has several tools to sort media items by a number of criteria. By default, items are sorted by MorphoBank number. You can change the sort order using the "Order by" drop-down menu in the media browser.
Figure 3.20. The tool for ordering media in unpublished projects
3.3.3. Filtering
By default the media browser displays all project media. For projects with lots of media this can get unwieldy, so the browser offers two ways to filter what you see.
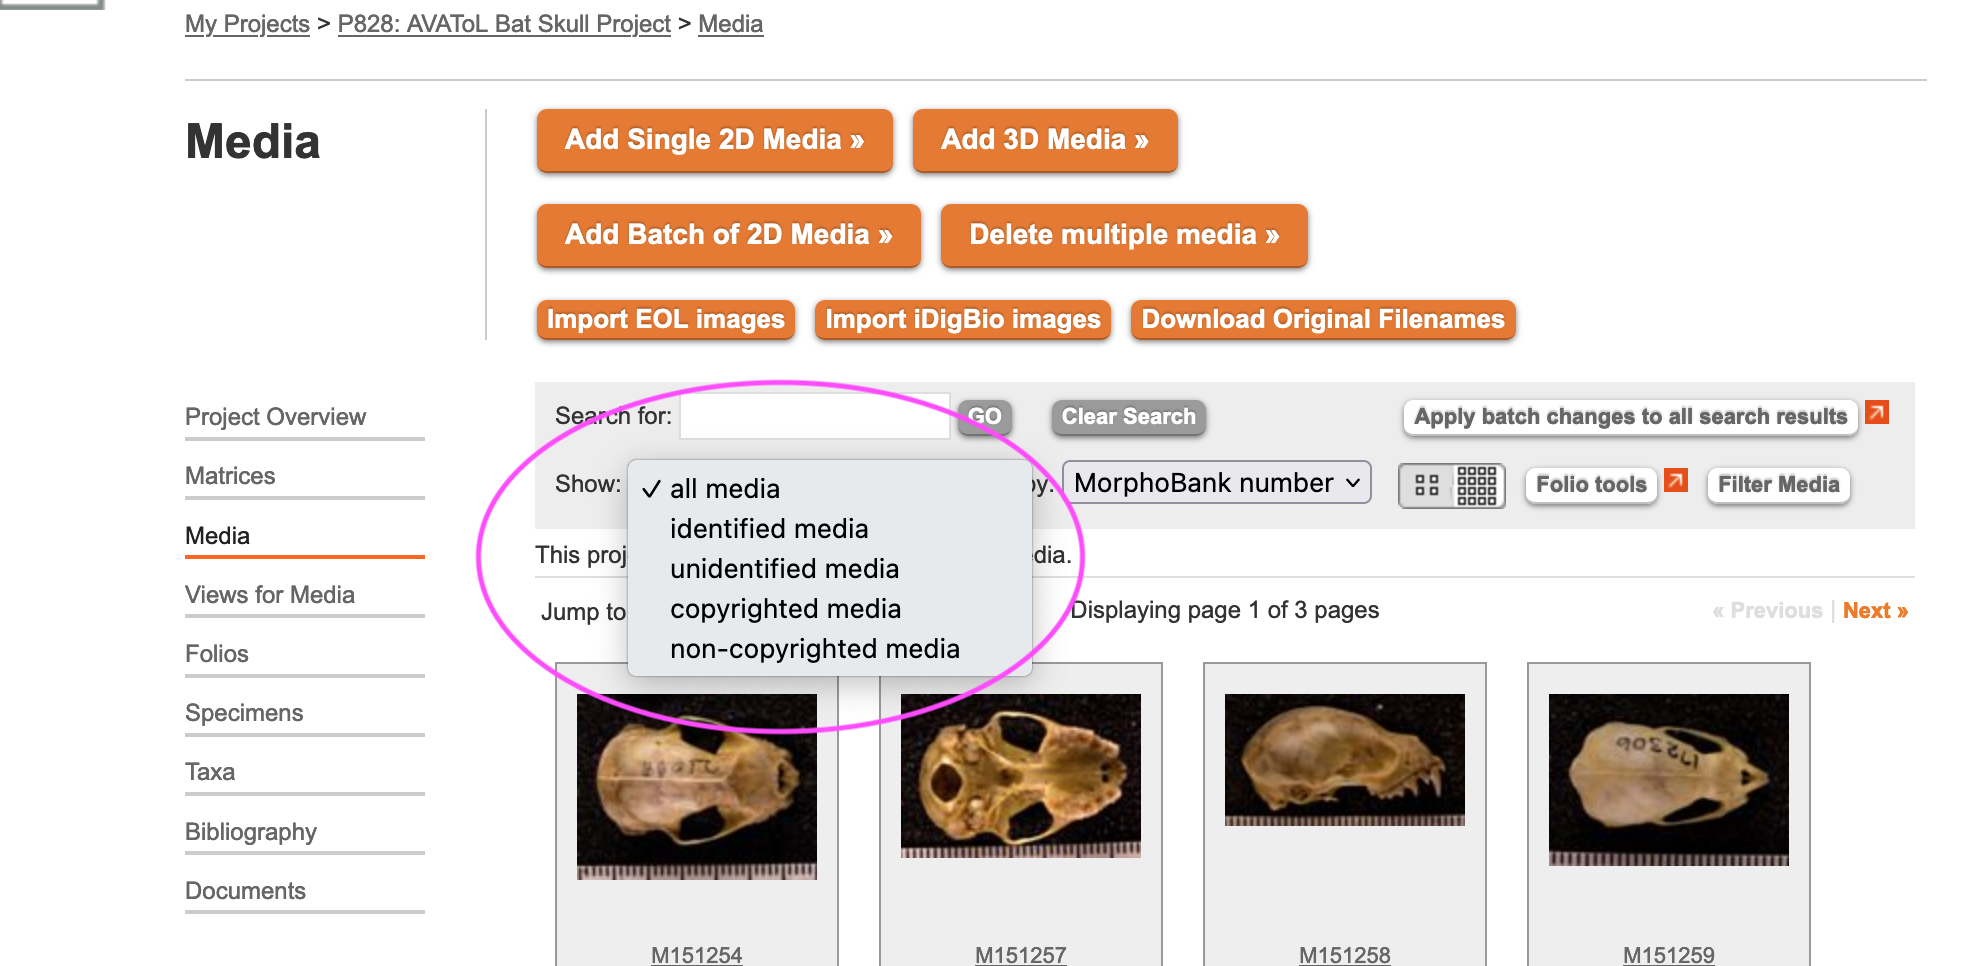
The "Show" drop-down menu in the top-left section of the media browser navigator allows you to easily display only those media items meeting some basic criteria:
identified media displays only media items that are associated with a specimen.
unidentified media displays only media items that are not associated with a specimen.
copyrighted media displays only media items that have their "is under copyright?" checkbox set.
non-copyrighted media displays only media items that do not have their "is under copyright?" checkbox set.
all media displays all media items. This is the default.
You can also filter media items by taxonomy, view, submitter, copyright license, copyright permission, specimen repository, status, or any combination of these by clicking on the "Filter Media" button towards the right of the media browser. Check off your desired filters on the set up screen, shown below, and click on the "filter" button. Multiple filters can be used at the same time to create specific lists of media to show, for example, a list of copyrighted materials that were uploaded by a specific member.
Figure 3.21. The "Show" drop-down menu in the media browser.
To clear filtering, select "Clear All." Once you have cleared your filters, be sure to click the "Filter" button beside the "Clear All" button to complete the action.
3.3.4. Searching media
You can also use the Search function to search for media. This function is found in the upper right corner of all MorphoBank pages except the matrix editor. While logged-in the search function will find media in both published projects and any unpublished projects in which you have membership.
3.3.5. Importing Media from EOL.org and iDigBio.org
The Encyclopedia of Life (EOL.org) and Integrated Digitized Biocollections (iDigBio.org) are growing sources of specimen and media available for re-use under Creative Commons licensing and may be useful to the scientific endeavors of investigators building content. You may wish to import media en masse from EOL.org or iDigBio.org to illustrate character states, cell scores or taxa in your MorphoBank matrix. MorphoBank makes this very easy.
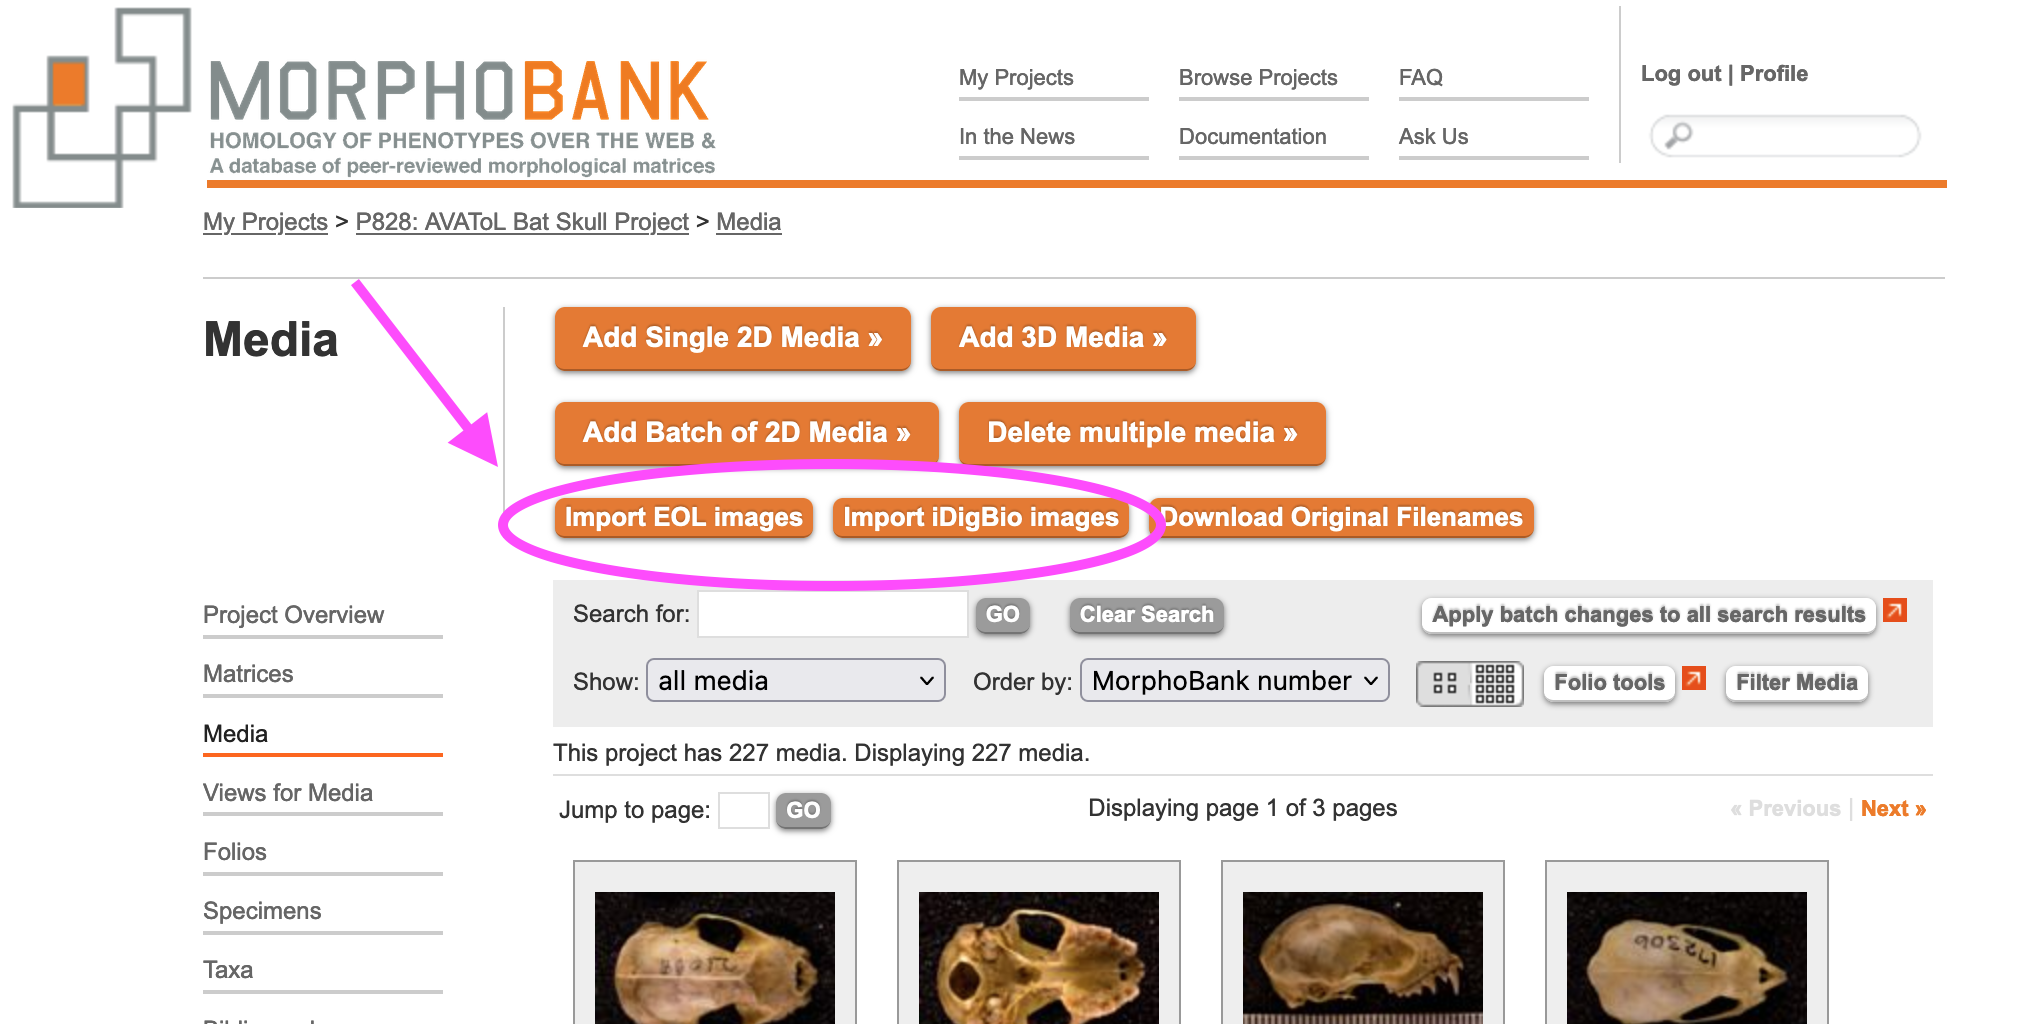
MorphoBank allows you to pull groups of images from EOL.org and iDigBio.org and load the associated data (e.g. species name) automatically. You can access these tools through both the "Media" tab and the "Taxa" tab. From either of these pages, click on the orange button that says "Import EOL.org images" or "Import iDigBio.org images"
Figure 3.22. EOL and iDigBio Import Images Buttons
Clicking on either of these buttons will open a window that lists all of the taxa in your project alongside checkboxes. Use the checkboxes to select which taxa to search in EOL.org or iDigBio.org. If your project has many taxa, you may want to be selective and do just a few at a time to avoid long load times. Once you've made your selection, click the large orange button that says "Search EOL.org."or "Search iDigBio.org"
Figure 3.23. Select Taxa, here shown using EOL as an example (iDigBio looks similar)
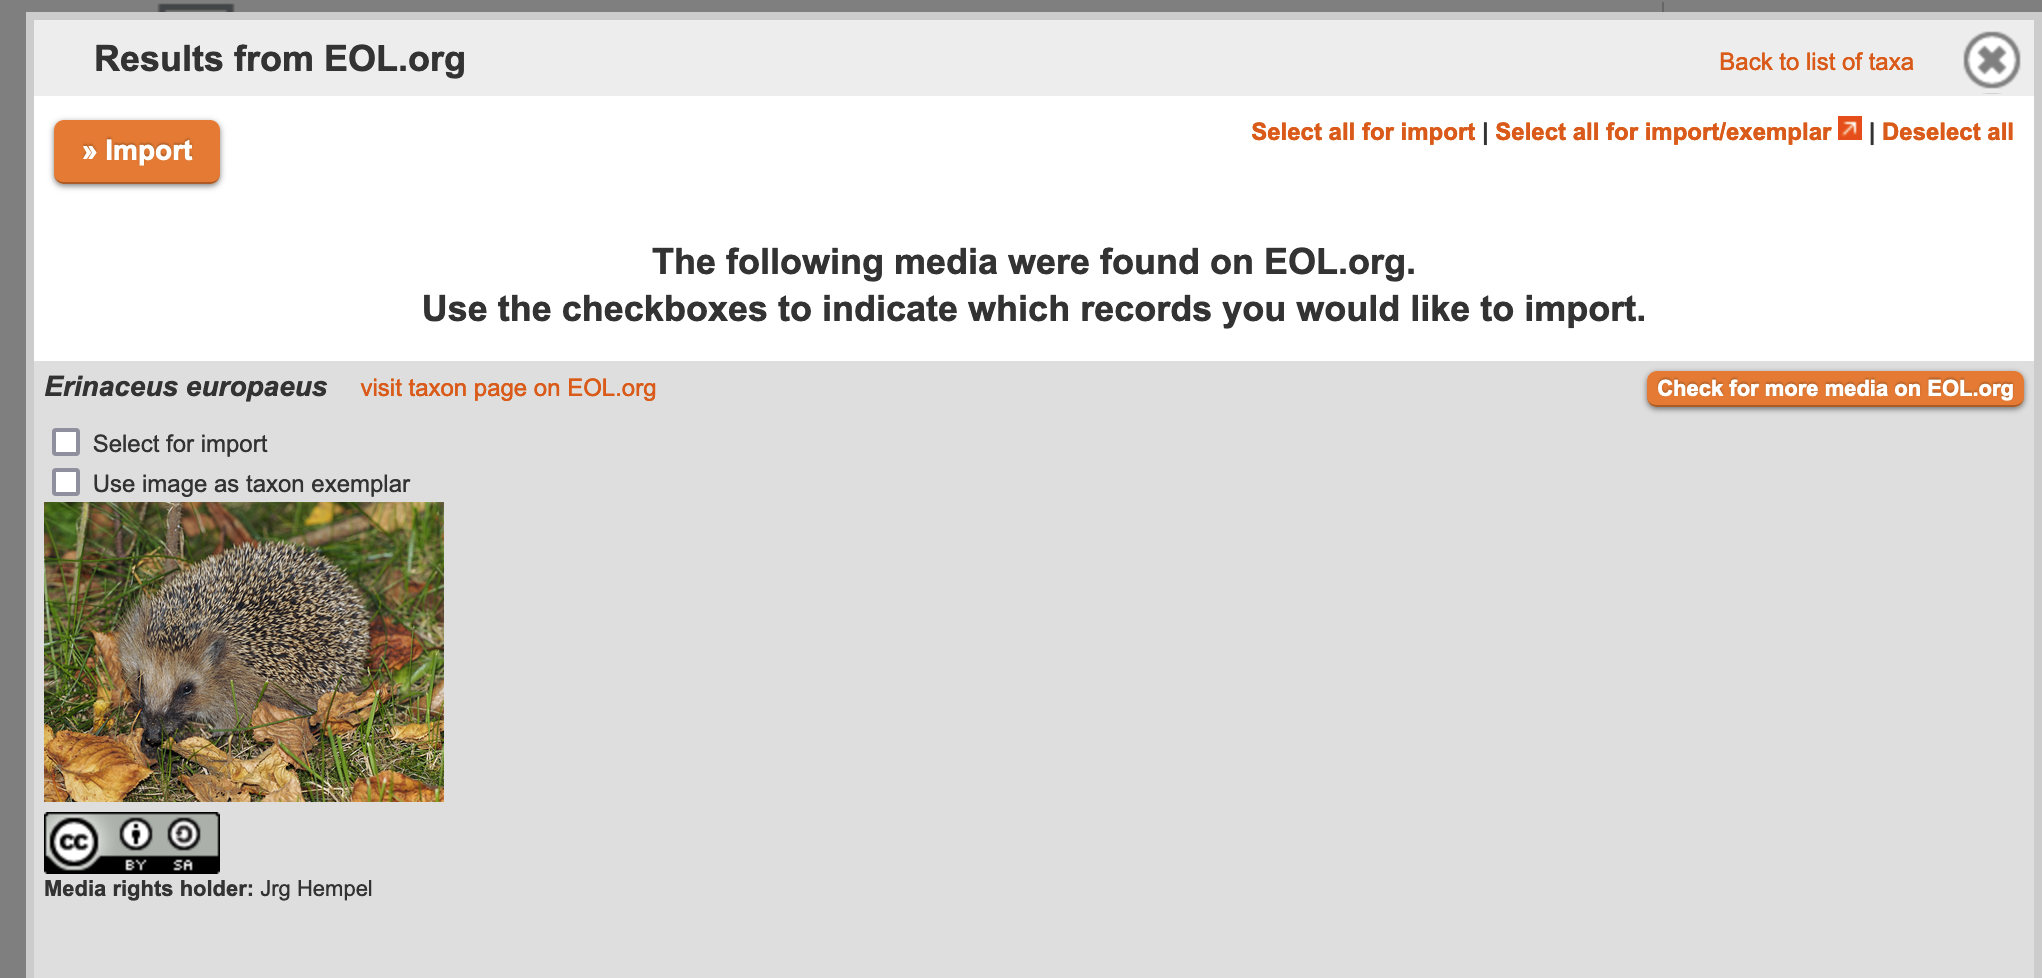
When your data has been retrieved, you will see an image thumbnail along with copyright information. You can either choose to import this image, or you can see what else EOL.org or iDigBio.org has to offer by clicking the orange "Check for more media on EOL.org" or "Check for more media on iDigBio.org" button. Once you're satisfied with an image or images, check "Select for Import,""Use image as taxon exemplar," or both, and then click "Import."
If you choose to use the image as a Taxon Exemplar, it will immediately appear as the example image for that t part of your matrix when the import process is complete. It is associated with the taxon names in rows. Typically the Taxon Exemplar is a picture of the whole organism. If you're importing images without selecting "taxon exemplar," then it will simply be added to the "Media page in your project. Either way, all imported media are available to you as you work and can be linked to cells, characters and states or taxa.
Figure 3.24. Example results from a search of EOL
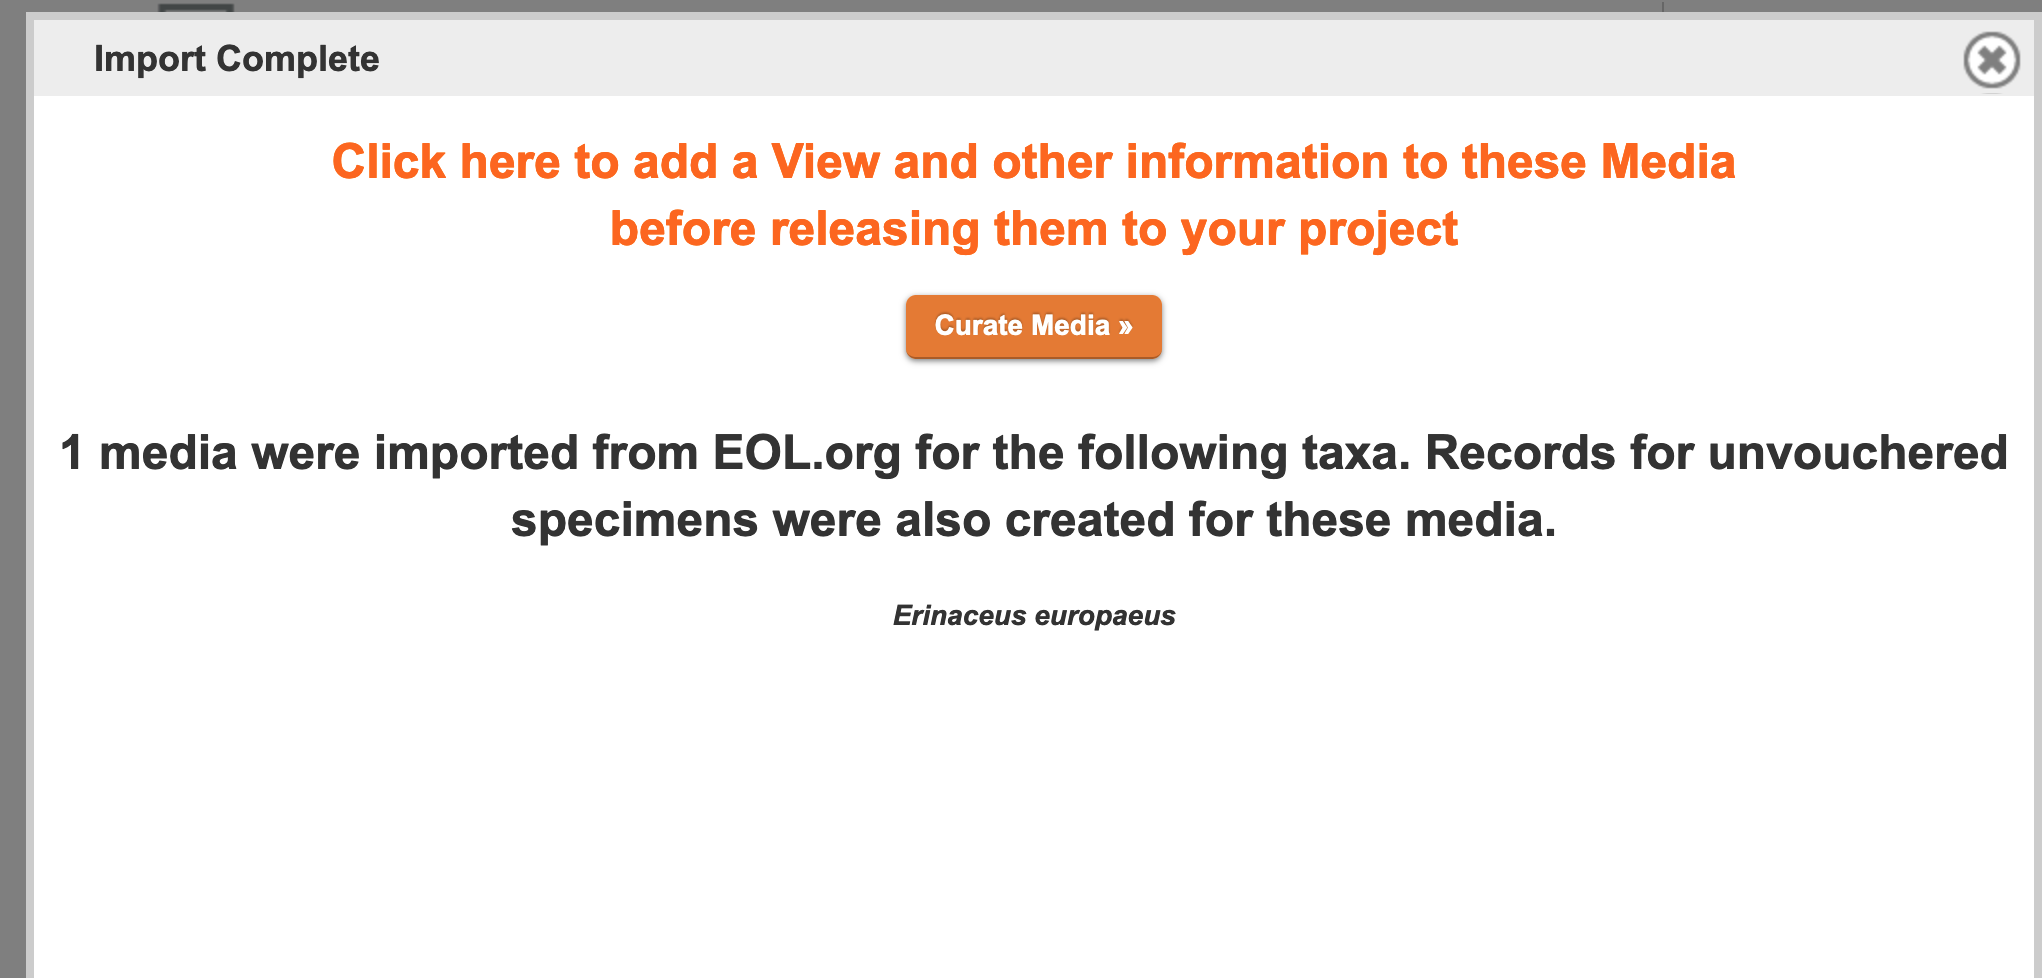
Once you import the chosen media, you'll see an intermediary window telling you how many images were imported and directing you to further "curate" your media:
Figure 3.25. Import Complete Screen
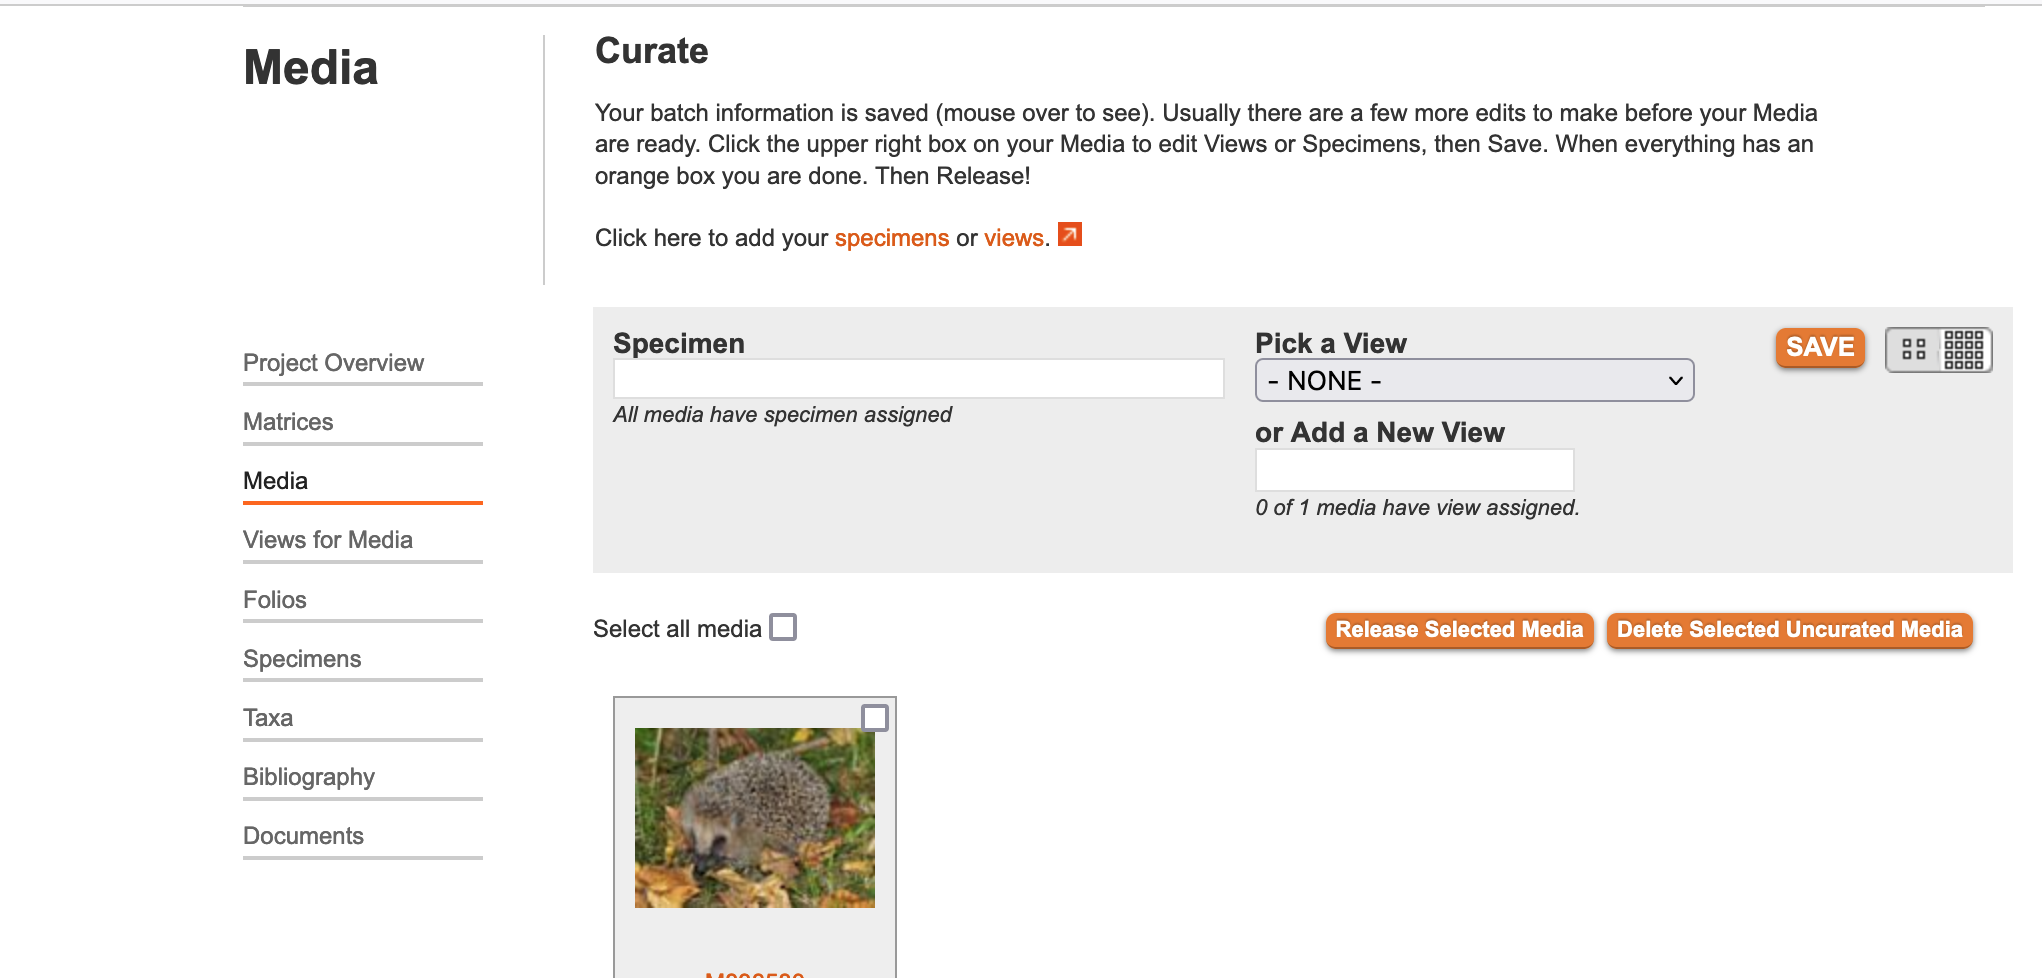
The "curate media" page allows you to associate Media Views (these are orientations and descriptors that you design such as "lateral skull," "body," "stamen," and "cross section) with your newly imported images. MorphoBank automatically creates an "unvouchered" specimen record for all media imported from EOL, but if you want to use a different, already extant specimen record, you may do so by typing its first few letters in the "Specimen" lookup (seen in the figure below). When importing media from iDigBio.org, specimen records will be created based upon the data available in iDigBio. You must also pick a View from the drop-down of all of the Views existing in your project. If you don't see the appropriate View, you must create a new one in the "Media Views" tab. If the "curate media" page has more than one image, you must select the appropriate one(s) by clicking the checkbox in the upper-right-hand corner of each thumbnail. When you've finished curating an image, click "Save." An orange border will surround the completed media. To complete the process, click "Release Curated Media to my Project."
Figure 3.26. Curate Media Page
You'll notice that there's another orange button, reading "Release All Media to my Project" that's available throughout the curation process. If you click this button, Media with no associated specimen or views will be released into the main body of your project. You'll see a warning pop-up asking you to confirm this choice.
3.4. Using the MorphoBank Image Viewer and Annotator
All images uploaded to MorphoBank are automatically converted into a format that allows efficient pan-and-zoom viewing at full resolution. This means you can upload very high resolution imagery and view it online on MorphoBank with full detail using a normal internet connection.
To efficiently display high resolution imagery, MorphoBank takes your original image, breaks it up into small pieces and stores those pieces at various resolutions, from full resolution down to thumbnail resolution. Special browser-based software built into MorphoBank requests only those pieces that are actually visible on the screen, and at the lowest resolution possible. The result is that even the highest resolution imagery can be viewed online using a standard connection. No detail need be lost.
To use the image viewer and annotator, first click on the image in the media browser.
Figure 3.27. Basic image viewer (published or unpublished projects). Note pan and zoom tools in upper left.
If you are logged into a project that you can edit, you will access an image editor. You will be taken to a media editor page with a version of your media on the right side of the screen.
Figure 3.28. Access the Media Editor by Clicking on Zoom (Unpublished Projects)
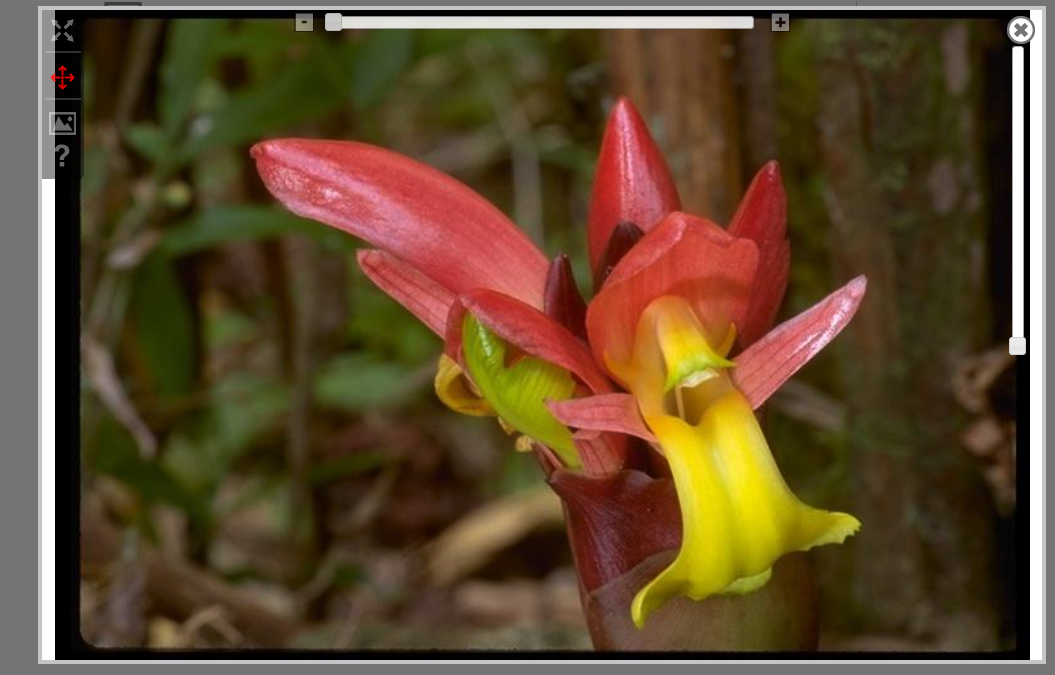
To use pan and zoom features, either click on the image itself or select "zoom" below the image. A window which looks something like the figure below will then appear:
Figure 3.29. Image editing tools visible to a project member when logged in. The image editing tool palette is in the upper left.
The horizontal slider allows you to zoom in and out, the vertical slider lets you to rotate the image.
The palette includes tools that allow you to view and label your images.
- Clicking on this icon will restore the image to its original zoomed-out, centered position.
- To move around an image that is too large to fit on the screen select the pan tool from the tool bar (or press the 'p' key on your keyboard), then click on the image, hold the button and drag the mouse until the region of interest is visible.
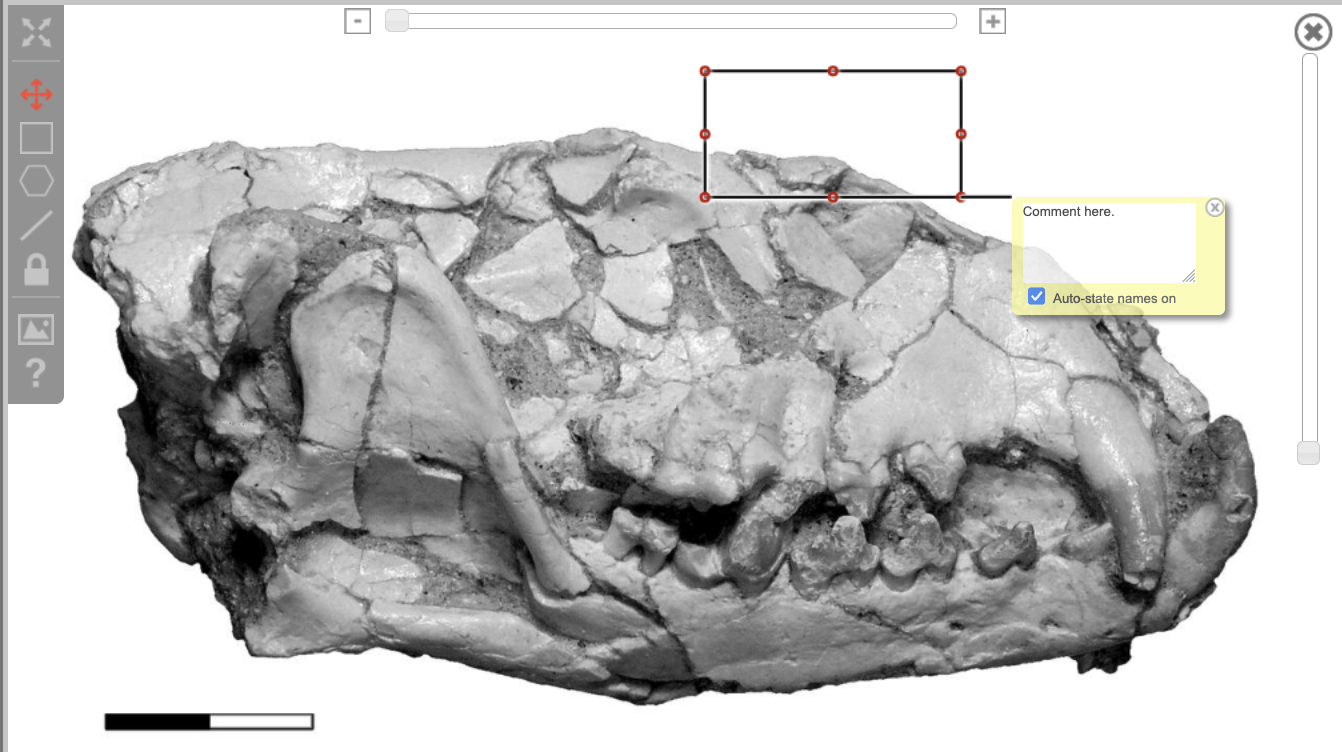
To annotate your image with boxes that highlight key areas, you can click this square icon. Once it is selected, click the area of the image you'd like to annotate, and a rectangle with a text box beneath it will appear. You can drag the rectangle anywhere on the image, and resize it by clicking and dragging the corner. To save any text that you enter into the text box, simply click outside of the annotation. To remove the annotation, click inside the text box once more, and then click the small "x."
Figure 3.30. Image editing tool: Square icon functionality
To annotate your image with custom polygons, click on the hexagon icon. Click on the image to add points to draw your shape. The shape is always closed, and you can add as many points as you like. You can click on points you've already added to move them, alt+click on existing points to remove them, and alt+click on the line to add new points. To remove the shape, click on the "X" in the label box.
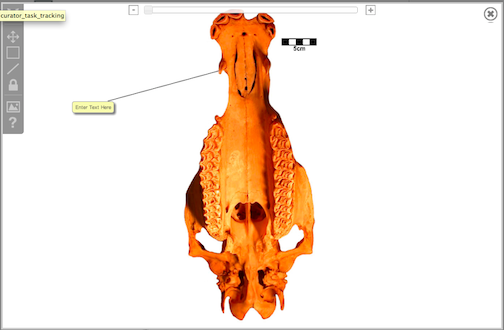
To annotate an image to point to a specific area, click the line icon. Like the box annotation above, you must first select the tool, and then click on the part of the image where you wish the line to point. The line will connect the selected portion of the image to a text box. The orientation of the box can be adjusted by clicking inside the box and holding the button down while dragging it. As described in regards to the box annotation, to save text simply click outside of the text box area. To delete the annotation, click inside the text box again and then click the small "x."
Figure 3.31. Image editing tool: Line icon functionality
You can use this button to prevent accidental movement or deletion of labels while navigating the image. When locked it will not be possible to move, edit, create, or delete labels on the image. You can still use the zoom and pan tools when the labels are locked.
- In order to keep track of where you are within a zoomed-in image, you can use this tool to highlight the visible area within a smaller inset of the whole image. See below.
Figure 3.32. Zoomed-in image with highlighted area
- This button opens a guide to all of the image viewer tools, along with a list of helpful keystroke shortcuts.
Media viewer: Keyboard Shortcuts
- "tab": hide/show on-screen controls
"space": to activate image panning
"r": to select the rectangle label tool
"p": to activate the point label tool
"n": to toggle visibility of the image overview
"h": to return the image to the centered, zoomed-out "home" position
"c": to toggle visibility of viewer controls
"+" or "]": to zoom in in small increments
"-" or "[": to zoom out in small increments
"?": to pan the image in small increments
"d": to delete the selected annotation
"l": to lock and unlock annotations
3.5. Editing Media
3.5.1. Updating media
You can update a media file at any time by finding the media in the media browser or search, clicking on the thumbnail, and then uploading a new file into the existing record. This is handy when you need to correct errors or replace an existing file with a higher quality version.
3.5.2. Labeling images in the Matrix Editor
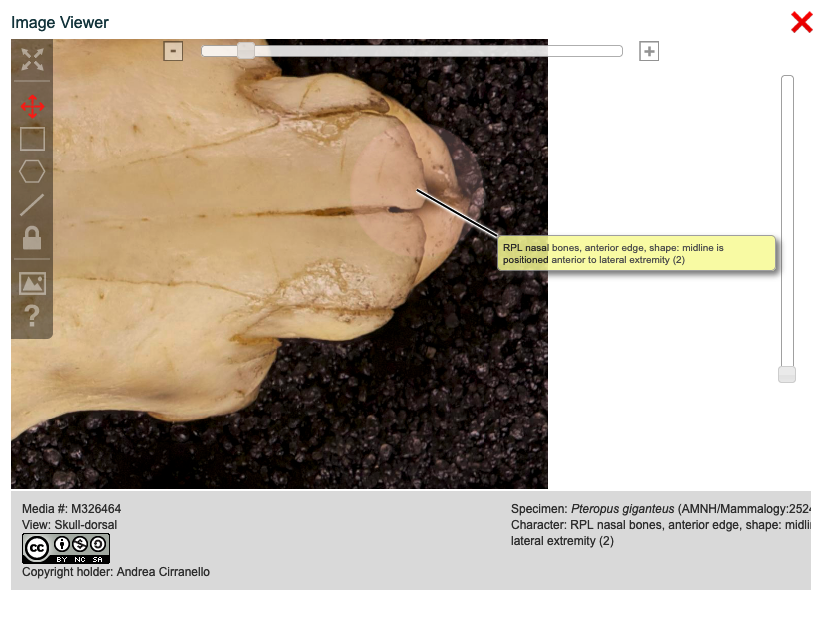
MorphoBank also allows you to label regions of images using the Media viewer when it is accessed from the Matrix Editor. The labels do not modify the image in any way. Labels only appear when viewing the image in the specific matrix cell in which the labels were added. In addition, labels are automatically tagged with the taxon and character of the cell to which they are attached.
Figure 3.33. Image viewer with labeling controls and label visible
To label an image in the matrix editor, first open the matrix, then click on the cell displaying the image in question. This will open the pan-and-zoom viewer, similar to what you would see if you clicked on an image in the media browser. You will see the same tool palette, including the annotation buttons discussed above
Changes made to a label's text or location are automatically saved. You do not have to explicitly hit a "save" button.
4. Managing Characters
As with taxonomic names and specimen data, MorphoBank maintains a central directory of characters for each project. The directory lists each character once - no duplicates are allowed.
Important
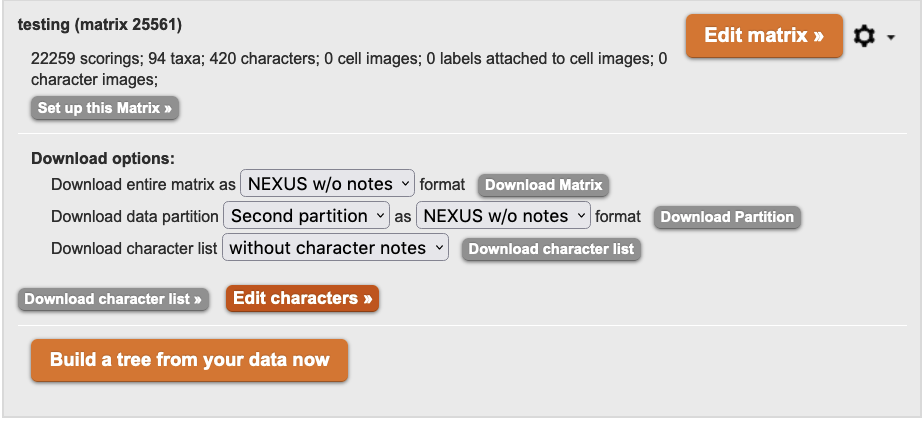
While it is possible to perform rudimentary editing of characters in MorphoBank's matrix editor, most management of character data in your project will be performed using the character editor. To access the character editor, select the Matrix of interest and then click the word "Characters" at the top of the Matrix Editor page. Alternatively, click on the 'Edit characters' button for the Matrix of interest on the Matrix main tab.
Figure 4.1. Accessing the character editor through the Matrix Editor
Figure 4.2. Accessing the Character Editor through the Matrix main tab
4.1. Character editor overview
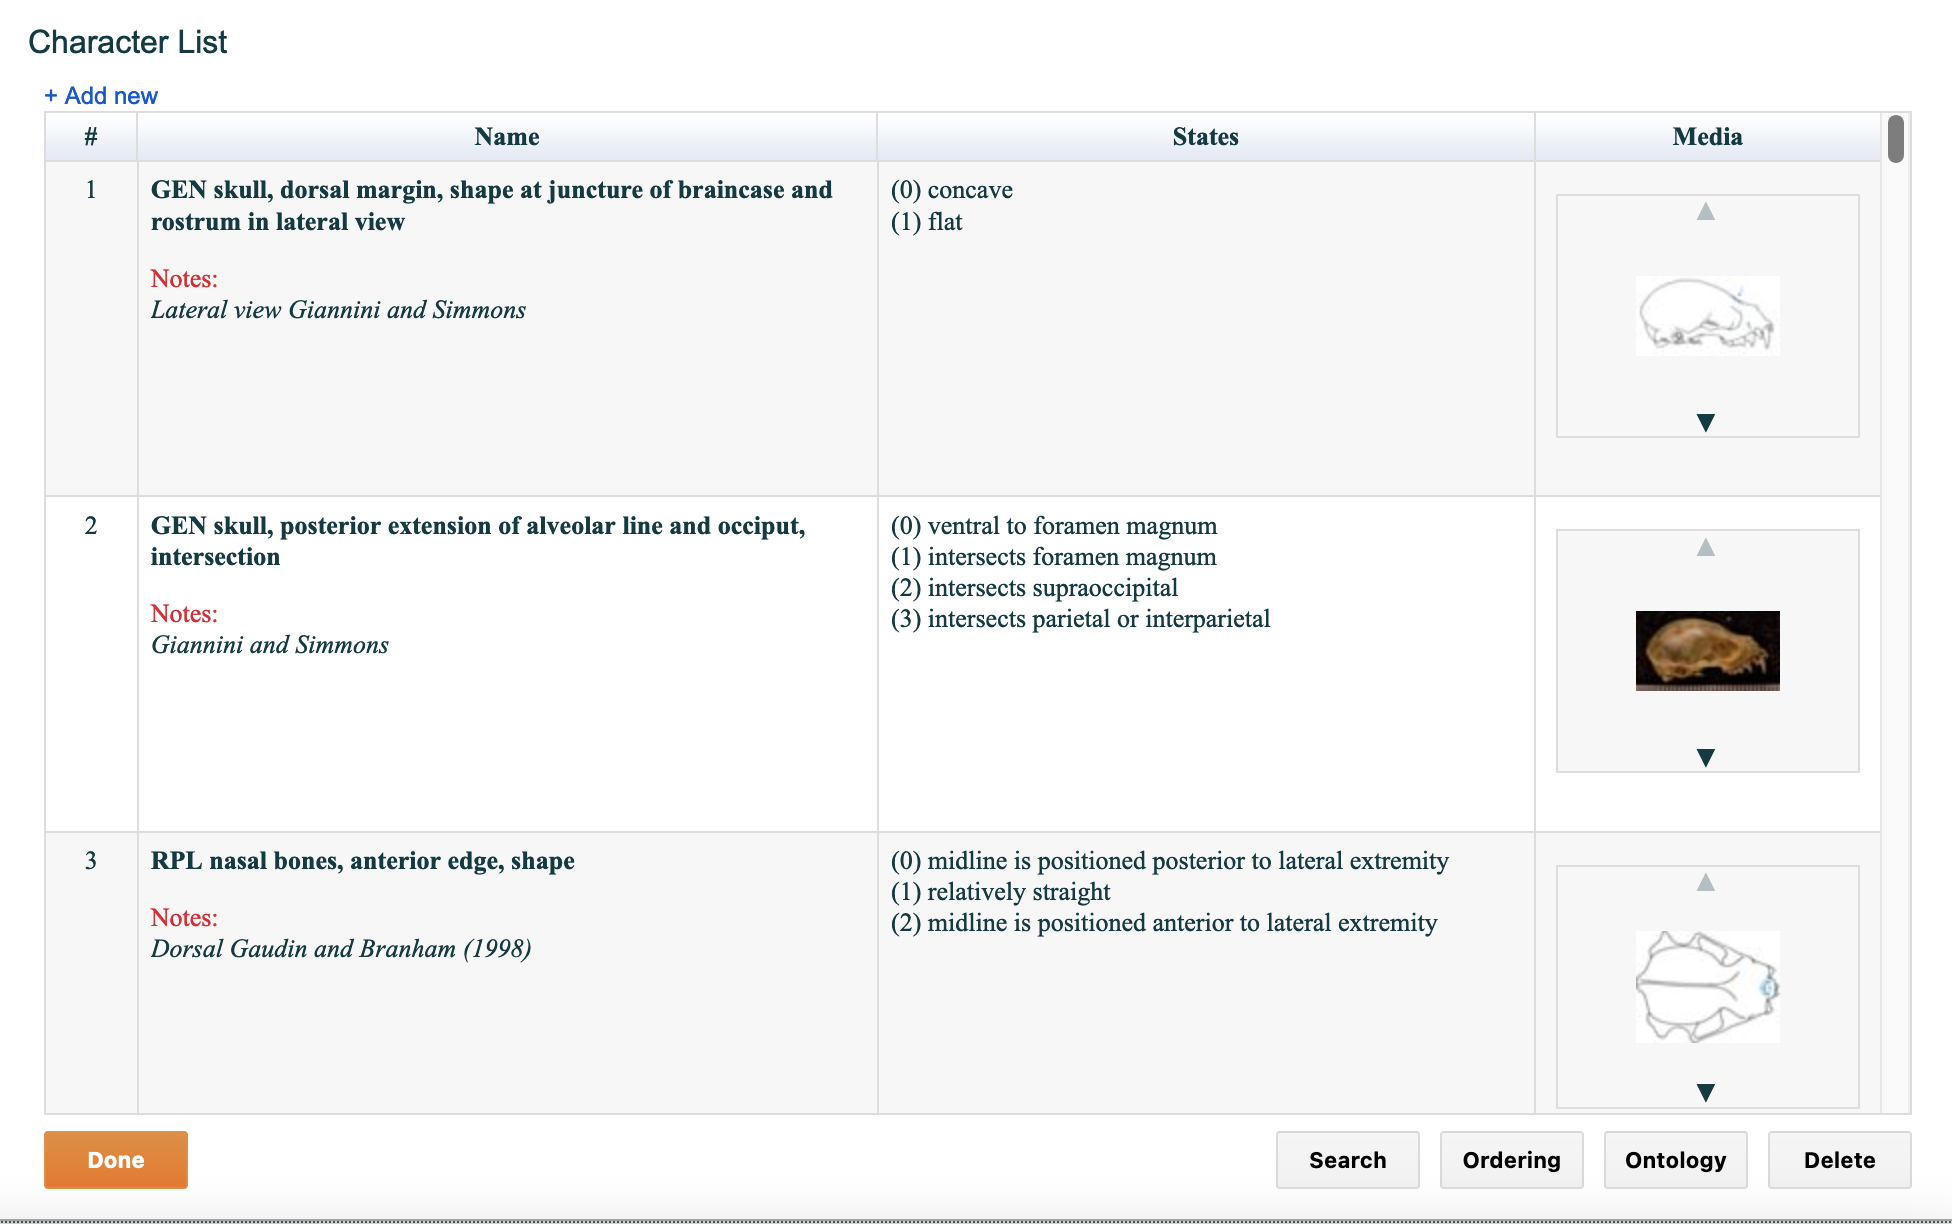
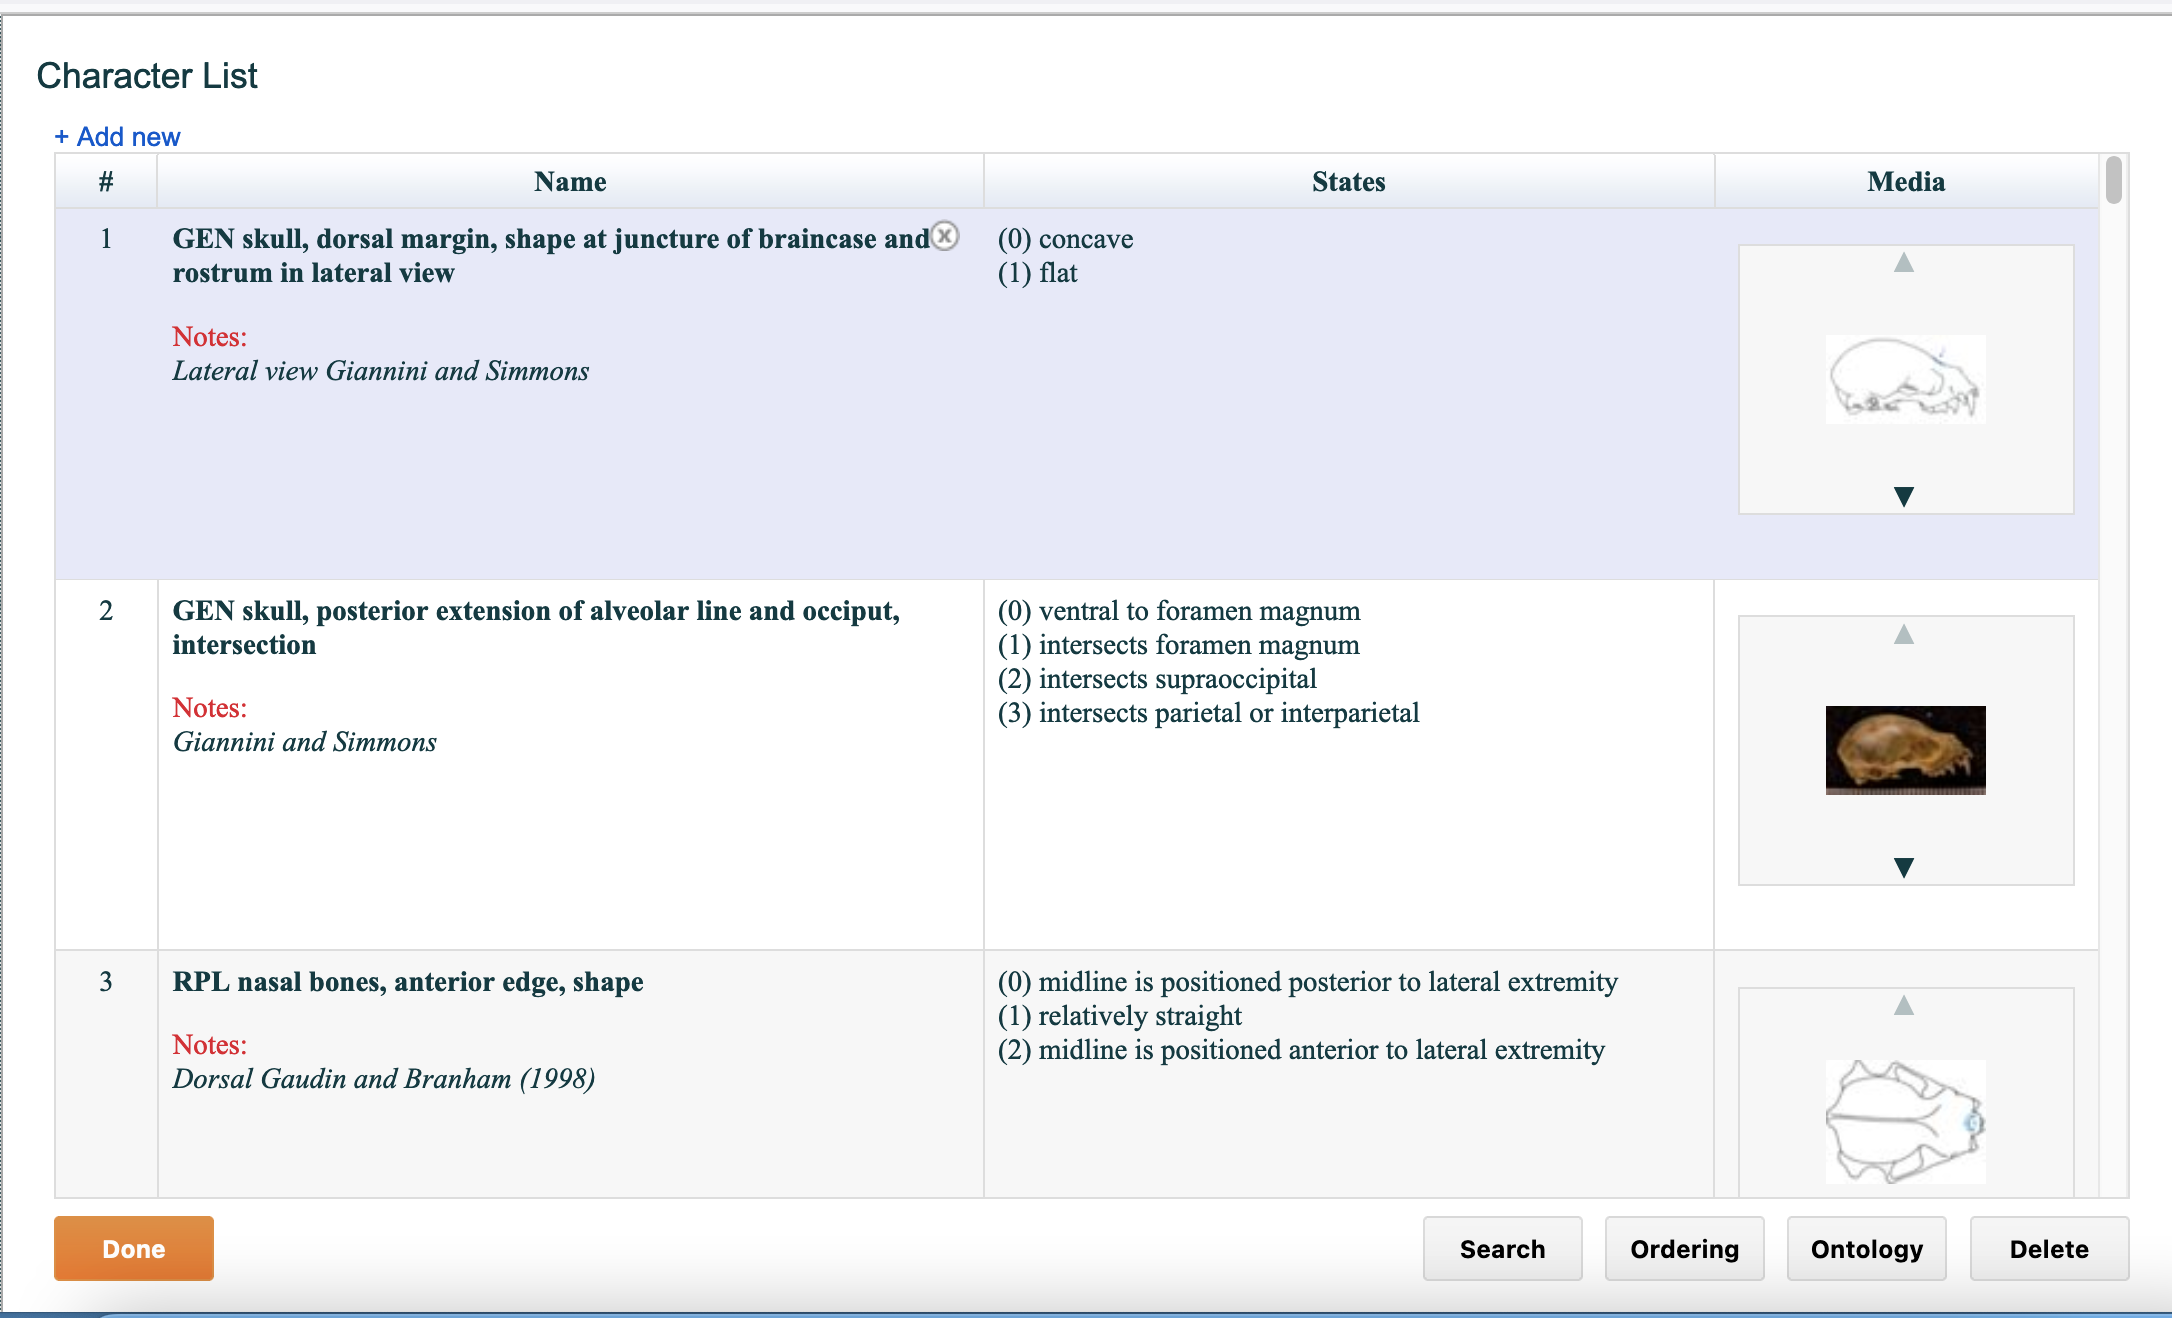
As shown in the figure below, the character editor provides a number of useful features designed to streamline the management of character data. When you select the word "Characters" button on Matrix page, you will see a screen called "Character List," a list of characters from the current matrix. The characters are displayed in the same order in which they appear in the matrix.
You can make changes to a character (assuming you have project-level privileges to do so) by opening the "Character Editor" and double clicking on the character number or name. You may delete by using the "x" button to delete. To select a range of characters, click on the first character in the range, then click on the last character in the range while simultaneously depressing the shift key on your keyboard. If you need to move a character or set of characters, you may drag the selection to its new location by clicking on a selection of characters and, with the mouse button held down, dragging it with your mouse to its new location. The delete and move functions work on single or multiple character selections.
Figure 4.3. The Character List
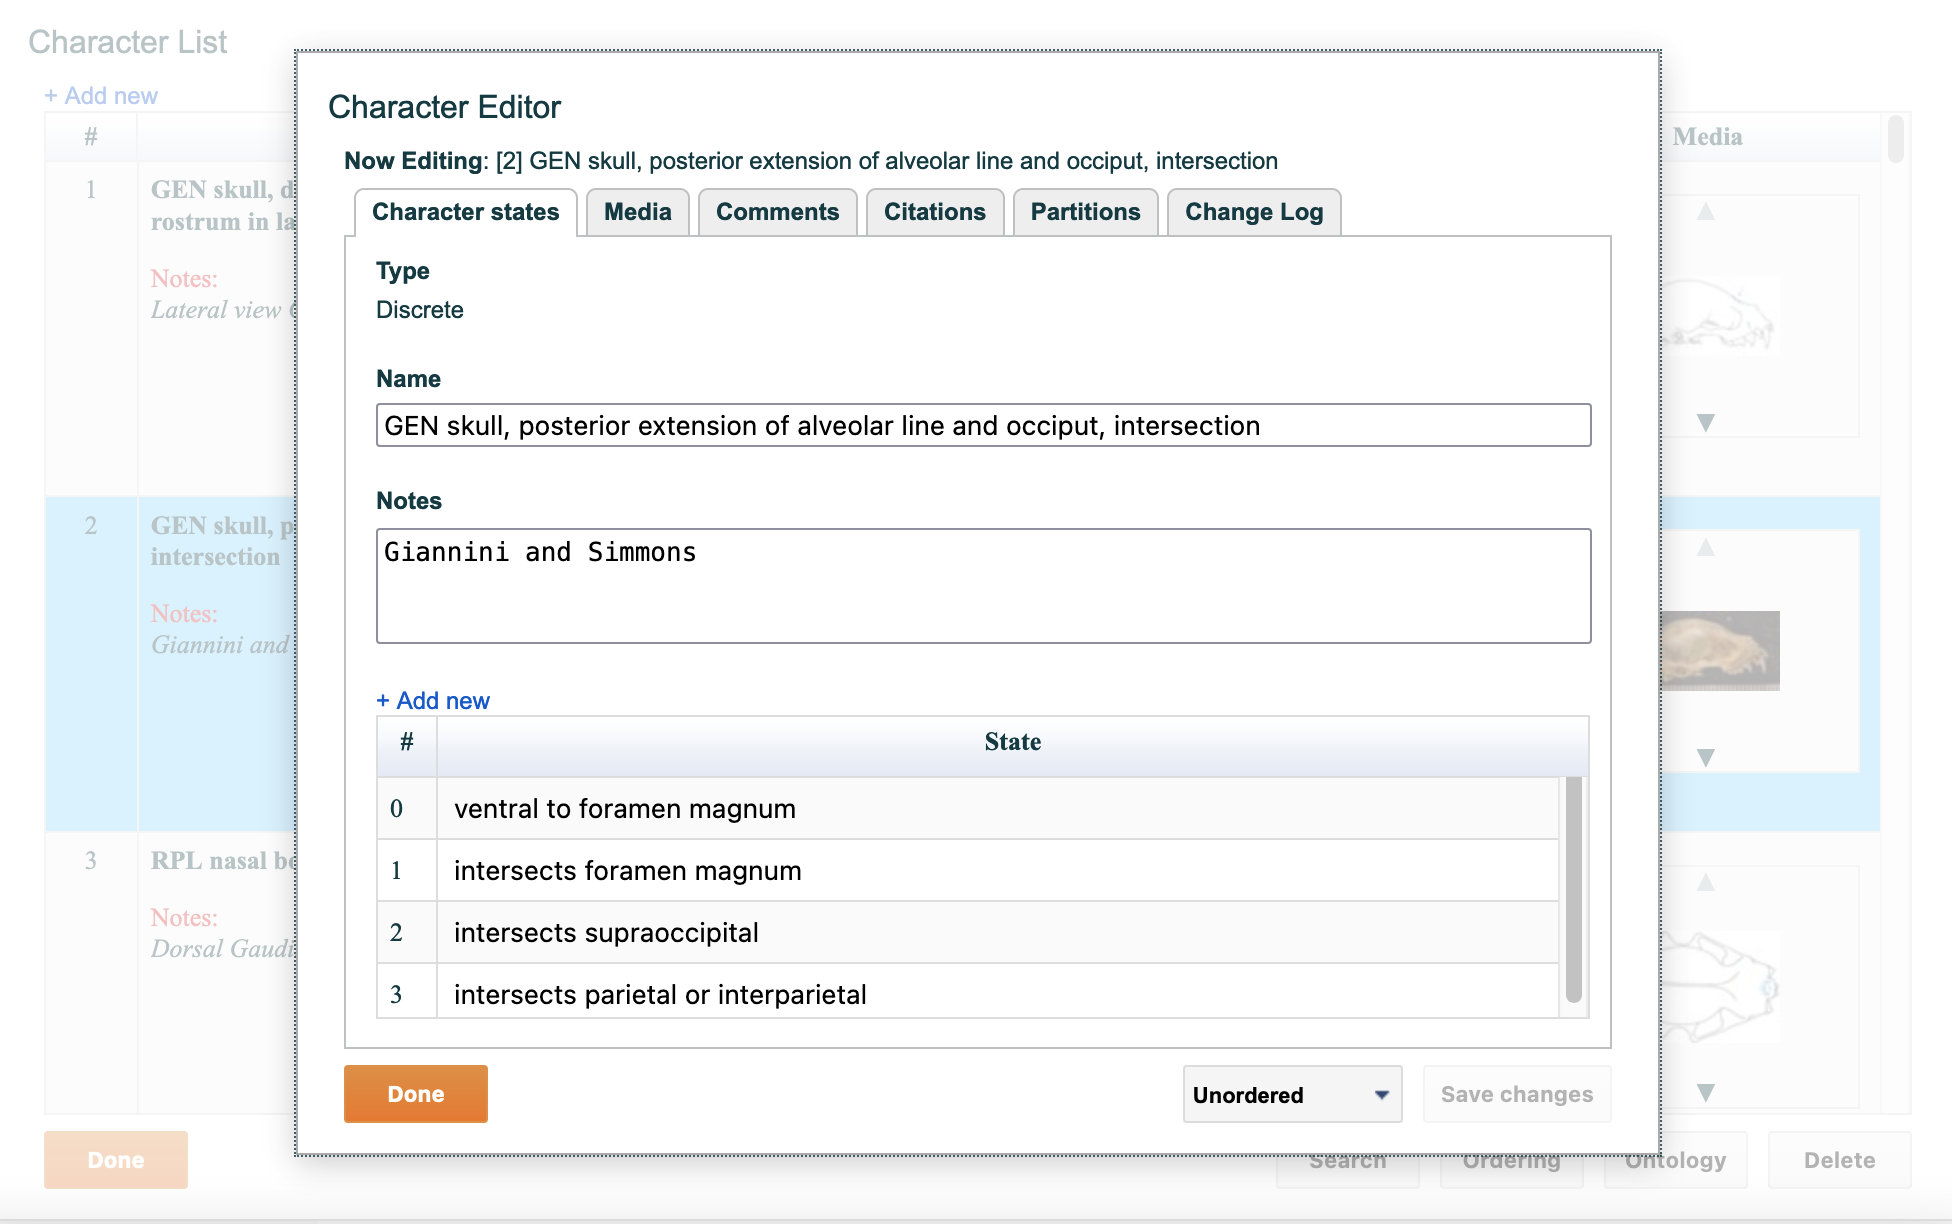
Figure 4.4. The Character Editor
4.2. Adding Characters
4.2.1. Adding a single character
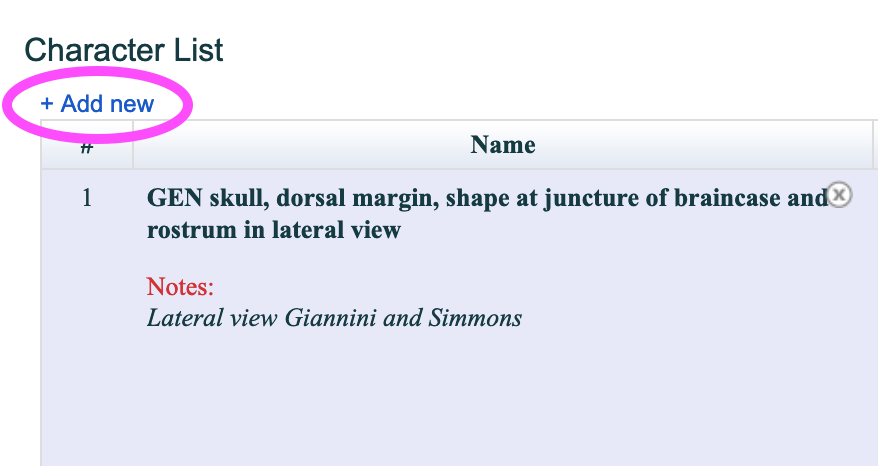
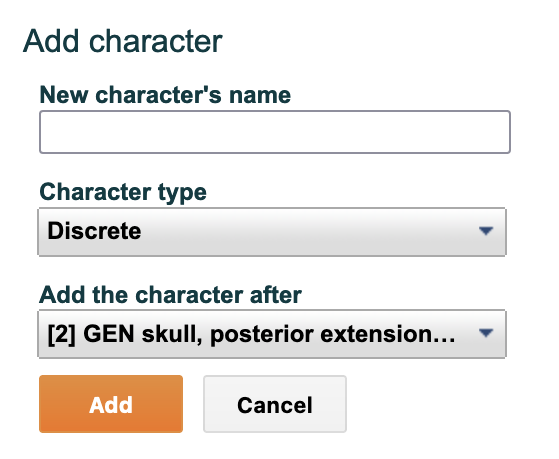
To add a new character click "+ Add new" in the upper-left corner of the Character List. A new screen will appear called "Add character." Enter the name of the character, its type and where it should be positioned. Then click "Add".
Figure 4.5. The add new character button
A new window will appear called "Add character." Enter the name of the character, its type and where it should be positioned. Then click "Add".
Figure 4.6. The add character form fields
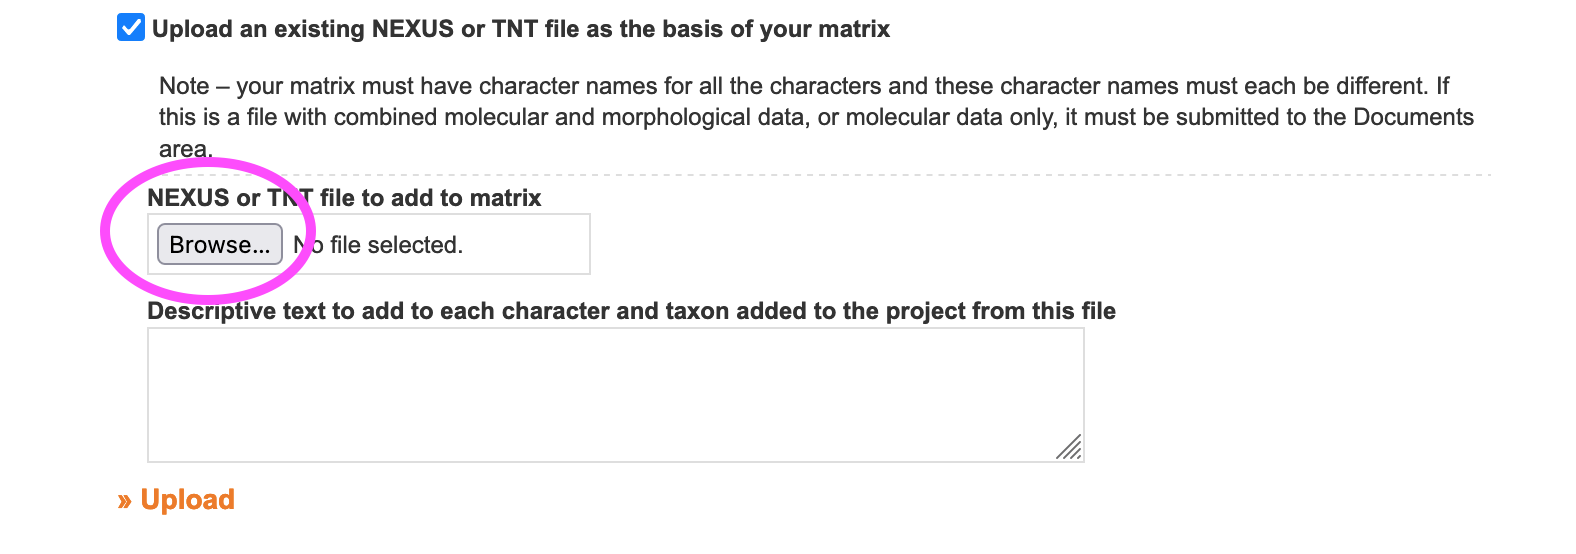
4.2.2. Batch adding characters using a NEXUS or TNT file
When uploading a NEXUS or TNT file to create a matrix, all characters and states present in the file are automatically added to the character directory. This is a collateral effect of importing a matrix but can be used to batch add characters and is especially convenient if your data is already in NEXUS or TNT format.
Because characters are shared across matrices in a project, you can load a matrix from a NEXUS or TNT file, then use the characters from the imported matrix in other matrices created directly in MorphoBank.
For projects that need to consolidate characters from disparate NEXUS or TNT format datasets into a single set, using MorphoBank's NEXUS import capability may be a convenient option.
The workflow we recommend is creating one large supermatrix and using the partitions feature (described elsewhere) to examine or export subsets of the matrix.
4.3. Searching for characters
To find for a character, click on the Search button in the Character List window and enter your search terms into the box. This action will return all characters that match your terms.
Figure 4.7. A typical search in the Characters List, here with 13 results returned
The Character List will substitute a list of all characters whose name or description contain the search terms in place of the full list of characters. Found characters are always displayed in the order in which they appear in the matrix. You can search for matches that begin or end with some text using the wildcard asterisk (*) character. So, for example, to find all characters whose name, number or description contains the word "pavement" you would simply search on "pavement." To find characters having words beginning with "pave", for example, you would search on "pave*" When you are done with the results of your search click on the "Done" button to return to the full character list for the selected matrix.
4.4. Moving characters
Each matrix has its own sorting order for characters. By default, the order of characters in a matrix is that in which they were added (or appeared in the imported NEXUS/TNT file.) However, project members may arbitrarily reorder characters in a matrix by drag and drop in the character editor.
4.5. Editing characters
To change any aspect of a character in the list, double click on the character number or name. A window, shown in the figure below, will open enabling you to edit all aspects of the selected character including:
edit the character's notes.
add, edit and remove character states.
link media to characters and character states.
add labels to media linked to characters and character states.
add citations to a character.
view member comments associated with a character and its states.
view the change history for a character
- add a character to or remove it from a partition
Figure 4.8. Editing of basic character information in the Character Editor
The editor is divided into six screens which may be accessed using the navigation tabs at the top of the editing window. The functions present on each screen are described below.
4.5.1. "Character states" tab
The "character states" tab lets you change basic character information such as character name and the notes for the character as well as add, edit and delete character states.
To add a state, click on the "+ Add new" text above the existing states. A new state will appear in the list. Click on the name to edit it. To reorder states click on and drag the state in the list by its number to the desired position. The states will automatically renumber themselves such that they are always sequentially numbered starting from zero. To remove a state, click on the state in the list, and then click the "x" button that appears on the right.
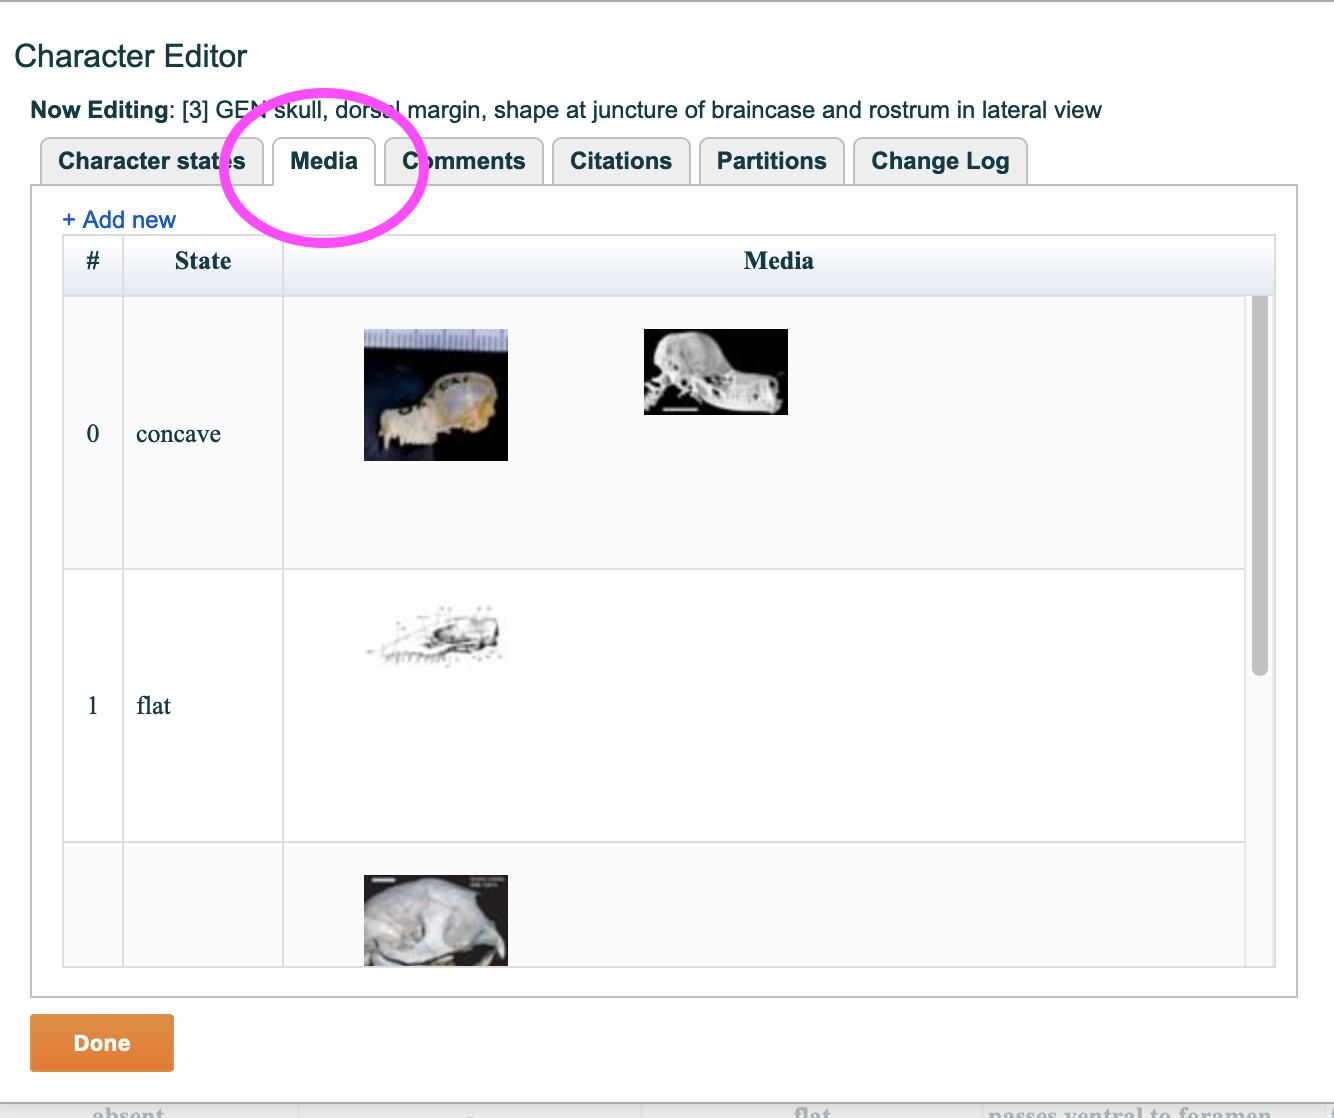
4.5.2. "Media" tab
Any number of project media may be attached to either a character or character state using this screen.
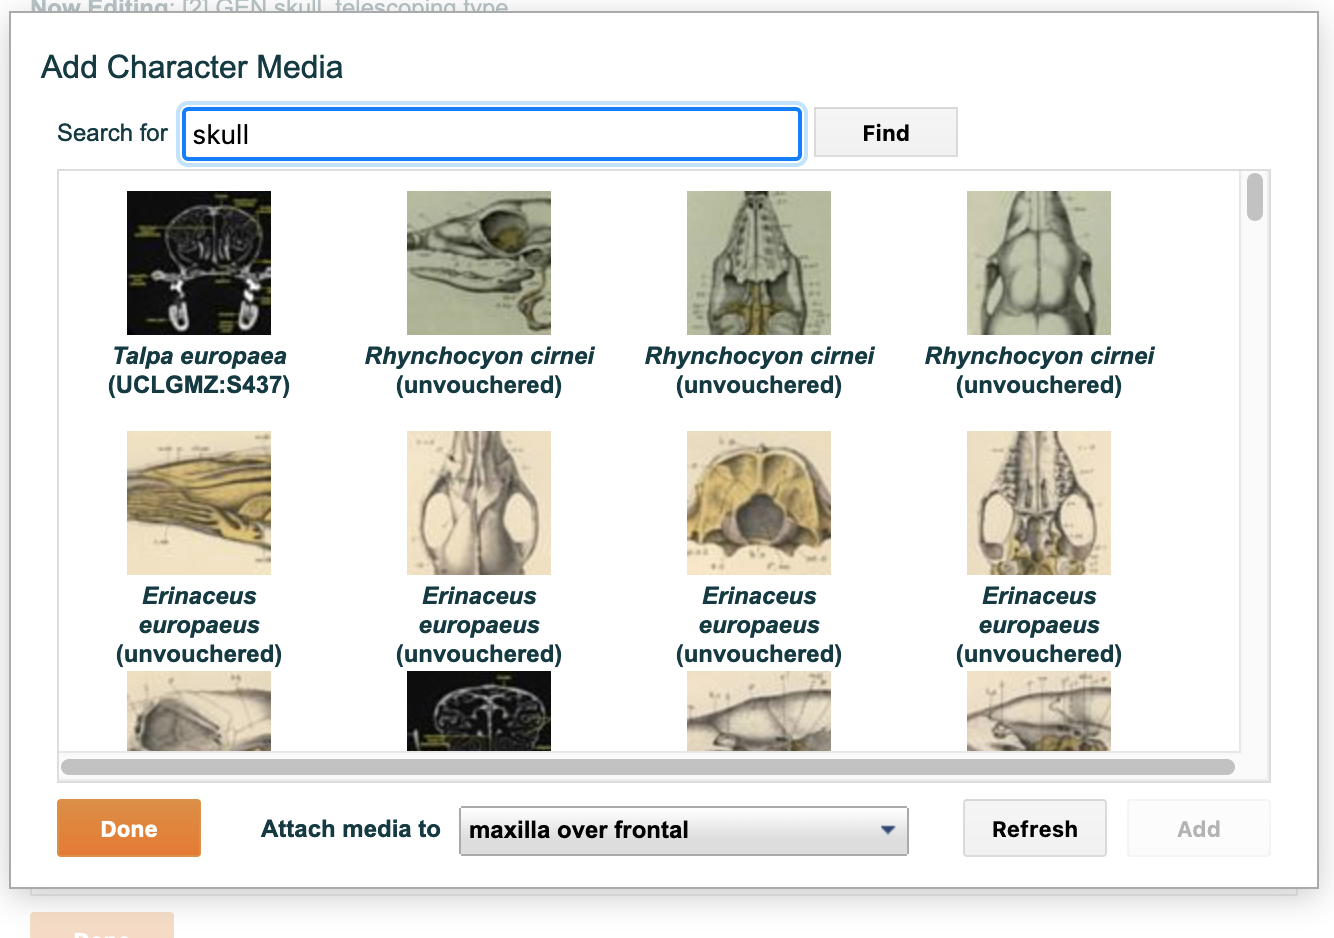
The screen lists all character states. To add an image to a specific state, click on the "+ Add new" text in the upper left or on the state itself in the list. A media selector window, as shown in the figure below, will appear allowing you to locate and link media from your project.
Figure 4.9. The character media tab
To find media for a character or character state, type text into the "search for" text entry box. This text can be, for example, a taxonomic name or a view. Then click on the "find" button. A list of relevant media will be displayed. Click on the desired media and click on the "Add" button on the bottom right to link it to the selected state or to the character in general. The character itself appears last in the list on this page after all the states. The search performed by the "media" field to find relevant media is broad, searching on the following data:
Table 4.1. Character media search summary
| Project item | Item fields searched | |
|---|---|---|
| 1 | Taxa | Phylum, class, order, suborder, superfamily, family, subfamily, genus, species, subspecies, author, year, notes |
| 2 | Specimens | Institution code, collection code, catalogue number |
| 3 | Views | View name |
| 4 | Media | Media accession number, Copyright information, notes, extended information fields |
You can search for partial matches by using the asterisk (*) wildcard character. For example, to find all media associated with words starting with the letters 'dent' search on 'dent*' Similarly, to find media associated with words ending is 'ism' search on '*ism'.
Figure 4.10. Attaching media to a character
4.5.2.1. Labeling media associated with characters
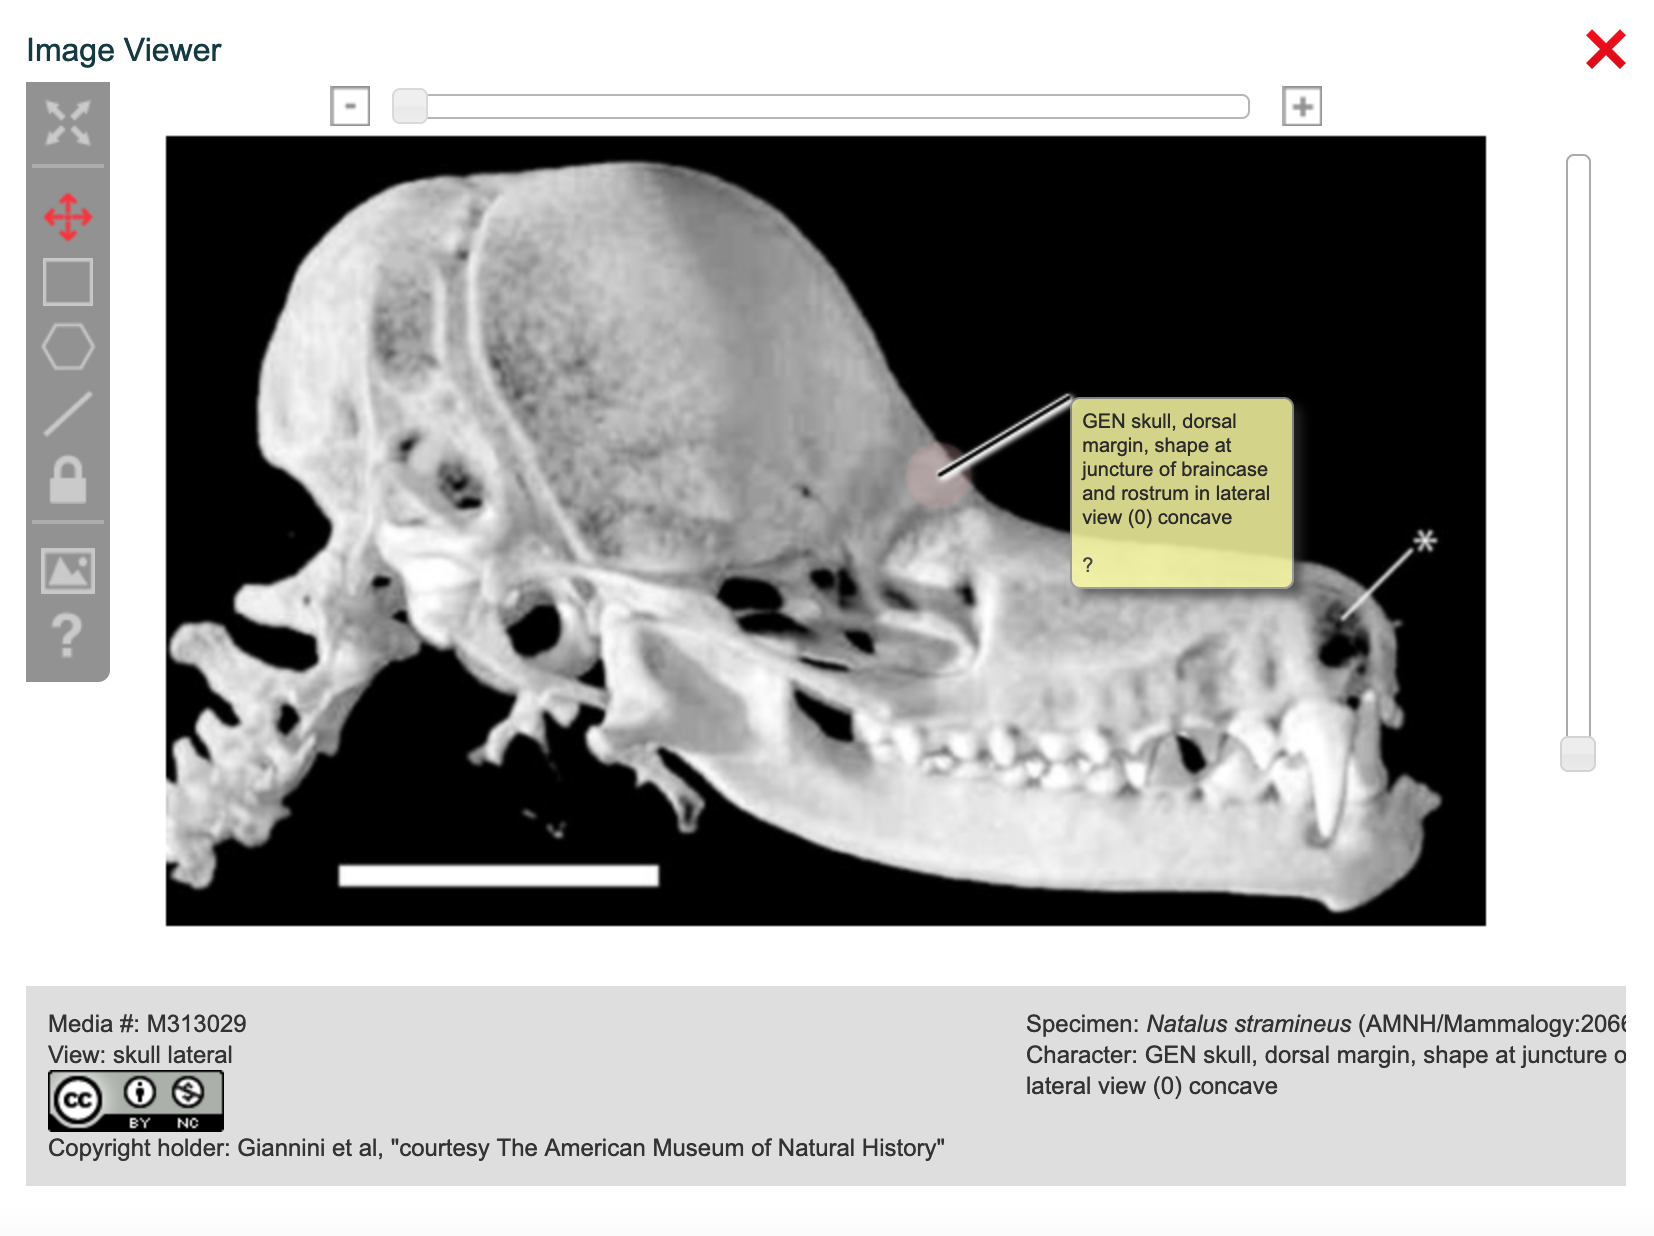
You may add character-specific labels to images associated with specific characters. To do so click on the thumbnail of the image in either the character editor "media" tab or on the small thumbnail images appearing next to characters and states in the character list. A new window will appear, as shown below. You may add labels to the image in this window in the same manner as is done in the matrix editor (see Media view). Note that labels added in this window will only appear when the image is displayed for the selected character. When the image is used in other contexts (e.g., in a matrix cell, or as a depiction of the specimen) these labels will not be visible.
Figure 4.11. Character image viewer and labeling of character images
4.5.3. "Comments" tab
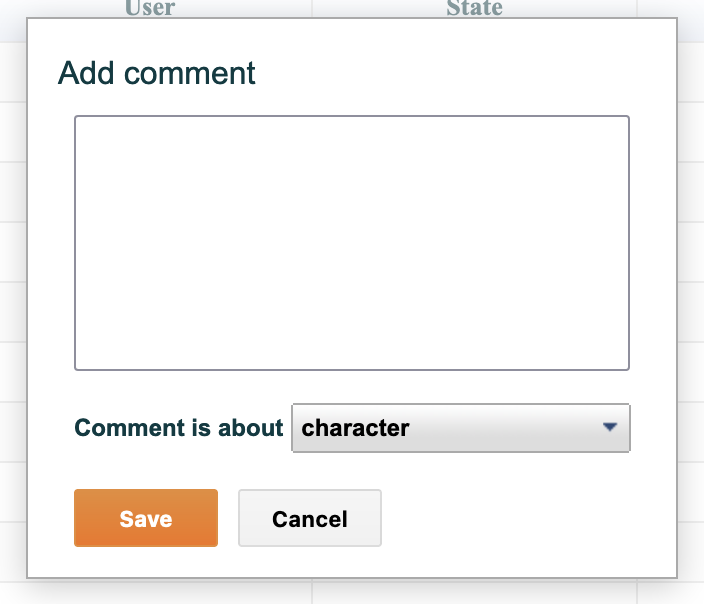
All project members - full or observer - may add comments to any character or state in a project. Comments are recorded with the date and time they were made and the identity of the commenter and are displayed in the "comments" tab listed with the most recent first. You may also add a comment to the character or a specific state by clicking on the "add comment" button at the bottom of the screen.
Comments are a permanent part of the project record and cannot be changed or deleted once made.
Figure 4.12. Adding a comment
Figure 4.13. Selecting whether a comment applies to a character or a state
4.5.4. "Citations" tab
You can use the "Citation" tab to add, edit, or remove citations from a character or state. To add a citation, choose the "add citation" button from the bottom-left corner of the screen. A new window will appear which will allow you to search for a reference from within your project's bibliography. Type a search term next to the "find" button on this page, and select a bibliographic reference from the list that appears. You will also be able to add page numbers and any specific notes pertaining to that reference in relation to the character in this window, or in the "Edit citation" window after the fact. Press "Save" when you are satisfied with your citation.
Figure 4.14. Adding a citation to a character
4.5.5. "Partitions" tab
Partitions are subsets of taxa and characters in your matrix. These are one of the most useful tools for examining parts of your data. You can display a partition on screen or download a partition for analysis. It is an excellent workflow to create a single large matrix and then use several partitions to publish subsets from that matrix. You can create as many partitions as you wish.
Figure 4.15. The Partitions tab showing three sample partitions
4.5.6. "Change Log" tab
MorphoBank keeps a log of changes made to a character and its constituent parts - states, media, notes, etc. - which may be viewed in the "Change Log" tab. Each change is noted with date and time, the identity of the member committing the change, and the precise value of each field after the change.
Figure 4.16. Using the Change Log Tab
5. Using Matrices
MorphoBank supports editing and display of dynamic phylogenetic matrices of morphological characters with labeled images and other metadata demonstrating homology statements. It implements many of the data editing functions of widely used desktop programs such as Mesquite and Nexus Data Editor in a networked, collaborative environment.
Unlike previous systems for phylogenetic research which focused primarily on the development of text-only matrices and trees, in MorphoBank, media - and particularly images - are first class citizens. MorphoBank matrix development features are fully integrated with media management features. You may place images - intelligently selected based upon taxonomy - into cells with cell-specific labels to document your homology statements. High resolution imagery is supported with continuous pan and zoom and labels that maintain their scale and position as images are enlarged and reduced for inspection. This makes it possible to include detailed visual documentation of each assertion in your matrix dataset.
MorphoBank also permits team collaboration on a single copy of the matrix, analogous to several authors editing a single manuscript in Google Docs.
5.1. Adding new matrices
You may create matrices in MorphoBank from scratch or upload an existing Nexus or TNT file that has been created in a desktop program like MacClade, Nexus Data Editor, Winclada or Mesquite. When you import a NEXUS or TNT file, all of the taxonomy, characters and states, cell scorings and notes, are imported into a matrix in your MorphoBank project. MorphoBank does not have tools for manipulating trees or sequence data. Therefore any data blocks present in the file that are not supported by MorphoBank (trees in a TREE block, for example) are imported as-is and exported untouched.
Figure 5.1. Two different options for adding a matrix
5.1.1. Starting a New Matrix from Scratch
When creating a new matrix in MorphoBank you have two choices: you can start from scratch and enter characters, states, taxa and cell scorings one at a time, or you can import an existing matrix (or matrices) created in some other application.
Figure 5.2. New matrix form
The matrix "Title" is simply an easy way for you to refer to your matrix. The operational taxonomic unit drop-down, which defaults to "Genus," should also be set, see “The Operational Taxonomic Unit (OTU)”.
If you simply fill in the Title, set the OTU and click on "save" you will create a new matrix with a single "dummy" taxon and character (all matrices must have at least one character and one taxon). You can open this matrix in the editor, change the dummy character and taxon to suit and begin adding additional character, taxon and scoring data.
5.1.2. Importing a Matrix from a TNT or NEXUS format File
If you have existing matrices, whether created in software such as Mesquite or MacClade or in a text editor, that are in NEXUS or TNT format, you can import those directly into MorphoBank as a starting point for your MorphoBank matrix. To do so, click on the Browse button and select your data file. You can also specify text to add to the notes data of each taxon and character imported from the file.
Note
Figure 5.3. Selecting a TNT or Nexus file from your desktop to load to MorphoBank
When you are ready, click on "Upload." File import can take some time so be patient. Most files take well under a minute to import, but very large data sets have been known to take five minutes or more. Once the import is completed, you will be presented with the list of characters and labels, followed by the taxa to review before saving to the database.
Figure 5.4. Review screen for taxon list prior to database save.
5.1.2.1. File import caveats
NEXUS is a loosely defined format that has never been definitively standardized (see Vos et al. 2012 for an interesting discussion about NEXUS limitations). Various software applications import and export NEXUS in subtly inconsistent and incompatible ways. MorphoBank tries to accommodate as many features and oddities as possible but there are still a number of caveats to keep in mind as you gather data to import into MorphoBank.
If MorphoBank rejects your uploaded file first look over the list of advice below. If your file is still unusable, then contact us via the "Ask Us" link in the header for assistance.
5.1.2.1.1. Only morphological data is accepted
MorphoBank only accepts files containing morphology data. It is possible to create NEXUS files with a mixture of morphological and sequence data, or with sequence data alone. These files will be rejected by MorphoBank. Unless one uses non-standard extensions to the NEXUS format, such as the MIXED datatype, it is not always clear what is morphological data and what is not. If you have mixed matrices, remove the sequence data before uploading the file to MorphoBank.
If you need to keep sequence data with your project, for publication or convenience or both, you can upload files containing the data to MorphoBank as a document. Unlike NEXUS or TNT file uploads MorphoBank simply stores documents - it does not attempt to manipulate or verify the uploaded non-morphological data in any way.
5.1.2.1.2. Supported NEXUS blocks
MorphoBank extracts data from the TAXA, CHARACTERS, DATA, ASSUMPTIONS and NOTES blocks. All other blocks are extracted as-is and retained. When you export a MorphoBank matrix as NEXUS, these blocks are reincorporated into the output file.
This allows files with tree data (for example) - data which cannot be manipulated with MorphoBank tools - to be uploaded. Data not usable in MorphoBank are preserved, although of limited use while using the system.
5.1.2.1.3. Bad data
Most desktop programs are quite forgiving of NEXUS data irregularities and errors, such as having two characters (or taxa) in the same matrix with the exact same name. MorphoBank employs a relational database with a more formal data model and is less forgiving of errors. In some cases it will reject your data outright, and in other cases it will revert to default values in an attempt to make the data work.
Known issues
- Blank characters or taxon data: all characters, character states and taxa should have names defined.
- Two or more characters with exactly the same name: MorphoBank will load these as distinct characters. For example, if there are three characters called 'cranial shape' in the file, they will be called 'cranial shape', 'cranial shape - 2' and 'cranial shape - 3' after upload.
- Two taxa with the same name will cause the upload to fail. The taxa need to have distinct names. Update the file and reload.
- In MorphoBank, where taxa and characters with the same name are considered the same thing, duplicates can have strange and unintended side-effects. Make sure duplicates are resolved before importing into MorphoBank.
- Files without any character names defined will fail to load. Update the file and reload.
- Files with generic character states will generate errors that can be fixed using the MorphoBank interface. Update states like 'State 0' to more informative text and save.
- Cases where there are more character states defined in the text than are scored in the matrix will be flagged. If this is correct, click 'Confirm'. If this reveals character states that should be merged, edit using the MorphoBank interface, save and proceed.
- Poorly formed NEXUS files: don't modify your NEXUS by hand unless you really know what you're doing. It rarely works. If a NEXUS file lacks internal consistency, as many hand-modified files do, it will be rejected. Examples of inconsistency include MATRIX blocks with characters and/or taxon counts that differ from the number of character and/or taxon counts present in other blocks, partitioned data with mismatched lengths or names, etc.
Figure 5.5. Error in loading characters if a generic character state is present in the file.
Figure 5.6. Character label/state editing screen
Figure 5.7. Potential error in loading characters, Edit or Confirm to clear the error message.
After importing a NEXUS file, you should always give the resulting MorphoBank matrix a quick look-over to make sure everything is as it should be. In general, if it looks good, it is.
Note
5.2. Merging Additional Matrices into an Existing Morphobank Matrix
MorphoBank allows you to upload TNT or NEXUS files and to concatenate them with an existing matrix at any point after the matrix has been created. The contents of each uploaded file are merged with those of the existing matrix. This procedure provides a mechanism for consolidating multiple TNT or NEXUS format datasets into a single Morphobank matrix. To upload one or more TNT or NEXUS files to an existing matrix, click on the small grey button entitled "Set up this Matrix" directly below the matrix summary information. Note that you will only have access to this editor if you are the Project Administrator or the user who created the original matrix. You can add a TNT file after you have added a NEXUS file or vice versa.
Figure 5.8. Step one: Click on the "Set up this Matrix" button.
You will see a checkbox that says "Merge a NEXUS or TNT file with this matrix." Once the box is checked, you will have the option to choose a file to add to the existing MorphoBank matrix. You will also be able to add descriptive text to each character and taxon added to the project from this file.
Figure 5.9. Merging an additional matrix with an existing MorphoBank matrix
As additional files are successfully imported, MorphoBank will give you taxon, character and cell scoring totals for both the current file and the merged matrix. Any characters and taxa present in the uploaded NEXUS or TNT file but not in the matrix will be added to the matrix. Cell scores for existing taxa/character pairs will be merged with the existing matrix data.
When you merge two matrices, MorphoBank will concatenate the rows and columns in all cases where the characters are not identical.
Warning
There are a couple of common issues to be aware of when utilizing this feature. First of all, note that while MorphoBank supports non-alphanumeric characters (i.e., characters other than letters) in character and taxon names, TNT files do not support these. When exporting matrices as TNT from MorphoBank, punctuation will be stripped from the names of all taxa, characters and character states (otherwise MorphoBank would not be outputting functional TNT files). Attempting to merge data so exported with other MorphoBank matrices (that retain characters like punctuation) may cause unintended duplication of characters and taxa due to punctuation present in Morphobank but stripped from the TNT file. You may wish to use Nexus format when merging to avoid such problems. Secondly, when merging matrices MorphoBank only looks at the character name, not the character sequence, to assess duplicates. For example, if you have a 3 character matrix on Morphobank in which characters 1-3 are: 1. Tall; 2. Round; and 3. Aquatic and you merge another matrix containing these same three characters in a different order (1. Aquatic; 2. Tall; 3. Round), MorphoBank will identify these characters as duplicates of the first matrix and will merge them in the new combined matrix.
5.3. Editing
All matrices in a project appear as a list accessible by clicking on the Matrices tab in the left-side navigation. As shown in the figure below, the list includes summary information for each matrix and a series of buttons implementing useful functions, from editing to downloading:
Figure 5.10. The matrix tab showing the matrices in a project as a list. In the example shown, the project has one matrix. Note that this is the view seen by the Project Administrator. Project Members see a subset of these tools.
Edit matrix opens the matrix for editing in the MorphoBank matrix editor application, which will appear as a new window. This option is distinct from Set up this matrix. The latter is only available to the Project Administrator.
Set up this matrix allows the Project Administrator to adjust access and publishing settings, and gives them the option to merge another TNT or NEXUS file with the existing matrix. This screen is also another entry point from which you can click on buttons that will enable you to add a new matrix, edit the matrix, or edit characters. This tool is only available to the Project Administrator.
Download options lets you download the full matrix to your desktop in a variety of formats displayed as a pull down list:
Note
Figure 5.11. The matrix download options
Download NEXUS w/o notes lets you download the full matrix as a NEXUS file to your desktop, but with all the cell and character notes entered in MorphoBank stripped out. For some datasets this can produce a much smaller file for sharing with colleagues or running a tree.
- Download NEXUS lets you download the full matrix as a NEXUS file to your desktop with all the cell and character notes (NOTES block) embedded in the file. MorphoBank does not guarantee that these notes can be read by desktop programs.
Download NeXML lets you download a file in NeXML format, which is, as the name implies, an xml format that represents the matrix data. It is inspired by NEXUS, but more flexible and designed to facilitate exchange. Character notes are not included.
Download TNT lets you download a file with the matrix in TNT format.
Warning
If the matrix (1) contains continuous characters then it cannot be downloaded as a NEXUS file; or (2) contains meristic characters then it cannot be downloaded as a TNT file.
Additional buttons
Download character list allows you to download to your desktop the characters in your matrix, with or without notes. The download is formatted as a text file.
- Edit Characters opens a list of characters in the order they appear in your matrix. You can edit the characters, states and their notes and media in this screen. Changes here will automatically propagate to the matrix itself.
Download data partition allows you to download a specific partition of your matrix from the list of partitions that you create. You will only see this button if you have created partitions.
Figure 5.12. The option to download a partition of a matrix.
The Matrix Preferences icon (to the right of the "Edit matrix" button) allows you to enable streaming for your matrix. This is important particularly in the case of large matrices. Based on the size of your matrix MorphoBank calculates automatically whether to stream your matrix while you work or load it all at once. Click the arrow to change the setting. MorphoBank will tell you if the matrix is too large to load at once. Choice of streaming vs. an upfront load is not based on the size of media in a project but on the size of the matrix. Matrices with greater than 50,000 cells will be streamed to ensure optimal server performance for the entire MorphoBank community.
Figure 5.13. Force streaming a large matrix
5.3.1. Tree-building Options
MorphoBank partners with CIPRES (Cyberinfrastructure for Phylogenetic Research) to allow users to run a matrix and search for a tree (or trees) using the Parsimony Ratchet. The Parsimony Ratchet improves your ability to find shortest trees during heuristic searches on datasets. You will be able to run your matrix on the Web by sending it to the online algorithms at CIPRES without leaving the MorphoBank environment. There are several settings you must define from within your MorphoBank project for the process to work. First, you will need to create a name for the job and add any helpful notes. Then, you will need to set parameters. Choose a Branch-swapping Algorithm to inform a heuristic search for a starting tree. Then PAUP will perform two searches for each of whatever number of iterations you specify. In the first search a subset of your characters will be assigned a weight of 2, and in the second all characters will be equally weighted. You must choose the number or percent of characters to permute.
Figure 5.14. Accessing tree-building tools
Figure 5.15. Details of tree-building tools
After your chosen number of iterations, CIPRES will return the resulting set of files to the MorphoBank Matrix page. Your underlying matrix will remain unchanged.
Figure 5.16. Access to analysis results via 'Download' button
5.3.2. Editor overview
The matrix editor is a web application that allows project members to edit a phylogentc matrix collaboratively in an environment implementing many of the editing functions of familiar desktop software. There are a few significant differences between the MorphoBank matrix editor and desktop applications that you should keep in mind as you work:
There is no "save" button in the editor. All changes to the matrix are saved to the database as you make them.
There is no automatic "undo" button in the editor. All changes to the matrix are permanent. MorphoBank does track changes made to the matrix, however, and keeps version information. You can access this information to pinpoint when and by whom specific changes were made. The change history includes enough information for you to reconstruct most aspects of a matrix at any point in its development.
Changes you make are instantly visible to other project members. You don't have to send them files to make your work accessible. Everyone is always using the latest data.
Character states must be defined before use. You cannot simply enter the number "3" into a cell without first entering a definition of state 3 into MorphoBank.
You can always export your matrix as NEXUS for use with other NEXUS compatible software. However, linked images will not be included as the NEXUS format does not formally support them.
Figure 5.17. The matrix editor in image display mode and the pull down menu showing different display modes
The layout of the editor is shown in Figure 5.6, “The matrix editor in image display mode”. Buttons providing access to various tools to manage taxa, characters and views of your data are arranged across the top of the editor. The rest of the editor display area is reserved for the display of matrix data. As is traditional, characters are listed horizonally along the top of the matrix display; taxa are listed vertically along the left-hand side.
You can obtain additional information about a taxon, character or cell by placing your mouse point over the item of interest and waiting a second or so for an overlay "tooltip" to appear. To edit any character, taxon or cell, simply double click on it with your mouse. The various editing windows which appear when double-clicked are described in detail in the following sections.
5.3.2.1. Tools
When using the editor you are always in "edit" mode. That is, you can always double click on a taxon, character or cell and change them (assuming you have privileges to do so, of course). Other matrix functionality is accessible via a set of controls arranged along the top of the editor and shown in Figure 5.7, “Matrix editor controls”
Figure 5.18. Matrix editor controls
The tools are:
The Highlight drop-down menu lists options for highlighting of cells. Options other than "no highlight" will color in red cells that match the highlight criteria . One exception: the "with colored cells" option will color cells in different colors based upon their states (e.g., 0 = red, 1 = yellow, 2 = blue, etc.).
- The Show button is a pull down menu that offers different ways to view your data, for example, with images displayed, with character names, or with numbers only or different combinations of these options. The menu lets you set the view mode for the matrix. By default the view includes state numbers and any associated images. Because the cells must be relatively large to accommodate images, the number of cells onscreen at one time is limited. Other modes provide denser displays with varying amounts of information displayed per-cell.
- The Characters button opens the Character List editing window that is a gateway to editing characters as a list. If you double click on any character in the list the Character Editor opens presenting you with a number of character editing tools (see Figure 4.2, “The character editor”). Note that you can also access the Character Editor directly from within the matrix editor by double clicking on any character at the top of a column.
The Taxa button will open the Matrix Taxa List Editor window described in futher detail below. This window allows you to reorder the taxa in your matrix, add new taxa to the matrix from your project's taxa list and remove taxa from the matrix.
The Search button allows you to find matching taxonomic or character names in the matrix editor. It supports partial matching of taxonomic names, character names and associated notes. To search, click on the button and enter your search in the search window that appears. Select either "taxa," "characters" or "cells" as your search type then click "done." The search will list all matches. Double-clicking on a match will scroll the matrix to the location of the match.
The Batch button provides access to features allowing you to set the score, and/or attach media and bibliographic citations to a range of characters for a given taxon in a single action. To do this, select whether you wish the function to apply to a row or a column, then select a taxon, select one or more characters, and then click on one of the "set" buttons. You can also use the Batch editor to reduce duplication of effort by copying scores in rows and columns. Be forewarned that changes made with the batch editor can easily affect large swaths of data and cannot be undone.
Figure 5.19. The Batch Editor
The Partitions button allows you to create partitions of characters and taxa and to select a partition to view. The page displays in individual boxes, the characters and taxa that are currently in (and not in) a given partition. You can drag and drop characters and taxa to add or remove them from partitions. Finally, this window includes a drop-down list at the bottom of the window Show partition in matrix editor from which you can choose which partitions (if any) to display in the matrix editor.
The Ontology button allows you to add or delete ontological rules to or from "set state rules" and "media rules" in two separate tabs. Beside each rule you can also add an associated action. You can also choose to View rules as graph, which will display the rules in graphic format in a separate window.
- The Go to button allows you to type an intersection of a character and taxon to go to quickly and directly.
The ! button will list any character editing warnings. These include indications that the states or name of a character that you have scored have changed since you last scored it. These changes would be those made by you or other members of your collaborative team.
The check button allows you to search for inconsistencies between your matrix and your character rules. When violations are detected, you will be provided with the rule, character, taxon, nature of the violation, and option to edit it or autocorrect all violations. Remember before you choose autocorrect that you cannot undo changes to large swaths of data.
- The circular arrow button reloads the matrix in your web browser.
5.3.3. Characters
5.3.3.1. Adding characters to or removing characters from your matrix
The character editor that appears within the matrix window is similar to the one that opens when you choose "Edit Characters" from the main Matrices page. The primary difference is that there are fewer options for moving or searching characters. To add a character to your matrix, click on the characters button. You will see a window like the one shown below. To add a character click on the character after which you wish the new character to appear and then click on the "new character" button. To remove a character highlight it and then click on the "delete character" button.
Figure 5.20. The in-matrix editor character editor list
5.3.3.2. Editing characters
To edit a character in your matrix either double-click on its name in the matrix or click on the "characters" button and choose it from the character list. The editing tools provided are similar in scope and function to those available when you choose the "Edit characters" button from the basic Matrices screen.
Note
Figure 5.21. The in-matrix editor character editor
5.3.3.3. Changing the order of characters
By default, the order of characters in a matrix is that in which they were added (or appeared in the imported NEXUS or TNT file.) You can arbitrarily reorder them by dragging them into place in the character list in the characters editor. You can also reorder characters in a matrix using the project character list editor.
5.3.3.4. Adding comments, media and bibliographic citations to characters
You can add comments to a character by editing it, then clicking on the "comments", "media" or "citations" tabs in the matrix editor.
5.3.3.5. Character warnings
If you score a character in your matrix that is subsequently changed by another user (either the character name or states are changed) the editor will display a warning to let you know. As shown below, a red exclamation point will be displayed next to the character name. A warning message will also appear in the "warnings" window when you click on the warnings button at the top of the editor. The warning indicator will display until you open that character's cell for editing.
Figure 5.22. Warning about changed character in the matrix
Figure 5.23. Warning about changed character in the Warnings window
5.3.4. Character ontologies
5.3.4.1. About ontologies
In the information sciences an ontology is a formal representation of knowledge as a set of concepts and the relationships between those concepts. In bioinformatics ontologies are increasingly being employed to codify how data is recorded and structured across projects, with the ultimate objective of standardizing concepts in various domains. Such standardization would, in principal, allow data from different sources to be easily and effectively combined, compared and analyzed. Analyses that now require many hours of work by specialists could potentially be performed by software and powerful data mining techniques could be brought to bear on previously intractable problems. Creating a basic form of ontologies is not required in MorphoBank, it is an option provided should researchers find it useful.
Ideally, an ontology for morphological phylogenetic analysis would include all possible characters (referred to as concepts in many discussions of ontologies) in a given domain. If all researchers in a particular domain were using the same set of characters for their analyses, combination and comparison of those analyses would become straightforward and amenable to automation.
Ontologies have not been widely used in phylogenetic analysis of morphological characters. MorphoBank introduces tools that allow researchers to establish relationships among phylogenetic characters such as character interdependency.
5.3.4.2. Ontologies in Morphobank
Ontologies in Morphobank are just another optional tool you can use to organize your characters and streamline your analysis.
Morphobank provides tools for creation of what we call ad-hoc ontologies. An ad-hoc ontology is a set of rules that a researcher creates within his or her project to establish relationships among characters. A common example is if one character is scored "absent" another character is always scored "-" [inapplicable]." Ontologies of this sort are project specific and thus are independent of initiatives across the Tree of Life to establish formal ontologies for particular taxa. What these ontologies can do is help researchers score more efficiently and to find mistakes in their coding.
A Morphobank ontology describes the relationships that you specify between the characters and states in your matrix. The relationships (or "rules") between characters/concepts work as in the following example: One can create a "set state" rule between a "source" character and one or more dependent characters. When the source character is set to a specific state then the states of dependent characters can be automatically forced to another value. Similarly, media rules can be established that cause all media attached to source characters to be automatically attached to their dependent characters.
Important
While ontology rules may appear on first inspection to be just a form of workflow automation they can be much more. Well-designed rule sets can capture valuable information about the nature of your characters and the analytical framework of your project. That certain characters are dependent upon other characters in specific ways can be used to infer patterns in characteristics across taxonomic units.
The relationships among characters can also be visualized graphically, providing a "birds-eye" view of your analysis than can be useful for collaborations, publications and future research.
5.3.4.3. Creating an ontology
To begin, click on the "ontology" button, at the top of the matrix editor window, as shown below. At the end of this chapter we will discuss how to ensure that your ontology rules work properly and can be applied either automatically as you score cells, or after you have already scored. First we will look at the rules themselves.
Figure 5.24. The ontology tool in the matrix editor window
After clicking on the "ontology" button you should see a Character ontology window like the one shown below. This window allows you to attach rules to any character in the currently opened matrix.
Figure 5.25. List of scoring rules that "set states" in cells in a matrix if certain conditions are met
To create a rule, first select the type of rule either 'Set State' Rules or "Media Rules" at the top of the window. Then, click on the "Add rule" button at the bottom right. For "set state" rules you will see a window like the one below. To establish a "set state" rule select the source character and state from the "When setting this character to this state..." lists. You can only select a single source character and state for each rule you create. Then select the characters for which you wish to set scores and the state they should contain.
You can select a range of characters by clicking on the first character and shift-clicking (clicking the mouse while the shift-key is depressed) on the last character in the range. Note that you can only target multiple characters with a single "set state" rule if the state you are setting is "inapplicable." Rules scoring to specific states other than "inapplicable" can target a single character only. Use multiple rules to set multiple characters to specific non-"inapplicable" states. Note that Media Rules, which plot the application of media to certain characters and states, are different from but complementary to “Batch Media Automation,” discussed here: the section called “Cell Media Automation Tool”. To add media to cells using Media ontologies, first select "Add rule" (seen at the bottom of the above figure), then choose "Add Media." Choose a primary character from the top list and dependent characters from the bottom list to create a rule that says "When adding media to character X, automatically add the same media to characters Y and Z."
Figure 5.26. The "add rule" window for "set state" rules
For "media" rules the "add" window will appear like the one below. As with "set state" rules, you first select the source character and then select one or more target characters by clicking and/or shift-clicking. Media rules can always target multiple characters.
Figure 5.27. The "add rule" window for "media" rules
You can delete a rule by clicking on the rule in the rule list and then clicking on the "Delete rule" button.
Note
5.3.4.4. Visualizing the structure
You can see a graphical representation of your rules by clicking on the "View rules as graph" button in the Character ontology window. The rule set is visualized as a directed acyclic graph. The large red dots represent "source" characters; the smaller grey dots represent dependent characters; and the orange lines represent "set state" rules between the characters. When viewing media rules, the lines will be green in color. You can zoom in and out of the visualization using the scroll wheel on your mouse. You can drag the visualization around the screen for easier viewing by clicking and dragging with your mouse. If the positioning of individual characters is not ideal (in large rule sets it is often impossible to position all characters for good readability) you can reposition individual characters dots by clicking and dragging them.
Figure 5.28. Visualization of a set of "set state" scoring rules
5.3.4.5. Using the ontology
Once established, ontologies can be used to check the validity of your data or, if desired, to automatically generate data. The default setting in MorphoBank is for automatic implementation of ontology rules to be blocked. In other words, even if the rules are established, the software will not automatically write the data into cells unless the Project Administrator elects to do so.
5.3.4.5.1. Checking data using an ontology
The "set state" rules you establish for your project are assertions as to how cells should be scored in certain situations. You can check your matrix data against your rules and highlight any deviations by clicking the check mark button on the bar along the top of the matrix editor. You may also need to click this "check rules" button for your rules to start taking effect (if your matrix is not already set up to automatically apply ontology rules).
Figure 5.29. Matrix editor button bar highlighting the check your matrix function
A window will appear like the one below and analysis of the matrix will begin. For very large matrices and rulesets the analysis may take a little while. Be patient! Once complete, a list of violations of the rules will be presented. Double-clicking on a violation in the list will scroll the matrix to the score in question.
Figure 5.30. Checking a matrix against a rule set
You can automatically change your matrix data to resolve all violations by clicking the "fix violations" button at the bottom of the window. In many cases the "fix violations" feature can be a huge time saver, providing automated cleanup of existing data. Note, however, that changes to your matrix made by "fix violations" cannot be undone! Use caution and consider the implications before using this feature. Violations can also be checked by hand, which can be a useful exercise if characters are still being revised. Just hit the “Recheck” button to refresh your screen as you eliminate violations of the rules (or change the rules if you need to do so).
5.3.4.5.2. Generating data using an ontology
You can optionally have the matrix editor apply your rules automatically as you score. To enable this feature click on the "Preferences" tab in the bar along the top of the matrix editor .
Figure 5.31. Preferences Tab
Then set the "Apply character rules while scoring" option to "Yes." Once enabled, that matrix editor will automatically change states in your matrix to conform to rules as a result of scoring changes you make. It will not make wholesale changes to your data as the "fix violations" does. In other words, changes are only made in response to individual scoring events.
By default, automatic scoring will only occur in cells that have no existing score. That is, only "?" cells will be automatically scored. You can enable automatic scoring for all cells, populated or not, but setting the "Allow character rules to overwrite existing scores?" options to "Yes."
5.3.5. Character Ordering in MorphoBank
Character ordering (also called additive binary coding) is a practice by which researchers assign a cost to certain character changes in multistate characters. For example, if a character has three states, 0, 1 and 2, and it is "unordered" it is equally costly to go from state 0 to either state 1 or state 2. If the character is ordered, it adds two steps to tree length rather than one step to go from state 0 to 2.
Character ordering is a common feature of Nexus and TNT files in practice, and you can now write commands (also called “assumption blocks” in Nexus terminology) to order characters in MorphoBank’s matrix editor so that matrix files can be exported from MorphoBank and retain these commands during tree searches. Then when the researcher goes to run an analysis in an algorithmic program like TNT or PAUP, they do not need to specify those commands again. The commands are embedded in the matrix file. Similarly, if a Nexus or TNT file with ordering commands is imported into MorphoBank, the commands will display in MorphoBank’s Character Editor.
The MorphoBank Matrix editor currently displays whether a character is “ordered” and “unordered”. This characterization is specific to each character, and thus need only be defined once in a project. To order characters in a MorphoBank matrix (in other words, to choose the command “Ordered” which indicates that the “cost” of change between two states is the absolute value of the difference in their state numbers), open the matrix editor and select “Chars” from the top row of buttons, as you would do for any other character-related function.
Figure 5.32. Character button
This will open the Character Ordering Editor, which consists of a drag and drop to order characters.
Figure 5.33. Character ordering editor
5.3.6. Taxa
5.3.6.1. Adding taxa to a matrix
You can add any taxon in your project taxon list to your matrix by clicking on the taxa button at the top of the editor and then dragging the desired taxon from the "taxa in this project but not in this matrix" list to the "taxa in this matrix" list. Drag the taxon to the location in the list where you want it to appear in the matrix.
Figure 5.34. Matrix editor taxa list
5.3.6.2. Treatment of Multistate Taxa in Matrices
MorphoBank recognizes that Nexus and TNT formats allow the user to distinguish between polymorphisms and ambiguities for multistate taxa.
Under the Preferences in the Matrix Editor, the user can select whether to treat multistate taxa as "polymorphic" or "uncertain". The default condition is "polymorphic". This choice applies matrix-wide but can be modified on a per-cell basis using the cell editor. Changing a selection in the cell editor affects only that cell.
The multistate taxa tool will be grayed out (disabled) if only one state has been scored for a given cell.
For display purposes on screen in the MorphoBank matrix editor, multistate taxa that are scored as polymorphic by the user appear as separated by a comma, like this "0, 2". Multistate taxa that are scored as uncertain by the user appear as separated by a slash, like this "0/2" or this "1, 4, 6"
The underlying Nexus or TNT file that MorphoBank produces will download such that a cell containing multistate taxa that are polymorphic will be represented as "{0, 2}" in the Nexus file, and multistate taxa that are uncertain will be represented as "(0, 1)".
If a pre-existing Nexus or TNT file contains the distinction of polymorphic vs. uncertain multistate taxa and is loaded to MorphoBank, the distinction will be preserved and will display as such. Any new changes to the matrix that the user enters will be preserved in future downloads.
5.3.6.3. Editing taxa notes
You can edit taxon notes by double clicking on the taxa in the matrix (in the main window of the editor; not under the "Taxa" button) and then clicking on the "notes" tab in the window that appears. Notes are saved once you close the window.
Editing of other aspects of a taxon, such as the name, must be done in the project taxa list outside of the matrix editor.
Figure 5.35. Taxon Notes Field
5.3.6.4. Changing the order of taxa
By default the order of taxa as displayed in the matrix is the order in which they were added or appeared in the imported NEXUS or TNT file. You can change the order by opening the taxa list (by clicking on the taxa button) and dragging the taxa in the "taxa in this matrix" list relative to one another.
5.3.6.5. Removing taxa from a matrix
To remove a taxon from a matrix drag the taxon in the taxa window from the "taxa in this matrix" list to the "taxa in this project but not in this matrix" list. Note that this will not delete the taxon from your project (that can be done in the project taxa list), only from the matrix.
Warning
5.3.6.6. Controlling access to cells by taxa
In a collaborative project it is often desirable to split scoring tasks on a matrix by taxon or group of taxa. To ensure that project members only have access to the taxa they are supposed to be editing, MorphoBank provides a mechanism for associating particular taxa in a matrix with individual members or groups of members.
If a member does not have access to a taxon a small "lock" icon will appear next to the taxon name in the matrix, as shown below. Neither the taxon notes nor cells in that row will be editable.
Note
To control access for a taxon double-click on the taxon and click on the "access" tab in the window that appears. If you wish to restrict access to a single user select the member from the "user" drop-down. To restrict access to a group of users select the group from the "group" drop-down menu. (Creating member groups in your project is described below). Access is additive. That is, if you choose both a group and a member, then both will have access even if the member is not in the group.
Note
Figure 5.36. Setting access restrictions for a taxon in the matrix editor
5.3.6.6.1. Creating member groups
In order to understand how to use the access controls for taxa editing, let's digress for a moment and look at Member Groups. To create a member group click on the the "Edit member groups" link in the right-hand navigation on the Project
Overview screen. Click on the "add new project member group" button at the top of the new screen. Then give the group a name and optionally a description. Repeat this process until all of the groups you require have been created.
Figure 5.37. Project overview page showing access for the Project Administrator to create Member Goups.
Figure 5.38. Establishing a Member Group.
Once you've established names for your groups, you can begin organizing members. Click on the "manage members" link on the Project Overview screen and edit the members you wish to add to the groups you have created. As seen in the figure below, the member's edit form will include checkboxes for each of the available groups. Check off the groups to which the member should belong and click "save." Each member of your project may belong to as many groups as needed.
Figure 5.39. Adding a member to a group
5.3.6.7. The Operational Taxonomic Unit (OTU)
The OTU determines the rank in the taxonomic hierarchy that you choose to use in a row in the matrix editor. For taxonomy at or above the genus level, the rank you specify as OTU is the rank that is displayed. For example, if the OTU for the matrix is set to genus, then all taxa will display in the editor with genus only, even if other taxonomy is present.
If the OTU is set below genus then taxonomy from genus to the OTU is displayed. For species or subspecies this means a binomial or trinomial will be shown, respectively.
The OTU set in the matrix Basic Info screen (reached by clicking "Edit Matrix Description" in the Matrices screen is used for all taxa unless the OTU in the taxon itself is set, in which case that OTU is used instead.)
5.3.7. Cells
The term "cell" refers to the intersection of a taxon and character in a matrix. The term "score" refers to a state (e.g., 0, 1, 2, etc..., or a continuous value) entered into a cell. In MorphoBank a cell can have one score, many scores, or none at all (i.e., "?").
5.3.7.1. Scoring
To score a cell double-click on it in the matrix (being sure to click on the area outside of the media thumbnail in a cell with an image). A window will appear, shown below, allowing you to edit all aspects of the cell:
Scoring & Status - allows you to choose states for the cell and set the overall status value of the cell. Status values - "new", "in-progress" and "complete" - are intended as a simple tool for tracking the status of matrix scoring. Cells can be highlighted based upon the status to provide a quick view of scoring progress in a matrix.
Notes - allows you to edit text notes for the cell.
Media - allows you to link media from your project media browser to the cell and optionally add cell-specific labels to the media. Note that only media of specimens whose taxonomy matches that of the cell are displayed.
Comments - allows project members to add commentary to cells.
Citations - allows you to link a bibliographic reference from your project bibliography to the cell along with citation-specific page and comment values.
Change log - lists all changes to a cell, including who, when and what.
If you do not see the state you need in the list, you may add it by editing the states of the character as described in the section called “Editing characters”.
Figure 5.40. The matrix cell editor window
5.3.7.2. Navigating cells
You can double-click on any cell to edit it, even if the cell editor is already open for another cell. If another cell is already open the changes you have made to it will be saved before the new cell is opened. As an alternative to clicking you can also use the arrow buttons in the cell editor to move to adjacent cells. As with double-clicking, changes made to the currently open cell are always saved before moving to a new cell.
Note
5.3.7.3. Managing cell media
To add media to a cell click on the "media" tab in the cell editor. A list of linked media is displayed. To remove media from a cell, click on the media and then click on the "remove media" button. Double-click on any of the media to label it in a pop-up browser window. Labels added to media in a cell apply to the media only in the cell. That is, you can have different labels on the same image in different cells.
Warning
To add media to a cell, click on the "add media" button. A list of media applicable to the taxon of the current cell will be displayed, as shown below. Click on the desired image and then click on the "add" button to add the media to the cell.
Figure 5.41. Choosing an image to add to a cell
5.3.7.4. Cell Media Automation Tool
Warning
The information in the Cell Media Automation Tool section may be out of date. We are working on verifying the functionality described below.
To make your work easier, MorphoBank now offers a tool that allows you to place Media in many cells at once. This tool does not score or label Media but, like the batch tool which works in rows, it works matrix-wide to put many Media in place at once.
The Cell Media Automation Tool populates cells with Media by using the Views (orientations) tagged to media. If Media with Views have been linked to character states (in a column), MorphoBank can populate similar Views in the cells of the matrix in that column. If the Cell Media Automation Tool previously placed media that doesn't match a new rule, the old media will be deleted from each cell. If, however, the media was place in a cell by hand, it will remain unaffected.
You can activate this feature at any time during your work if (and only if) you are the Project Administrator or the Project Member who uploaded or created the matrix. To do so, navigate to "Set up this matrix," a small grey button under the title of the matrix. Please note that cell media automation is automatically switched-off at the start of a project, so you must follow these steps in order to use it.
Figure 5.42. Set up this matrix button
Figure 5.43. Enable Cell Media Automation check box for Project Administrator.
On the resultant screen, you will have the option to check "Enable Cell Media Automation?"
Once checked, a new button will appear in the toolbar at the top of your matrix editor. It will look like a small arrow, and the text "cell media automation" will appear when you hover over it with your cursor. Please note that if you are working with a laptop or smaller screen you may need to expand the size of the matrix window in order to see this arrow.
Figure 5.44. Cell media automation arrow
Once you have activated your cell media automation tool, how can you put it into effective use? First, you must be certain that your Media - both those destined for cells and those that are with Character States - all have Views (see "the section called “Media views”"). Then, affiliate exemplar Media with your character states and upload Media tagged with the same Views for all of your taxa (you can do these steps in different order if you like). As a reminder, in order to affiliate Media with character state you must open the Matrix editor, click on "chars" along the top row of buttons in the Matrix editor window, OR simply click on "Edit Characters" on the top of the Matrix overview tab. Then in the Character Editor window that appears, double click on the character you wish to edit. You will see another window with several tabs, including one that says "Media." Click on that tab, and you will see a list of that character's states, with an option to upload media to each:
Figure 5.45. Add Media to Character States
If you then activate the abovementioned arrow, the tool will first check what media Views are affiliated with your character states. If the taxa in your matrix rows have the same Media Views in the database, the tool will automatically populate cells with the appropriate Media. In its simplest expression, often a single View is adequate for all states of a character. In such cases the Cell Media Automation tool will know to insert that same View in all the cells below. In some cases, however, scientists use different Views for different states. In cases like this both images will be inserted until you score and then the one that does not pertain will be removed. The tool will not score, label, or overwrite media that were inserted by hand. You can use the tool more than once and it will keep updating. Before the automatic cell population occures, however, you will have the opportunity to confirm your choice. A box that looks like the figure below will appear:
Figure 5.46. Cell media automation confirmation
If you decide not to follow-through on the cell media automation, you can choose "cancel." If you go ahead with the process and later determine that you want to remove media, there is an "undo" tab (visible in the figure above.) When this is selected, you are given a list of past actions with Status, Description, and the date they occurred. You can select the one you wish to undo and press "Undo" at the bottom of the window. This feature will remove all the media inserted by the cell media automation as well as any media inserted by the corresponding character media ontologies, discussed below.
Important
Like Cell Media Automation, Media Ontology Rules are disabled at the start of a project and must be actively enabled by the Project Administrator Ontologies are representations of the relationships between concepts in your matrix. Therefore, the Cell Media Ontology rules work like this: you can create a Rule that says "If Character W has a particular Media associated with it, always apply that Media to Character X, Y, and Z. This action will be triggered, for example, as you score, if you happen to add Media to W. Alternatively, if you already have an entire column with Media for Character W and you then run a "Rule Check," (the small checkmark from the top row of your matrix editor) MorphoBank will copy Media from column W into columns X, Y and Z according to your rule. Cell Media Automation, on the other hand, is based simply on the Media Views rather than on Character rules. To use both tools, be sure that Cell Media Automation is turned on (as described earlier in this section) and check "Apply character rules while scoring" under "Matrix Preferences."
Figure 5.47. "Rule Check" in the Matrix Toolbar
Any media that was added using the Cell Media Automation feature will also be applied to the Media Ontology feature. This means that when Cell Media Automation is applied to characters that have rules, the media are then inserted into the "daughter" characters. In other words, Cell Media Automations allows you to add media to any cell associated with a chosen character, but ontology rules allow you to impact other cells not in that column. By employing both tools you can maximize batch Media functions by adding the same media to additional characters according to the automatic framework you've established using Ontologies. See Ontologies in Morphobank.
5.3.7.5. Labeling images
Labeling images is described in Labeling images in the Matrix Editor. There is no difference between labeling an image in the media editor and labeling it in the matrix editor, save that the labels you create in a cell are specific to that cell and will only appear when viewing the image in the cell.
5.3.8. Making changes to your matrix data en-masse
The matrix editor provides tools for making changes to a range of cells for a given taxon in a single action. Supported actions include:
Changing of cell states - you can force the states of selected cells to "?" (no score), "-" (inapplicable) and "NPA" (not presently available). You can also set the status of cells in the same operation.
Assignment of selected media
Assignment of selected bibliographic citations
Ability to undo batch actions
Figure 5.48. The batch operations window set to the Batch Row Score Editor
To perform a batch operation open the batch window (shown above) by clicking on the Batch button at the top of the editor. Then select the taxon for which you would like to perform the operation (you can only batch process for a single taxon at a time). Select the set of characters to include in the operation. Then click on the button for the operation you wish to perform and choose the appropriate settings - select a specific media, bibliographic reference or state and status value. Then click the "add" button (for media) or "save" button (for bibliographic citations and states).
While you are working in a matrix, you may find that you need to add another representation of a taxon that is closely related to one already in your analysis. With this in mind, the batch editor includes a tool that allows you to duplicate an existing taxon in your matrix, and then make changes to character states as needed. This saves time and effort by eliminating the need to re-enter scores and notes. To duplicate a taxon in a matrix, select "Copy a Row" tab in the batch editor. When you click this button, you will see a checkbox that allows you to decide whether or not you will include notes in your copy. This tool allows you to duplicate an entire row of scores (and notes, if you wish) from one taxon to another taxon. You can then edit the parent or daughter row.
Figure 5.49. Copy a Row feature in the Batch Editor
To prevent you from inadvertently overwriting data in your matrix a warning will appear if there is at least one set score of any type (state, NPA or "-") in the cells you are about to change. The warning will include a numeric summary (e.g., 5 set states, 2 NPA cells, 2 in applicable cells); if you want to actually see the content of the cells you can look at the specific cells in the editor.
Batch functions could potentially be risky without an "undo" feature. The last tab in the Batch Editor allows you to choose a batch function that you wish to reverse. Under the "Undo" tab, you'll see a list of all the batch functions performed in your matrix with a date, a description, and a status of "done" or "undone." To undo a batch edit, select it from this list and simply click "undo." Altered cells will revert to their original state. To double-check undone media affiliations, you can refresh the Project Information page to see how many total cells have affiliated media. You can also change the matrix setting to color cells with media to get an overview of where the changes were made.
Figure 5.50. Batch "Undo" Feature
5.3.9. Downloading a NEXUS-format copy
You can download a copy of your matrix in NEXUS format at any time by clicking on the "Download as NEXUS" button at the bottom of the matrix editor or in the matrix list. You also have the option of downloading your matrix with all notes removed by clicking on the "Download NEXUS file without notes" button.
Note
5.3.10. Deleting a Matrix
To delete a Matrix from your project, first click on the “Matrices” tab on your project. Once on the Matrices screen, you must click on the “Set Up this Matrix” button on the Matrix you wish to delete.
Figure 5.51. "Set Up this Matrix" button
Once you click on this button, you will see a screen where you can edit information on the matrix such as the title, access, and other details. On the top and bottom of this form, there are “Save” and “Delete” buttons. You can click on either “Delete” button to fully delete your matrix.
Figure 5.52. Final Step in Deleting a Matrix
6. Folios
Folios are annotated groupings of media selected from your project. Your project can include as many folios as necessary and each folio can contain any media item in your project, in any order and with attached notes.
Folios are a useful tool to organize and present your data. Prior to publication of your project, folios are only accessible to project members. After publication all folios become publicly accessible (unless they are explicitly set to not publish) and can be accessed using "PermaLinks". These stable, easy to publish URLs (see Public Access) are suitable for publication in a paper or online.
6.1. Creating Folios
To create a folio, click on the Folios tab in the left-side navigation. You will be presented with a list of existing folios. You may edit the name and description of an existing folio by clicking on its "edit" button. You may remove a folio by clicking on its "delete" button. To create a new folio click on the "Add new folio" link in the upper-right hand corner of the tab.
When you create a new folio in the Folios tab you are only creating an empty container. To add or remove media to or from a folio, you need to use the folio tabs under the matrix and media tools.
6.2. Adding Media
To add media to a folio, click on the Folios tab in the left-hand navigation, choose (or create) a folio, and click on the "Edit Folio Media" button . You will be presented with a list of media already present in the folio, along with three buttons: "Back to list," "Edit folio info" and "Add media to folio." Select "Add media to folio" and enter the first few letters of the taxon in the desired image in the type-ahead field. A list of matching images should appear; choose one and then click on the "save" button. As an alternative or to add a batch of media to a folio, go to the Media tab and click the "folio options" button. A box instructing you to "use checkboxes below to select media to add to the following folio" will then appear. Choose a folio from the drop-down list, mark the checkboxes in the upper right-hand corner of your desired media, and click the "Add Media to Folio" button.
6.3. Changing the Order of Media
By default media are displayed in the folio in the same order as they were added. You can change the order by clicking on the Folios tab in the side-navigation, then clicking on the "edit" button next to the desired folio. You can then drag and drop the media in your folio in the desired order.
6.4. Public Access
Folios are published when the project is published (unless explicitly set not to) and may be linked to using a URL in the format: https://morphobank.org/permalink/?F20 where 'F20' is your folio identifier. Folio identifiers always begin with the letter 'F' and appear next to the folio name in the project folios tab. Your project must be published for folios to be accessible to the public.
7. Project Documents
Members with full access may add any number of documents to a project. Documents may be in any format, and can document aspects of the project or provide data in formats that are not directly supported by MorphoBank. Each document may include an optional title and description, and may be published along with other data (media, matrices, etc.) or kept private to the project.
Figure 7.1. Adding a project document
7.1. Adding a Document to Your Project
To add a document, select the docs tab in the project tab bar, then click on "add new project document" and fill out the new document form, displayed above. You are encouraged to fill in the title and description fields to better describe the file, although they are optional. If you wish to publish the document when the project is published, be sure to set the status drop-down to "publish when project is published." Documents with a status of "never publish to project" will never be made public.
Published documents are listed on the MorphoBank project page once the project is published.
As with other project data items, you may restrict editing access for the document to the owner (the member who added the document to the project) or allow all full project members to edit by setting the access drop-down.
7.2. Document Folders
If you wish to group documents together, you can also create document folders in your project. To do so, simply choose the "Create Document Folder" button, and give your folder a name, description, and access settings in the resultant screen. You will then have the option of adding new documents to this folder as an organizational tool.
7.3. Public Access to Project Documents
When a project is published, all documents with a "publish when project is published" status will be listed and made available for download on the project's MorphoBank project page, accessible from the project browser and search tab.
8. Managing Access
The creator of a project, who is also by default the Project Administrator (PA), has sole access. At any time the PA can elect to invite collaborators to join the project. Collaborators don't have to be registered with MorphoBank to join. If the invitee is already a registered member of MorphoBank then they they will receive an e-mail notification and the project will appear in their project list the next time they login. If the invitee is not a registered member of MorphoBank, they will receive an e-mail notification with login instructions and a pre-issued password.
The current membership list for a project can be accessed via the "Project Overview" screen. To the far right of that screen, the PA has a list of multiple options, including "Manage Members" and "Edit Member Groups." Clicking on "Manage Members" will display a list of all of the current members of that project, their status, and an option to edit any of that information.
Figure 8.1. The project member list
8.1. Adding Members to a Project
To invite a collaborator to your project, click on Manage
Members from the Project Overview screen and click on the "add new member" button. You will then be prompted to enter an email address for the new member. Enter the address, and click "go." You will then see a form like the one below. Be sure to choose the appropriate access level for the new member. Note that once the invitation is sent the member has access to the project. There is no confirmation process.
Figure 8.2. Adding a new member to a project
8.1.1. Types of access
The Project Administrator can grant full membership, "character annotator," "bibliography maintainer" or observer status to collaborators. Full members may edit any item in the project, subject to item-level access restrictions. Observers may not modify anything in the project, no matter the access restrictions on items. Character annotators are in-between: they can edit everything but characters and states, subject to item-level access restrictions. Bibliography maintainers may edit only bibliographic data.
Figure 8.3. Editing access for members of a project.
8.2. Removing a Member From a Project
To remove a member from a project, go to the Members tab and click on the "delete" button next to the member you wish to remove.
When you remove a user from your project their data will remain - they just can't access the project any longer. Users marked as "deactivated" have had their MorphoBank login suspended across the board by the MorphoBank administrators for some reason. In this case the user cannot login at all, to any project, but when their login is reinstated they will once again have access to your project.
8.3. Anonymous Reviewer Access
Anonymous, read-only access may be enabled by the project Administrator using the reviewer login settings on the Project Info form accessed through the "Edit project info" link to the far right of the Project Overview page. As the name suggests, this type of access is designed to accommodate anonymous reviewers from publications.
To enable anonymous access, check the "Allow reviewer login?" button in the Project Info form and enter a password in the "Reviewer login password" field, then hit the "save" button (not visible in figure).
Figure 8.4. Granting anonymous reviewer access
Figure 8.5. Anonymous reviewer login
IMPORTANT
Figure 8.6. Publishing Status/Status setting for anonymous reviewer access
8.4. Item-level Access Control
MorphoBank adopts a simple approach to data access within a project. All primary data items (taxa, characters, specimens, media and matrices) are "owned" by the member who created them. The owner has the option of reserving editing access for themselves or allowing all full project members to edit. (Editing access includes the ability to delete an item.) By default all newly created items are editable by all; restricted access must be explicitly set by the creator using the access control menu present on the basic editing screens for each type of data item.
8.5. Who Gets to Edit What?
Access control rules in MorphoBank reduce down to this:
The public (i.e. users without logins) can only see those items in published projects that are marked to "publish when project is published." They can never see unpublished project data.
Anonymous reviewers and members with observer status can never change anything in a project. They can only view project data in the projects to which they have been granted access.
Full members of a project can always edit items that they created.
Full members of a project can edit items that others created only if those items are marked as "Anyone may edit this item".
No one can edit project data once the project has been published.
9. Backing Up Your Data
One advantage of a web-based system like MorphoBank is that time-consuming maintenance tasks such as data backup can be centralized. MorphoBank runs on AWS. The database and media files are backed up on a weekly basis.
This is all well and good, but how do you know that your data is safe? Sometimes there's nothing more reassuring than having a copy of your data on your own machine, or even several of your own machines.
This is where the MorphoBank data backup tool comes in. The tool allows you to download a copy of your project data at any time. The copy is a snapshot of the project data at the time the backup was initiated.
The backup includes copies of all the originally uploaded media files, so for some projects the download will be quite large. You should balance your need for an up-to-date backup with the required download time. However, we encourage all projects to perform a backup on a monthly basis, or more frequently if required.
Figure 9.1. Creating a download of the entire project file
To create a backup your project, go to the Project Overview then click on the "Download Project SDD File" button, which will initiate the creation and download of a ZIP-format archive. For large projects, be patient. The creation of the ZIP archive can take some time.
9.1. The Download Package
The ZIP archive contains the following items:
9.1.1. Project media
The originally uploaded files for all project media are included in the backup. To minimize the size of the download, files derived by MorphoBank from uploaded media are not included, only the originals. These 'missing' files can, of course, be regenerated from the originals.
9.1.2. Matrices in NEXUS format
All project matrices are included as NEXUS format files. Note that these are "straight" NEXUS files and do not include any links to media that have been added in MorphoBank.
9.1.3. Project documents
All files uploaded into your project using the Documents tab are included.
9.1.4. Project data in SDD format
Most, but not all, project data are included in an XML-format file conforming to the Structure of Descriptive Data (SDD) standard (https://wiki.tdwg.org/twiki/bin/view/SDD/WebHome).
A single SDD file is generated for the project and includes:
Project information (title, abstract, citation, etc.)
Media views
Taxonomic names
Specimen information, with references to taxonomic names
Media, including extended information and references to specimens
Characters and states, including references to media
Matrices, including references to media
10. Publishing Your Data
MorphoBank permits the posting of peer-reviewed scientific research. Exceptions may be made (generally labeled "MorphoBank Exclusives") at the discretion of the Executive Committee. These studies have typically been conducted under the supervision of research scientists. Users whose research has not been peer-reviewed may use the site for organizational purposes, but are asked not to make their projects live.
Prior to publication, you need only specify a title and abstract for your project which are visible only to you and your collaborators. Things change when your article is to be published. In order to present your work publicly, enough information must be provided to construct a citation and an informative description on the MorphoBank project list and search engine.
You can set the project information by entering your project, then clicking on the Project Info tab and then clicking on the "update" link.
Warning
Figure 10.1. Project Verification Screen before Publishing
Figure 10.2. Second Confirmation Screen for Publishing
Figure 10.3. Success Screen after Publishing
10.1. Project Information Fields
The Project Information tab contains the following information fields and controls:
Table 10.1. Project information options
| Information | Description |
|---|---|
| Title | Title of project, used to identify the project to all members. Once the project is published this title will be displayed to the public as the primary label for your data set, so be sure to formalize it prior to publication. e.g., Phylogenetic analysis of the Sironidae (Arachnida:Opiliones: Cyphophthalmi) |
| Abstract | Your project abstract. Although this is optional, and only accessible to project members and MorphoBank staff prior to publication, you are strongly encouraged to formalize this text as soon as possible. MorphoBank staff members periodically read project abstracts and may question those projects lacking one. |
| Status | Determines whether a project is published or not. Once you set this to published and click the "save" button, your project is public and cannot be modified. |
| Journal Title | The name of the journal in which the article based upon your dataset was published. Required if the data set has been published. e.g., Invertebrate Systematics |
| Journal URL | A valid URL leading to your published article on the publisher's web site. This is optional and should only be filled in if your manuscript has been published. Do not use this link to point to personal web sites. This is optional but strongly encouraged. e.g., https://www.publish.csiro.au/paper/IS03029.htm |
| Journal Volume | The volume number of the journal in which your data set was published. Required if the data set has been published. e.g., 12 |
| Journal Number | The number of the issue in which your data set was published. Required if the data set has been published. e.g., 1 |
| Journal Logo Image | Journal logo will automatically appear when the journal title is selected. If you are entering a new journal in MorphoBank, curators will add a journal logo at the time of project publication. Feel free to contact support to ask for the journal logo to be added to MorphoBank. |
| Journal Year | The year of the issue in which your dataset was published. Required if the manuscript has been published e.g., 2006. |
| Article authors | A list of authors of the published article. Names should be separated by commas. The primary author should be listed with last name first; subsequent authors should be listed with first name first. Required if the data set has been published. e.g., Sues, H.-D., E. Frey, D. M. Martill, and D. M. Scott |
| Article Title | Title of article, as it appeared in the published journal. Required if the data set has been published. |
| Article Pagination | Pagination of article as published. Required if the data set has been published. e.g., 5-15 |
| DOI | The digital object identifier of the publication. Enter the DOI only, and not the URL. |
| Allow Reviewer Login? | If checked, anonymous logins are allowed using the project number and the password entered in the Reviewer Login Password field. This feature enables you to grant anonymous read-only access to your data set to reviewers. Read-only access without anonymity is also possible. See the Managing Access chapter for more information. |
10.2. Accessing Published Data on MorphoBank
Once published your data will be accessible in three ways:
as lists of published media and matrices linked to from a project summary page. These lists are similar to the matrix list and media browser in the MorphoBank editing interface, but without editing capabilities. The project summary can include an abstract, citation, links to the published article, and other relevant information.
in the MorphoBank search engine. Your media and matrices will be included in the results of searches on the MorphoBank.org site.
as folios. Folios are groupings of selected project media. Using the project folios tab, you can create as many named folios as you need. You may then select specific media to add to your folios using the folios tab within the media or matrices tabs. Once you have added items to your folio you can return to the project folios tab and change the order of the media, add annotations, and preview the resulting folio. Folios are published when the project is published and may be linked to using a "PermaLink" URL whose format is described below.
10.3. Citing Your MorphoBank-Hosted Data
Each MorphoBank project is issued a unique identifier beginning with the letter 'P' for project. This identifier is displayed next to your project title in the project list and on the project info tab in your project options. Once your project is published you may link to your project with a URL in the format https://morphobank.org/permalink/?P44 where 'P44' is replaced with your project identifier. Always precede your project number with the question mark and the letter P. For unpublished projects, the only way to access data is by logging in to MorphoBank.
You can cite individual folios using a URL in the format: https://morphobank.org/permalink/?F20 where 'F20' is your folio identifier. Folio identifiers always begin with the letter 'F' and appear next to the folio name in the project folios tab. Your project must be published for folios to be accessible to the public.
These PermaLink URLs will remain stable and unchanged no matter how many projects are added to MorphoBank, making them suitable for inclusion in published papers.
11. Project Duplication
11.1. Contacting MorphoBank
Investigators can request that a published or an unpublished project be duplicated for reuse. While MorphoBank aims to meet the needs of all users, storage is finite and some projects with media are quite large. Therefore, we ask that researchers consider best practices prior to submitting a request for duplication.
Duplication is only performed by MorphoBank administrators upon request. Requests for duplication of published or unpublished projects where one is a project administrator can be made by filling out the form that is displayed when clicking on the 'Request project duplication' link in the right hand menu for the project in question. All other duplication requests can be make by filling out the Ask Us form.
Figure 11.1. Duplication link
A duplicate is an exact and a full copy of the original project with the exception that character and cell comments and character and cell logs are not duplicated. Project duplication efforts isolate parent and children data. There is no cross sharing of data. When users edit various parts of the duplicate projects the changes do not have any effect on the master project. Users will be contacted by MorphoBank once the duplication request has been fulfilled. Derived projects will appear at the bottom of the project list with the same name as the parent. The user can log in and change the name of the duplicated project.
11.2. Duplicating Published Projects
If the project to be duplicated is published, the person requesting the duplication should state in the request who the Project Administrator of the duplicate should be and whether or not the old members of the project should be deactivated. New members can then be added to the duplicate copy by the person who requested the duplication. Requests for duplication of published projects can be received from any MorphoBank member.
11.3. Duplicating Unpublished Projects
If the project is unpublished, after duplication the daughter project will appear in the list of active projects of all members of the original project. If one does not wish to make the duplicate available to all members, the Project Administrator should simply delete those other members from the duplicate project.
If the project is unpublished and the person requesting the duplication is not the Project Administrator, that person can request that they be made the Project Administrator of the duplicate copy. These kinds of project duplications will be done in consultation with the Project Administrator of that project.
Requests for duplication of unpublished projects will always result in the notification of the Project Administrator of that project before any action is taken. Preferred candidates for duplication are projects that:
- are intended to serve as a common base of data for two or more distinct sub-projects. Duplication allows your project data to be "branched" into sub-projects.
- are scheduled for partial publishing at different times. Branching allows you to create "snapshots" of your project for publication, which you continue working on the primary copy.


